Hitachi VT-F372A Скачать руководство пользователя страница 21

Getting Started (Controls) 

21 


Getting 

Started 

(Controls)         

 Quick Tour of the Controls 

Study these pictures carefully to learn about the buttons and controls that you'll need for 
everyday operation.  Various controls are explained throughout this manual as they are 
needed, but now is a good time to get familiar with their locations. 

Most of the time, you'll be directing the VCR from the remote control, but there are some 
controls on the VCR that will come in handy too. 

When you're familiar with these basic controls, proceed to Initial Setup (page 20).  We'll 
show you how to program your local channels and set the clock to make your VCR fully 
functional. 

How the Remote Control Works 

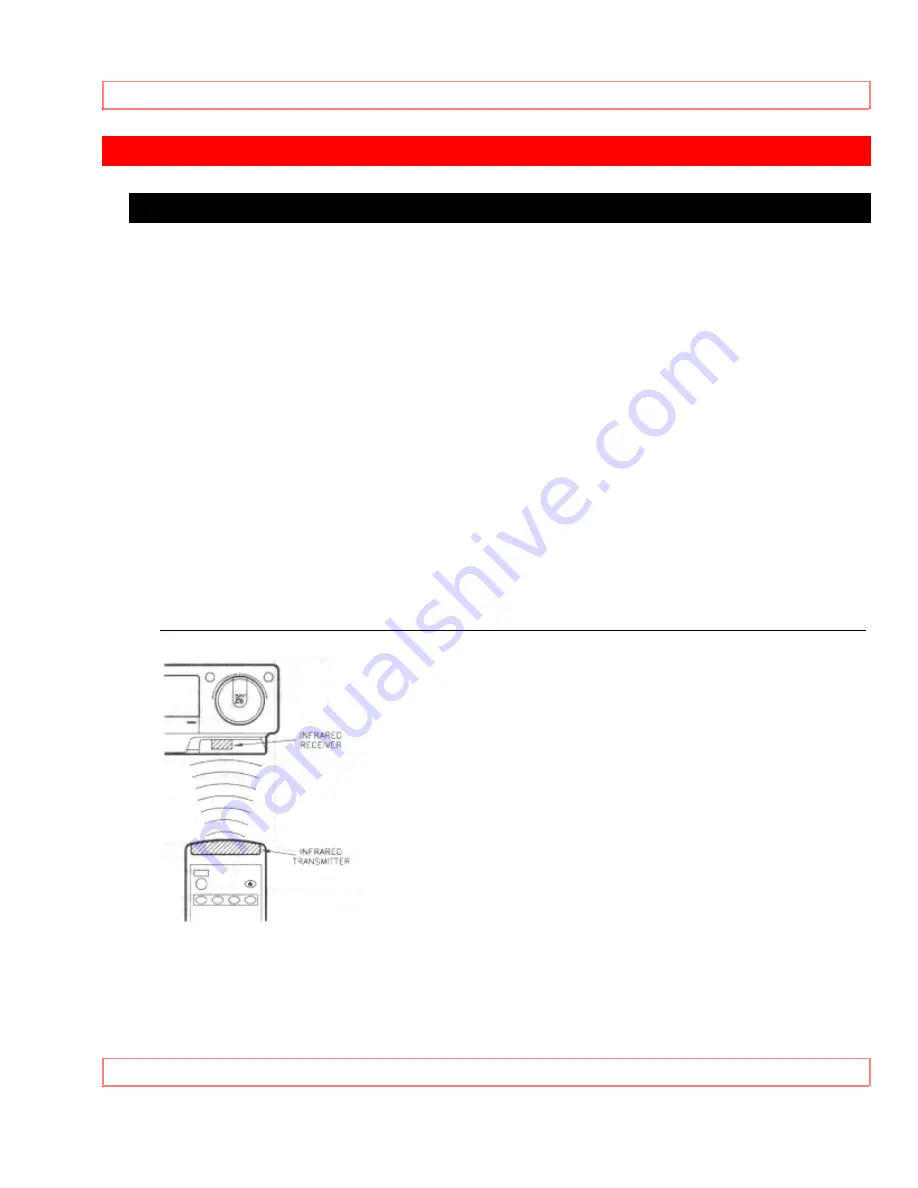
Pressing a button on the remote control transmits an invisible beam of light (infrared) to 
a receiver at the right front of the VCR. 

When using the remote, aim the front end toward the VCR and make sure nothing - 
such as a coffee table or your dog - is blocking the path of the infrared beam. 


About the Illuminated Buttons 

Try pressing the remote control's white buttons one at a time. As you press, one of the 
three device buttons lights up - VCR1, TV or VCR2. This helps you keep track of which 

Содержание VT-F372A

Страница 1: ... your VCR TV and cable converter All basic playback functions on convenient shuttle control On screen programming guide Multi channel TV sound MTS VCR Plus for easy timed recording VCR Plus and PlusCode are trademarks of Gemstar Development Corporation HITACHI HOME HITACHI SALES HITACHI HSC ELECTRONICS CORPORATION CANADA INC AMERICA INC OF HAWAII INC 3300 Trans Canada Hwy 3890 Steve Reynolds Blvd ...

Страница 2: ... of the Controls 21 Remote Control Buttons 22 When the Remote Doesn t Work Right 23 VCR Controls 24 Display Indicators 24 Meet Your On Screen Guide 24 Getting Started Initial Setup 26 Setup for First Time Operation 26 Initial Setup Options 26 Setting the Clock 27 More About Channel Selections 28 Choosing a Mode for Audio Playback 29 Stereo vs Mono Sound 29 Hi Fi Sound 30 Getting Started Videotapes...

Страница 3: ...Remote 52 Programming the Remote Control 53 Controlling the TV 54 Advanced Operations Cable Box Hookups 55 Hooking Up to a Cable Box 55 A Step by Step Approach 55 Remote Control of the Cable Converter 57 Advanced Operations Stereo System 59 Integrating Your Stereo System 59 Hookup 59 Recording from Your Stereo System 59 Advanced Operations Second VCR 61 Integrating a Second VCR 61 Hookup 61 To Con...

Страница 4: ...Table of Contents 4 Don t Attempt Repairs Yourself 68 Care and Servicing Problems 69 Hitachi Service Hotline 70 SPECIFICATIONS 71 Technical Specifications 71 ...

Страница 5: ... inside part of this unit This symbol alerts the user that important literature concerning the operation and maintenance of this unit has been included Therefore it should be read carefully in order to avoid any problems CAUTION TO REDUCE THE RISK OF ELECTRIC SHOCK DO NOT REMOVE COVER OR BACK NO USER SERVICEABLE PARTS INSIDE REFER SERVICING TO QUALIFIED SERVICE PERSONNEL WARNING Many television pr...

Страница 6: ...manual and how it is set up Keep it handy for future reference too To guide you we ve concluded Must read sections containing important cautions for your family s safety as well as the basic facts you need to use the VCR These sections are highlighted like this in the table of contents Information on the advanced features of your Hitachi VCR We hope you ll take time to learn about these functions ...

Страница 7: ...a Program 45 Advanced Operations 48 Controlling Your TV with the VCR s Remote 48 Programming the Remote Control 48 Controlling the TV 49 Hooking Up to a Cable Box 50 A Step by Step Approach 50 Integrating Your Stereo System 54 Hookup 54 Recording from Your Stereo System 55 Integrating a Second VCR 56 Hookup 56 To Control Both VCRs with the Remote Control 57 Copying from One VCR to Another Dubbing ...

Страница 8: ...Read This First 8 ...

Страница 9: ...operating instructions 4 Polarized Plug This video product is equipped with a polarized alternating current line plug a plug having one blade wider than the other This plug will fit into the power outlet only one way This is a safety feature If you are unable to insert the plug fully into the outlet try reversing the plug If the plug should still fail to fit contact your electrician to replace you...

Страница 10: ...g These openings must not be blocked or covered The openings should never be blocked by placing the video product on a bed sofa rug or other similar surface This video product should never be placed near or over a radiator or heat register This video product should not be placed in a built in installation such as a bookcase or rack unless proper ventilation is provided or the video product manufac...

Страница 11: ...I NFPA No 70 provides information with respect to proper grounding of the mast and supporting structure grounding of the lead in wire to an antenna discharge unit size of grounding conductors location of antenna discharge unit connection to grounding electrodes and requirements for the grounding electrode See example below EXAMPLE OF ANTENNA GROUNDING 13 Power Lines An outside antenna system shoul...

Страница 12: ...s video product during a lightning storm or when it its left unattended and unused for long periods of time unplug it from the wall outlet and disconnect the antenna or cable system This will prevent damage to the video product due to lightning and power line surges ...

Страница 13: ...ed by the operating instructions Improper adjustment of other controls may result in damage and will often require extensive work by a qualified technician to restore the video product to its normal operation e If the video product has been dropped or the cabinet has been damaged f When the video product exhibits a distinct change in performance this indicates a need for service 19 Replacement Par...

Страница 14: ... speakers for better sound reproduction place the VCR near the stereo receiver or have enough long audio cables to make the connections but keep in mind that the electronic signal weakens the further it has to travel 2 Decide Which Hookup Method to Use To make your VCR function you ll deal with two basic hookups 1 The audio and video signal If all you want to do is view a prerecorded videotape on ...

Страница 15: ...r VIDEO IN If you are not sure look at the back of your VCR you will see two sets of these jacks If you have no jacks like these on your TV skip this step and proceed to Step 4 TV with Audio and Video Jacks If you do find all three jacks on your TV you need to purchase a three line audio video cable with bell RCA connectors like this If you find a video jack and only one audio jack your TV is prob...

Страница 16: ... of cable box see the hookup options in Advanced Operations page 50 Simple Antenna Cable 75 Ohm Hookup This is an easy hookup that you can use if your cable or antenna has a 75 ohm round wire connector You will need the 75 ohm cable supplied with your VCR It looks like this If you have been watching the TV in your home before getting the VCR you will already have a round wire attached to your TV O...

Страница 17: ...Antenna If you have either an external or internal rabbit ears antenna rather than cable you may have 300 ohm connectors like these In this case you will need special adapters to make the 75 ohm round wire connection shown below You may already have one on your TV 1 Remove the antenna line from the back of your TV if it is already connected there or take it from where it comes in on the wall 2 Con...

Страница 18: ...ou will need an additional adapter and 75 ohm extension to make your leads reach from the antenna to the VCR This connection will work only if you have a strong clear picture on the TV indicating a strong signal Connect the antenna to the adapter and use the cable extension to go from the adapter to the VCR Use the supplied 75 ohm cable to connect the VCR to the TV Now continue with the hookup ...

Страница 19: ...ou should now be able to perform all basic functions provided by this equipment 5 Attach the TV and VCR to the Power Supply Plug in the TV and VCR power cords to the wall outlet or an appropriate extension cord or surge protector See Important Safeguards for further precautions page 6 6 Install Batteries in the Remote Control The remote control requires two fresh AA batteries On the back of the re...

Страница 20: ...the VCR and look for a switch on the back of the VCR Set the switch to 3 or 4 whichever is not a commercial channel in your area Your basic hookup is now complete When you re ready to try hooking up a second VCR or a video camera for a complete home entertainment system see Advanced Operations Now turn the TV and VCR back around facing you and begin your quick tour of the controls page 15 ...

Страница 21: ...iliar with these basic controls proceed to Initial Setup page 20 We ll show you how to program your local channels and set the clock to make your VCR fully functional How the Remote Control Works Pressing a button on the remote control transmits an invisible beam of light infrared to a receiver at the right front of the VCR When using the remote aim the front end toward the VCR and make sure nothi...

Страница 22: ... SP and extended play EP SLOW SPEED Plays back in adjustable slow motion AVX Used for recording from an auxiliary input such as a stereo system GO TO INDEX Used for marking and searching for specific tape locations EJECT Unloads a cassette tape from the VCR LAST CHANNEL Switches to the TV channel you watched previously during the current viewing session CHANNEL Top button switches to the next high...

Страница 23: ...ote and the VCR for instance a stack of books on the coffee table your 2 year old the dog Hold the remote so that it points at the VCR with nothing in the way Set to Wrong Device It may be set to VCR2 when you re trying to control VCR1 To confirm that this is the case try pressing VCR2 and a function button like channel up or down If the remote works now you know that it s set to VCR2 To reset it ...

Страница 24: ...tape PLAY Play the loaded videotape SHUTTLE Controls the videocassette s forward and reverse motion with one convenient dial DISPLAY Shows time channel and status indicators CHANNEL Up and down arrows for selecting channels REC IRT To begin recording PAUSE To interrupt play or recording Press again to resume Display Indicators Meet Your On Screen Guide ...

Страница 25: ... be set to English Press number 8 or 9 for the other language options Now you will do most of your programming and setup by pressing numbers on the remote control which correspond to options presented in this and other on screen menus Instructions are easy to follow and blinking spaces on the screen will show you where your input is needed When you want to leave the Easy Guide System simply press ...

Страница 26: ... OR ERASE CHANNEL 4 VCR CODING VCR1 5 MOVIE RETURN ON 6 AUDIO PLAYBACK HIFI 7 STEREO MONO STEREO 8 SECOND AUDIO OFF END GUIDE The screen shows the default settings on your VCR The default settings are the ones that are preset at the factory They come up on the VCR every time the power goes out for more than 30 minutes for example during a storm or when you unplug the VCR Look at each item to see i...

Страница 27: ...nd VCR2 5 MOVIE RETURN Press 5 to select whether you want prerecorded movies safety tab removed to automatically rewind eject and turn off the power when the movie is over and no prerecorded signals exist Options are ON and OFF 6 AUDIO PLAYBACK Press 6 to control how the audio signal is processed by the VCR Options are HIFI and LINEAR 7 STEREO MONO Press 7 to control how the audio signal is record...

Страница 28: ... for the hour or 20 for the month will not be accepted A question mark displays instead of the illogical number If you press the wrong digit exit the screen by pressing GUIDE and recall the screen to enter the correct setup The day of the week is set automatically More About Channel Selections Your VCR is capable of receiving 68 broadcast TV channels VHF 2 13 UHF 14 69 and 125 cable channels CATV ...

Страница 29: ...channel had a weak signal or was off the air at the time of programming Or you may change your mind about a channel you removed from memory To Add or Erase Channels Press GUIDE then press 5 to bring up the Initial Setup screen Item 9 lets you add or delete channels Use the number buttons to enter the channel you want to change then press STOP to delete it or press PLAY to add it Caution After a Po...

Страница 30: ... quality reception for example when there is signal drift or noise Hi Fi Sound Choose between hi fi and linear modes depending on your needs Hi Fi sound is the same quality as that of a compact disc player Its dynamic range of over 90dB will record either stereo or monaural broadcasts with the highest quality possible Linear sound on the other hand will record monaural sound using the same format ...

Страница 31: ...ape Capacities at Different Speeds TYPES RECORDING TIME SP EP T 120 120 min 360 min T 160 160 min 480 min You may have noticed that there is also an LP speed You Hitachi VCR does not record at this speed but it can play cassettes that were recorded in LP mode No special setting is required for playback Safety Tabs Prevent Erasure A safety tab is located on the front left edge of every videotape ne...

Страница 32: ...een removed To remove the cassette simply press the STOP EJECT button on the VCR If the tape is playing press STOP EJECT once to stop the tape and a second time to eject it Now you can take the cassette out and put it away Tape Storage Store your videocassettes in their jackets and in an upright position like books in a bookshelf away from any magnetic sources Resist the temptation to leave them l...

Страница 33: ... TV and select the video channel 3 or 4 using the number buttons on the TV s remote control 3 Press PLAY to start the tape 4 Press STOP to end play Direct Video Input to the TV Normally you would select channel 3 or 4 on the TV to receive a signal from the VCR You can get an even better picture if your TV has an auxiliary video input feature and if the TV and VCR have a direct video to video hooku...

Страница 34: ...e Return If your videocassette has the safety tab removed and you set the MOVIE functions to ON during initial setup the VCR will stop and automatically rewind the videocassette eject it and turn off the power when it reaches the end of the tape or a blank section of tape which lasts for more than 30 seconds This function works only in PLAYBACK mode not in RECORDING mode Special Playback Effects P...

Страница 35: ...w motion Use the TRACKING buttons to minimize any visual noise bands on the screen After 5 minutes in slow motion playback the VCR will stop the tape automatically to prevent damage to the tape and the VCR To return to playback at a normal speed press PLAY To stop the tape press STOP Using the Shuttle Control on the VCR The shuttle feature lets you control all the playback functions play pause slo...

Страница 36: ...orward and backward Searching with the Time Counter During playback and recording a counter keeps track of how many hours minutes and seconds the tape has run When you first start playback the counter shows briefly in the TV screen s upper right corner When you want to check the counter during playback there are several ways to do it Pressing DISPLAY will cycle you through the three options Press ...

Страница 37: ...arker and then back to it Press PLAY to watch the tape from that preselected spot Press DISPLAY to take the counter display off The spot is still in memory until you set a new one or until the tape is ejected Jump Forward or Backward with GO TO Using the time counter you can search for a spot a certain number of minutes before or after your current position on the tape Press STOP if tape is playin...

Страница 38: ...he Set Go To Time Index Screen Press REW or F FWD to begin the index search The tape rewinds or fast forwards until an index mark is detected During this search the words SCAN AND PLAY display on the bottom of your screen When the VCR finds an index mark it plays 15 seconds of the program that begins at that spot If this is the program you were looking for press PLAY to resume normal playback If t...

Страница 39: ...t act responsibly in this are check into the matter if you are unsure Basic Recording Steps 1 Load the videocassette into the VCR The power comes on automatically when the tape is fully inserted 2 Tune the TV to channel 3 or 4 Or if you are hooked up with a direct audio video cable set the TV to AUX or VIDEO 3 Press TAPE SPEED on the remote control to select SP standard play for the best picture q...

Страница 40: ...recording indicator light up on the VCR display You can check on the recording by pressing VCR TV again This will switch you back to viewing through the VCR you ll see the program you are recording To Skip Commercials When a commercial comes on that you don t want to record simply press PAUSE on the remote control The VCR will stop recording Press PAUSE again to continue recording when you see the...

Страница 41: ...up screen Press 8 to set the SECOND AUDIO option to ON When this is set the VCR records the second audio program Using the Instant Recording Timer IRT The Instant Recording Timer REC IRT button on the VCR will let you make a simplified timer recording without having to use the programming timer In order to set the IRT properly the clock must be set before starting Follow the steps 1 through 5 on B...

Страница 42: ...d recording setup will work Types of Delayed Recordings ONE TIME Records one show at a particular date and time DAILY Records a show at the same time every day of the week Monday through Friday WEEKLY Records a show at the same day and time every week Your VCR can record up to 8 programs at different days and times or up to 8 programs on the same day Before You Begin Assemble the information you n...

Страница 43: ...n off the power on the VCR When the power is off the delayed recording indicator will display on the VCR This tells you that the VCR will automatically record at the times and dates you have programmed To Stop a Delayed Recording in Progress Press POWER and then immediately within 10 seconds press the STOP button use buttons on the remote or VCR as you wish An Example Let s say you were interviewe...

Страница 44: ...ram if there are more or it will switch back to the main menu Programming Priorities When you have set up several timed recordings it may occur that some of their times overlap For example this can happen if you are set up to record shows on a daily or weekly basis and a special show comes on that you try to record during the same time slot The following charts will help you visualize how the VCR ...

Страница 45: ...Basic Operations Recording 45 starting time To avoid recording only bits and pieces of different overlapping shows review your programming and delete those shows that are not essential ...

Страница 46: ... in your VCR s memory This is called channel setup and you do it using the on screen Easy Guide System The procedure depends on what kind of hookup you have We ll give you step by step instructions Then you will be ready to begin VCR Plus recording also using the on screen Easy Guide System VCR Plus and PlusCodeTM are trademarks of Gemstar Development Corp Channel Setup Before You Begin Channel se...

Страница 47: ...o assign your local channels to VCR Plus channels in the VCR s memory The way you do this depends on how your VCR is hooked up to the incoming RF signal Decide which hookup you have from the diagrams below and follow the setup instructions for your type of hookup Hint Try several practice recordings after doing your channel setup You should get the same channels as you usually watch at home Home a...

Страница 48: ...example above none of the cable channels match all of them need to be assigned to VCR Plus channel codes Matching Broadcast CH Numbers to VCR Plus Channels 1 Press GUIDE then press 4 to select VCR PLUS SETUP For Home Antenna Setup You will see the screen as shown below For Cable No Cable Box Setup First the question Is a cable box being used with the VCR for all channels will appear when you press...

Страница 49: ... begin you need to know the output channel for your cable box Usually this is either 03 or 04 but it could be 02 through 13 Consult your cable company if you re not sure 1 Press GUIDE then press 4 to select VCR PLUS SETUP 2 Press 2 to answer YES to the question Is a cable box being used with the VCR for all channels You will then see this screen 3 Use the number buttons to enter the cable box s ou...

Страница 50: ...ox s output channel number 03 or 04 This will assign the scrambled cable channels For example suppose you receive Home Box Office HBO through the cable box Its cable channel is 2 and its VCR Plus channel code is 33 Your cable box output channel is 4 You would assign HBO like this 3 Press GUIDE to end the setup procedure 4 You are ready to begin timed recording with VCR Plus But you will need to us...

Страница 51: ...ou have entered the correct PlusCode press GUIDE to store the PlusCode in the VCR s memory This brings up another screen 5 Press number buttons 1 2 or 3 to select ONE TIME DAILY or WEEKLY RECORDING Important Programming does not take effect unless you select one of these options 6 When the next screen comes up choose between standard or extended tape speed by pressing the TAPE SPEED button This is...

Страница 52: ...irect cable for all other channels Important Your timed recording settings take effect when you turn off the power on the VCR Caution on the VCR Plus recording After entering a VCR Plus number check the information displayed with the PROGRAM REVIEW if there is are any unnecessary program s please cancel or correct it them Advanced Operations This section explains how to use the VCR s remote contro...

Страница 53: ...ere s what to do Programming the Remote Control Turn the television on any channel is okay Aim the VCR s remote control at your TV set Hold down the TV button not the VCR TV button while you press the number corresponding to your brand of television as shown in the chart page 49 For example if you have an RCA television press TV and 0 at the same time If this button combination sends a signal that...

Страница 54: ...ntrol is ready to control the TV First press TV to change to the TV function mode then press the button of the TV function that you want For example press TV and the CHANNEL up arrow and the TV station will change to the next higher station Press VCR1 or VCR2 on respective mode to operate your VCR with the remote again Be aware that not all of your TV s functions may work even though the remote co...

Страница 55: ...ell you more about this After each hookup power up the VCR and the TV Use the Initial Setup screen page 20 to select option CATV1 or CATV2 Then check out the system using these questions as a guide Does the TV receive the same number of channels as before the installation Does the VCR record all channels Do the VCR and TV remote control functions work Can I record on one channel while watching ano...

Страница 56: ...e line Check all the TV and VCR functions If you don t get all the functions you want precede with Option 2 Option 2 All Channels Unscrambled 1 Remove the cable company s cable line from the back of the cable box that goes to your TV Connect it to the IN FROM ANT lower jack on the back of the VCR 2 Using the 75 ohm coaxial cable supplied with the VCR connect either end to the VCR s OUT TO TV upper...

Страница 57: ...Box Hookup This setup lets you switch between the two configurations in Options 1 and 2 Check all the TV and VCR functions If you still don t get the functions you want proceed with Option 4 Option 4 If none of the preceding hookups work check with your cable company You may need to purchase a video switching system from your local electronics or video retailer This will easily handle most hookup ...

Страница 58: ...ups 58 Hamlin 4 Zenith 5 Scientific Atlanta 6 Pioneer 7 Philips 8 To operate the cable box once the remote is programmed for it Press CATV and then the button of the function you want Press VCR1 to operate your VCR with the remote again ...

Страница 59: ...lt your stereo owner s manual for further information You will need two audio cables the kind with two color coded plugs on each end for left and right audio channels With the power off Connect the right red and left white AUDIO OUT on the VCR to the right and left AUDIO IN on the stereo system Connect the left and right AUDIO OUT on the stereo to the right and left AUDIO IN on the VCR The AUDIO I...

Страница 60: ...Press DISPLAY then press 5 on the remote control to select SP or EP The EP setting gives you reasonable quality and a longer tape program Press AVX on the remote control to turn the LINE L1 indicator on Press REC IRT on the VCR and start the stereo playing To stop recording press STOP To play back the recording rewind the tape and press PLAY ...

Страница 61: ... VCR1 Be sure to match left to left white and right to right red Second VCR Hookup To Control Both VCRs with the Remote Control If the second VCR that you ve hooked up is also a Hitachi you can set your remote to operate both VCRs Press GUIDE then press 5 to bring up the Initial Setup screen The default setting on the Initial Setup screen is VCR1 for when you only have one VCR running Press 4 to s...

Страница 62: ...to VCR1 Press AVX on VCR1 the LINE indicator will display Press REC on VCR1 and press PLAY on VCR2 To monitor the picture as you record VCR1 must be connected to your TV follow instructions in the other VCR s manual Press the VCR TV button on the remote The VCR indicator will light on VCR1 s display and you can view the picture being recorded ...

Страница 63: ...t be a Hitachi and must have a jack labeled EDIT This is the recording VCR You will need to purchase a synchro edit cable You may order by calling 1 800 HITACHI Ask for part number VTCH40S Remember to switch the remote control between VCR1 and VCR2 mode depending on which device you are signalling Hookup When VCR1 is Recording Hook up the two VCRs and the TV as shown on page 56 Connect the synchro...

Страница 64: ...press PAUSE again recording will continue Press the STOP buttons on both VCRs when you are finished This procedure won t leave index marks unless you press STOP then REC between sections recorded more about index marks on page 32 and 35 Programmable Easy Edit Hookup when VCR1 is Recording Hookup the two VCRs and the TV as shown on page 56 Connect the synchro edit cable from EDIT on VCR1 to EDIT on...

Страница 65: ...fore the beginning of the program section that you want to copy The VCR will then enter the play mode When the START point is reached the word EXECUTE will disappear on the screen to show that your program segment is being copied Putting The Record VCR In Pause Some models of VCR will switch to the STOP mode if they are left in the RECORD PAUSE mode for more than five minutes It is a good idea to ...

Страница 66: ...ble to your VCR see diagram below Camcorder Hookup Illustration Press the AVX button on the VCRs remote control so that the L2 Line indicator appears in the VCR display Press REC IRT on the VCR to start recording Press PLAY on your camcorder to start copying your tape Information on Audio Hookup If your camcorder is only capable of monaural output one audio jack connect it to the AUDIO IN L MONO i...

Страница 67: ...t forward and reverse play You will hear a mechanical sound during auto head cleaning Even with the auto head cleaning system dirt can build up on the heads If the picture is blurry during playback or is occasionally interrupted or blanks out try playing different cassettes to see whether you get the same picture problems If the picture problems persist the heads may need to be cleaned professiona...

Страница 68: ... problems that new VCR owners encounter Don t Attempt Repairs Yourself Do not remove the cover or the back of the VCR this will void the warranty and endanger your safety The exposed uninsulated voltage in this unit may be high enough to cause electrical shock It is dangerous to make contact with any inside part and none of these parts are intended to be serviced by an untrained user To be safe re...

Страница 69: ...correct firm connections Poor picture quality noise during playback TV channel selector on the proper channel Set TV to channel 3 or 4 as correct for your area Set TV or AUX or VIDEO have a direct video hookup Is TV correctly tuned Fine tune the TV Static lines through the picture Press 1 or 4 button to adjust tracking Noisy picture despite all previous adjustments even when playing different cass...

Страница 70: ...n is necessary Hitachi Service Hotline Authorized Hitachi service facilities are available throughout the US and Canada For the location nearest you call the Hitachi Service Hotline at one of these numbers In the continental U S A DIAL TOLL FREE 7 days a week 24 hours a day 1 800 HITACHI 1 800 448 2244 You must state your zip code when calling In Canada QUEBEC 418 681 7719 MONTREAL 514 697 9150 TO...

Страница 71: ...d A I 90MHz 174MHz CATV VHF HIGH CH 7 13 174MHz 216MHz VHF SUPER CH J W 216MHz 300MHz CATV VHF HYPER CH W 1 W 28 300MHz 468MHz CATV UHF CH 14 69 W 29 W 84 470MHz 806MHz Video Input 1 2 Vp p 75ohm unbalanced Video Output 1 Vp p 75ohm unbalanced Audio Input 316mV rms 7 8dB 50 kohm Audio Output 316mV rms 7 8dB 1 5 kohm Video Recording S N Better than 45dB SP better than 40dB EP Horizontal Resolution ...

Страница 72: ...861141 1 remote control unit Part No 5616491 2 AA batteries For information about how to obtain these accessories please call TOLL FREE 1 800 448 2244 for your nearest Hitachi Authorized Parts Distributor in the continental United States For ALASKA and HAWAII please contact the nearest Hitachi Regional office ...

Отзывы: