61
MAINTENENCE
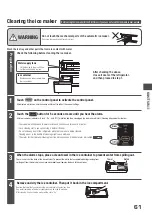
Before using the ice maker for the first time or if you have not used the ice maker in over a week.
Cleaning the ice maker
Check the following before cleaning the ice maker.
After checking the above,
close all doors of the refrigerator,
and then proceed to step 1.
Water supply tank
・
Fill the tank up to the max fill line.
・
Set the tank correctly in place.
Ice container
・
Remove any ice cubes remaining in
the ice container.
4
3
There is a notch at the back of the ice container. To prevent the water that accumulated during cleaning from
spilling out from this notch, place a clean, absorbent towel towards the back of the container.
All three ice maker indicators (“Quick”, “On”, and “Off”) will blink and then cleaning on the ice maker will start. (Cleaning takes about 4 minutes.)
2
Touch the button for 5 seconds or more until you hear the alarm.
All indicators will turn on, and then some will turn off to reflect the current settings.
1
Touch on the control panel to activate the control panel.
Wash the ice tray and other parts that come in contact with water.
When the alarm stops, place a clean towel in the ice container to prevent water from spilling out.
Remove and dry the ice container. Then put it back in the ice compartment.
Remove the towel that you placed in the ice container in the previous step.
Any water remaining in the water supply tank can be used to make ice.
After cleaning finishes, the ice maker will be set to “On” .
Notch
Towel
WARNING
Do not touch the mechanical parts of the automatic ice maker.
(Touching these parts might result in injury.)
P.57
Preparation
・
The indicators will blink and the alarm will sound continuously for about 4 minutes.
・
Once cleaning starts, you cannot stop it before it finishes.
・
Do not open any door of the refrigerator while the ice maker is being cleaned.
Opening a door in the middle of cleaning might cause problems.
・
The alarm for the ice-maker cleaning function will sound even if the door alarm is disabled.
Blinks
Touch for
5 Seconds

