background image

20

Adding and replacing hardware components

Hyper Scale-Out Platform Supporting and Troubleshooting

Using the Management API

HTTP request syntax


POST https://<

cluster-ip

>:<

port

>/hspapi/nodes/<

node-id

and specify the following in the POST payload:

“maintenance-mode”: True

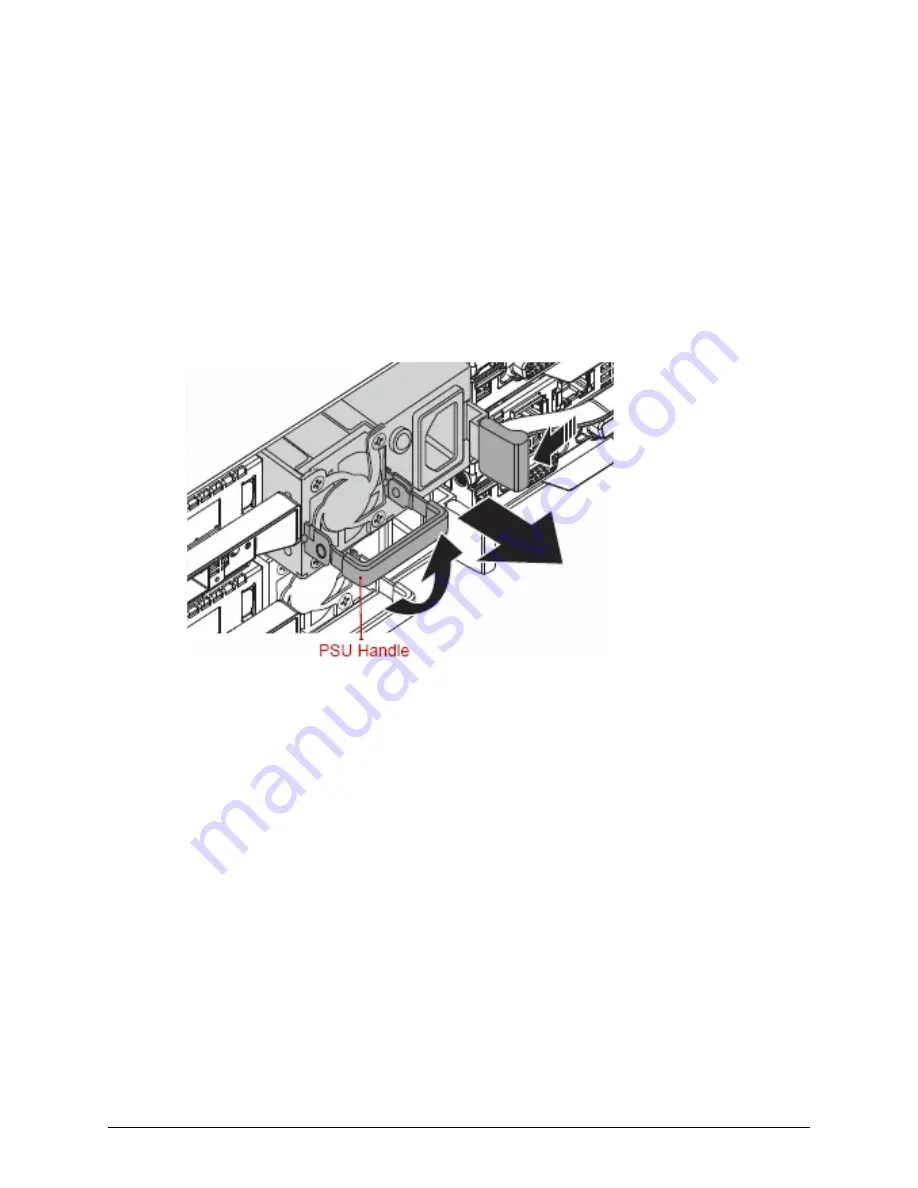
Step 2: Remove and replace the power supply

1. Unplug the power cords to the node.

2. Pull the power supply unit (PSU) handle up to the open position.

3. Press and hold the locking latch lever.

4. Pull the PSU from the system.

5. Insert a new PSU into the system and lock the side lever into place.

6. Plug back in the power cords.

7. Press the power button on the node control panel.

8. On the back of the node, verify that the LED lights on both power supplies and both 

boot drives are displaying green.

Содержание Hyper Scale-Out

Страница 1: ...MK 94HSP006 03 Hyper Scale Out Platform Maintaining and Troubleshooting 1 2 ...

Страница 2: ...or 1 Acquiring the relevant consents as may be required under local privacy laws or otherwise from authorized employees and other individuals to access relevant data and 2 Verifying that data continues to be held retrieved deleted or otherwise processed in accordance with relevant laws Notice Export Controls The technical data and technology inherent in this Document may be subject to U S export c...

Страница 3: ...cessing product documentation vii Getting help vii Comments viii 1 Accessing the health of an HSP cluster 1 Overview 1 Visually monitoring cluster node health 2 Monitoring system drives 2 Monitoring data drives 2 Monitoring alert conditions using the management interfaces 4 Using the Management Console 5 Using the Command Line Interface 5 Using the Management API 5 HTTP request syntax 5 Request 5 ...

Страница 4: ...r cables 16 Step 5 Power on the nodes 17 Replacing a failed node 18 Step 1 Removing the failed node from the rack 18 Step 2 Installing the replacement node 18 Replacing a failed power supply on a node 19 Step 1 Put the node maintenance mode then shut down the node 19 Step 2 Remove and replace the power supply 20 Step 3 Take the node out of maintenance mode 21 Replacing one or more failed disks 22 ...

Страница 5: ...for maintaining and troubleshooting Hyper Scale Out Platform To maintain and troubleshoot the Hyper Scale Out Platform you should have Basic knowledge and understanding of the Hyper Scale Out Platform solution including how to use one or more of the management interfaces Basic understanding of networking as well as site specific network knowledge If you need a high level overview of the Hyper Scal...

Страница 6: ...tant new terms Italic in angle brackets Indicates a variable which is a placeholder for site or installation specific details that you need to provide For example copy source file target file monospace Indicates text that is displayed on the screen or text that you need to enter For example pairdisplay g oradb Also the name of a directory folder or file For example The horcm conf file square brack...

Страница 7: ...e vendors employees and prospects It is the destination to get answers discover insights and make connections Join the conversation today Go to community hds com register and complete your profile Caution Warns that failure to take or avoid a specified action could result in adverse conditions or consequences for example loss of access to data cv Electric shock hazard Warns of electric shock hazar...

Страница 8: ...g Comments Please send your comments on this document to hsp documentation comments hds com Include the document title number and revision and refer to specific sections and paragraphs whenever possible All comments become the property of Hitachi Data Systems Thank you ...

Страница 9: ...de is automatically rebooted and if the reboot fails to bring services back online the node is marked DOWN and a system alert condition is reported The HSP software will automatically attempt the reboot a few more times before marking the node as in ERROR and another system alert condition is reported All services will be stopped on the node in ERROR but the node will remain powered on for debuggi...

Страница 10: ...hould be green If the LEDs are red this indicates drive failure Monitoring data drives The control panel located on the front of each node has five LEDs that provide critical information This section explains what each LED means when illuminated and any corrective action you need to take Reference Meaning 1 Power button with LED Blue on System power on Off System power off Amber blinking DC off an...

Страница 11: ...rier has a green LED that indicates drive activity If the red LED is illuminated this indicates a disk drive failure The HSP software reports an alert condition for disk failures 2 Status LED Amber blinking System failure 3 ID button with LED Blue blinking ID indicator Off No indicator 1 MB1 2 MB2 3 MB3 4 MB4 4 USB 2 0 port USB 2 0 port Reference Meaning ...

Страница 12: ...ity alert conditions are raised when the administrator defined high and low watermark thresholds for file system space are out of the specified range Warning severity alert condition is raised when the run state of a file system is IMPAIRED Error severity alert condition is raised when the run state of a file system is ERROR Alert conditions are also raised when a node s power supply fan speed and...

Страница 13: ...y the URL link specified in the alert conditions uri for the cluster for which you want the list of alert conditions Response In addition to the response header that provides the status code 200 if the request was successful the request returns the following properties in the response Property Type Description alert description string Description of the alert condition severity string Severity of ...

Страница 14: ... up and fully functional DOWN node is offline but no errors were detected When a node is DOWN its disks are also marked as DOWN An administrator might have shut down or rebooted the node If a node remains DOWN for more than 10 minutes and is not in maintenance mode you should ensure that the power cord and network cables have not been disturbed and that the node is powered on Call support if the n...

Страница 15: ...s not available An administrator might have disabled the file system IMPAIRED File system has reported errors We recommend running fsck to check and repair the file system A warning severity alert is raised ERROR File system is down due to errors that prevent it from staying online We recommend running fsck to check and repair the file system Customer support intervention may be required to troubl...

Страница 16: ...e for a virtual machine volume can be UP VM Volume has been added and available for use ERROR The underlying disk to which the VM volume is associated has failed GUI Virtual Machines VM Volumes CLI hspadm vm volume list API GET https cluster ip hspapi v2 vm volumes list Resource Run state description Access command ...

Страница 17: ...r customer replaceable component If the hardware component is not a a field replaceable or customer replaceable component then you will need to contact HDS Support to obtain a Return Material Authorization RMA to return the component If the hardware component is a customer replaceable component follow the instructions in this section for replacing the component The following table provides an over...

Страница 18: ...nd Troubleshooting This chapter covers Increasing storage capacity by adding nodes Replacing a failed node Replacing a failed power supply on a node Replacing one or more failed disks Fans X Power supplies X Description Customer Serviceable Replaceable Field Serviceable Replaceable ...

Страница 19: ...he outer rails on the rack 1 Press upward on the locking tab at the rear end of the middle rail 2 Push the middle rail back into the outer rail WARNING Sharp edges or corners Node and rail surfaces have sharp edges or corners Avoid touching or wear gloves WARNING ESD sensitive Equipment is sensitive to electrostatic discharge ESD and could be damaged if you do not take appropriate precautions such...

Страница 20: ...ep 2 Installing the node on the rack 1 Pull the middle rail out from the front of the outer rail and make sure that the ball bearing shuttle is at the front locking position of the middle rail 2 Align the chassis inner rails with the front of the middle rails 3 Slide the inner rails on the chassis into the middle rails keeping the pressure even on both sides until the locking tab of the inner rail...

Страница 21: ...beled cables have been installed in the switches at the factory Each individual cable is marked with a red or blue tab insert to identify which switch and which 40 GbE port they are to be plugged into Red cables go into the top switch in rack unit 42 and are plugged into the left 40 GbE port on each node Blue cables go into the bottom switch in rack unit 41 and are plugged into the right 40 GbE po...

Страница 22: ...ttom that you installed and moving up the rack continue to plug each incrementally numbered cable into the next node in the rack you will plug in as many blue node cables as you installed nodes in the rack 3 Moving to the red cable harness locate the cable labeled with the node number of the first node you installed and plug the cable into the left 40 GbE slot in node For example if you were shipp...

Страница 23: ...Adding and replacing hardware components 15 Hyper Scale Out Platform Supporting and Troubleshooting ...

Страница 24: ...n the left side of the rack and zip tie the node s power cables to the rack using the rack mount hole immediately above the server rail kit PDU UPPER LEFT PDU UPPER RIGHT Switch U42 Switch U42 node20 node20 node19 node19 node18 node18 node17 node17 node16 node16 Switch U41 Switch U41 node15 node15 node14 node14 node13 node13 node12 node12 node11 node11 PDU LOWER LEFT PDU LOWER RIGHT empty empty no...

Страница 25: ...upporting and Troubleshooting 4 Verify that all power cables are fully seated Step 5 Power on the nodes 1 Press the power button on the node control panel 2 On the back of the node verify that the LED lights on both power supplies and both boot drives are displaying green ...

Страница 26: ... 2 Installing the replacement node Follow the steps in Increasing storage capacity by adding nodes on page 2 11 to install the replacement node WARNING Sharp edges or corners Node and rail surfaces have sharp edges or corners Avoid touching or wear gloves WARNING ESD sensitive Equipment is sensitive to electrostatic discharge ESD and could be damaged if you do not take appropriate precautions such...

Страница 27: ...of maintenance mode so that rebalancing and file protection activities are resumed Step 1 Put the node maintenance mode then shut down the node Using the Management Console 1 Go to Hardware Nodes 2 On the Nodes page point and click on the row in the list to select the node with the failed power supply 3 Right click to display the context menu and select Set Maintenance Mode 4 On the Nodes page poi...

Страница 28: ...ve and replace the power supply 1 Unplug the power cords to the node 2 Pull the power supply unit PSU handle up to the open position 3 Press and hold the locking latch lever 4 Pull the PSU from the system 5 Insert a new PSU into the system and lock the side lever into place 6 Plug back in the power cords 7 Press the power button on the node control panel 8 On the back of the node verify that the L...

Страница 29: ...Nodes page point and click on the row in the list to select the node on which you replaced the failed power supply 3 Right click to display the context menu and select Unset Maintenance Mode Using the Command Line Interface 1 Logged in to the CLI as admin or other administrative user 2 Run the hspadm command to take the node out of maintenance mode For example hspadm node edit name Node007 mainten...

Страница 30: ... as foreign Importing a foreign drive will disrupt the node s ability to map drives to a slot location You may swap a complete and intact set of drives from one node however because this task requires manually importing them via bios or command line it should only be accomplished with the assistance of Hitachi Support personnel To replace a 3 5 HDD disk 1 Press the tray release button 2 Pull the d...

Страница 31: ...leshooting 3 Troubleshooting This chapter describes some methods of identifying and fixing some basic issues you might encounter using the Hyper Scale Out Platform Hardware troubleshooting Alert troubleshooting Network troubleshooting Virtual machine troubleshooting ...

Страница 32: ...red cable from the left 40 GbE NIC is plugged into the upper switch in rack unit 42 Ensure the cables lock into place both in the node and the switch there is an audible click when the cables are properly seated Ensure you are using the required cables In a multi rack cluster make sure you place the rack with the two switches in the middle Central switches must be within 5 meters from a rack to us...

Страница 33: ... is in maintenance mode Take the node out of maintenance mode when maintenance is complete A power supply on node has failed Replace the power supply in error or Contact Customer Support for assistance A power supply cord on node is unplugged Ensure power cord is fully engaged Sensor sensor on node has exceeded normal thresholds Monitor the thresholds to ensure they do not reach critical status Se...

Страница 34: ...80 ca 40 68 05 ca 32 10 d8 68 05 ca 32 10 d9 cc 4e 24 38 a8 74 cc 4e 24 38 a8 80 Node003 f4 52 14 80 8b b0 68 05 ca 32 10 98 68 05 ca 32 10 99 cc 4e 24 38 a8 74 cc 4e 24 38 a8 80 You can also use this script to determine if you plugged eth2 and eth3 into the wrong switches The last two columns report the chassis ID of the brocade switches which is the MAC address of it s management port Note The b...

Страница 35: ...icmp_req 7 ttl 64 time 0 175 ms 8980 bytes from 192 168 0 11 icmp_req 8 ttl 64 time 0 192 ms 8980 bytes from 192 168 0 11 icmp_req 9 ttl 64 time 0 151 ms 8980 bytes from 192 168 0 11 icmp_req 10 ttl 64 time 0 132 ms 192 168 0 11 ping statistics 10 packets transmitted 10 received 0 packet loss time 899ms rtt min avg max mdev 0 132 0 169 0 221 0 025 ms PING 192 168 0 12 192 168 0 12 from 192 168 0 1...

Страница 36: ...0 12 icmp_req 5 ttl 64 time 0 031 ms 8980 bytes from 192 169 0 12 icmp_req 6 ttl 64 time 0 029 ms 8980 bytes from 192 169 0 12 icmp_req 7 ttl 64 time 0 046 ms 8980 bytes from 192 169 0 12 icmp_req 8 ttl 64 time 0 042 ms 8980 bytes from 192 169 0 12 icmp_req 9 ttl 64 time 0 042 ms 8980 bytes from 192 169 0 12 icmp_req 10 ttl 64 time 0 051 ms 192 169 0 12 ping statistics 10 packets transmitted 10 re...

Страница 37: ...Troubleshooting 29 Hyper Scale Out Platform Supporting and Troubleshooting Virtual machine troubleshooting ...

Страница 38: ...30 Troubleshooting Hyper Scale Out Platform Supporting and Troubleshooting ...

Страница 39: ...ts used by the HSP software Port Protocol Service 22 tcp ssh 111 tcp udp portmapper 564 tcp udp mountd 2049 tcp udp nfs 4001 tcp udp nlockmgr 4002 tcp udp statd 5900 5910 tcp VNC server for virtual machines 8000 80 tcp http API GUI 8443 443 tcp http API GUI 8080 tcp http Swift proxy server 8888 tcp http Ganglia graphs ...

Страница 40: ...32 Hyper Scale Out Platform Supporting and Troubleshooting ...

Страница 41: ...Hyper Scale Out Platform Maintaining and Troubleshooting ...

Страница 42: ... 2845 Lafayette Street Santa Clara California 95050 2639 U S A www hds com Regional Contact Information Americas 1 408 970 1000 info hds com Europe Middle East and Africa 44 0 1753 618000 info emea hds com Asia Pacific 852 3189 7900 hds marketing apac hds com ...

Отзывы: