
QUICK SETUP GUIDE
VIEWING THE REMOTE CONTROL
3
物料号:
条形码定位框 35x10.5mm
SPECIFICATIONS
5
HLUD84XT900
Size with base (mm)
Size without base (mm)
Weight with base (kg)
Weight without base (kg)
Screen Diagonal Size
you refer to the Trouble Shooting tips in the User Manual.
76
97
1921×1175×450
1921×1123×75.6
84 inches
NOTE
Screen Resolution
Colour System
PAL NTSC
Television System
HDMI mode
PAL B DVB-T
Environmental
Conditions
Temperature: 5°C - 45°C
Humidity: 20% - 80% RH
Atmospheric pressure: 86 kPa - 106 kPa
480I/60Hz, 480P/60Hz, 576I/50Hz, 576P/50Hz,
720P/50Hz, 720P/60Hz, 1080I/50Hz, 1080I/60Hz,
1080P/50Hz, 1080P/60Hz
640×480, 800×600, 1024×768
3840x2160/24Hz, 3840x2160/25Hz, 3840x2160/30Hz
only for UHD port
Component mode
480I/60Hz, 480P/60Hz, 576I/50Hz, 576P/50Hz,
720P/50Hz, 720P/60Hz, 1080I/50Hz, 1080I/60Hz,
1080P/50Hz, 1080P/60Hz
VGA mode
640×480, 800×600, 1024×768, 1280×1024 60Hz
Sound Output (RMS)
3840 × 2160
10 W + 10 W
Model
HLUD84XT900
CHANGE THE BATTERIES
Match the Remote Control with TV
1. Slide open the battery cover on the back of the remote control.
2. Install two AAA size (1.5V) batteries. Match the “+” and “-” signs on the batteries to the
signs on the battery compartment.
3. Close the battery cover.
1
2
3
Gently Push
NOTES
Dispose of your batteries in a designated disposal area. Do not throw the batteries
into fire.
Do not mix battery types or combine used batteries with new ones.
Remove depleted batteries immediately to prevent battery acid from leaking into the
battery compartment.
If you do not intend to use the remote control for a long time, remove the batteries.
The effective range of remote control is suggested in the figure below.
1. Please ensure that your TV is switched on.
2. Aim the remote control at the left-bottom of the TV within 4 inches.
3. Press the [Last] and [EPG] buttons on your remote control simultaneously for at least 3
seconds, the LED light on your remote control will light up three times to indicate
successful pairing.
User Manual
Quick Setup Guide
Warranty Card
Remote Control
Batteries: AAA × 2
3D Glasses × 1
Screw (M5×12) × 13
Screw (M6×25) × 6
ACCESSORIES LIST
1
INSTALLING THE STAND
2
CAUTION
Carefully place your TV facedown on a soft, cushioned surface to prevent
damage to the TV or scratching to the screen.
NOTE
Product image is only for reference, actual product may vary in appearance.
NOTE
If the LED is black, the remote has failed to pair with the TV, repeat the pairing
procedure.
SECURING THE INSTALLATION SPACE
Install with stand
Never install the TV set as follows:
Leave at least this much
space around the set.
4 inches
(10cm)
4 inches
(10cm)
4 inches
(10cm)
12 inches
(30cm)
Make sure that your TV has adequate air circulation. Allow enough space around
the TV as shown below. Avoid operating the TV at temperatures below Inadequate
air 41°F (5°C).
CAUTION
Inadequate air circulation can lead to overheating of the TV and may cause
damage to your TV or cause a fire.
Air circulation is blocked.
Wall
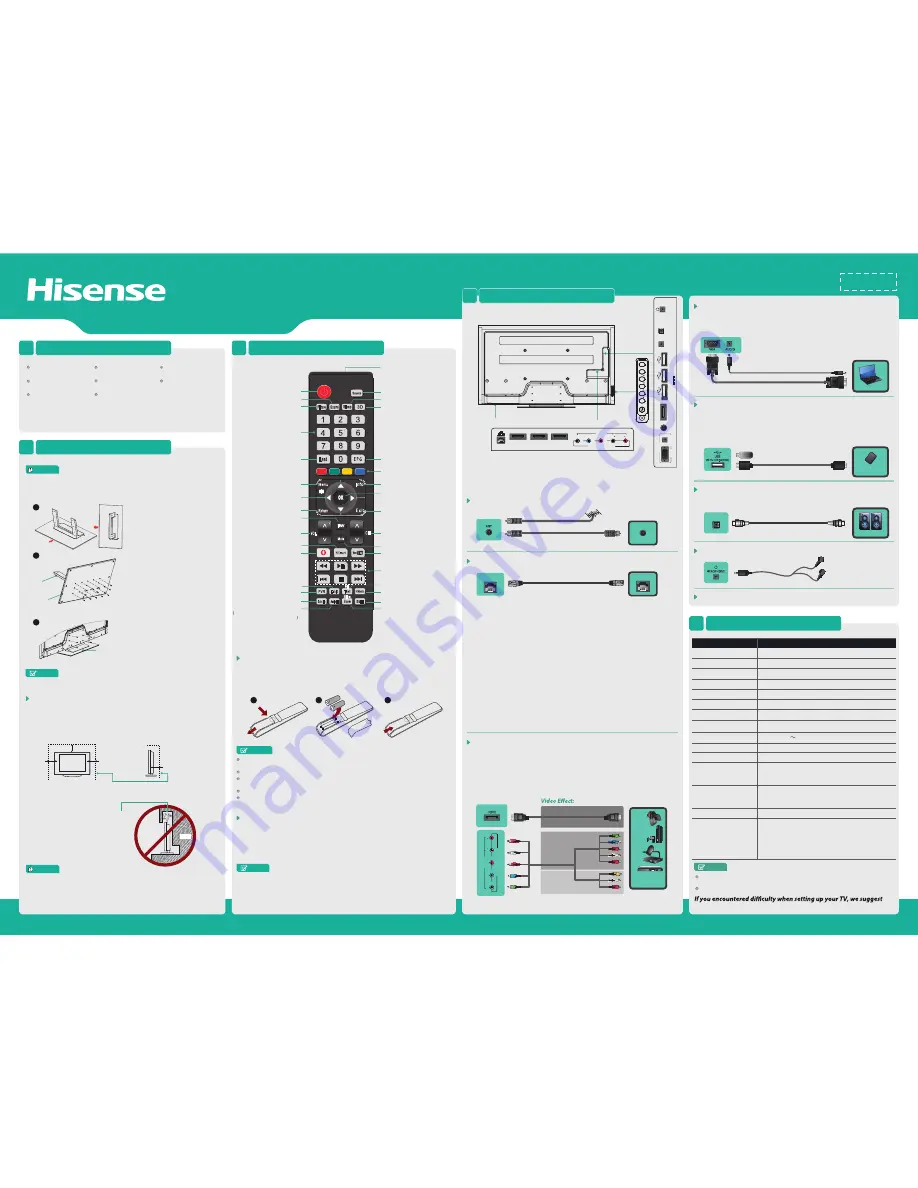
Power Switch
HDMI / COMP / AV
AV
Y
P
b
P
r
Component
L
R
Video
L
R
Connect an HDMI cable or Comp/AV Adapter from an external A/V equipment. No sound
connection is needed for HDMI to HDMI connection. If the device signal resolution does
not match the specification table you need to change the setting of device according to the
table. Please consult your device user manual for instruction.
BEST (HDMI)
BETTER
(COMP)
GOOD
(AV)
Check the jacks' for position and type before making any connections.
Loose connections can result in image or color problems. Make sure
that all connections are tight and secure.
Connect an outdoor VHF/UHF antenna.
Turning the TV On for the First Time
ANT
Connect Headphone for audio out of the TV.
HEADPHONE
Just for factory used, it can't be inserted any equipment.
DEBUG
VGA & AUDIO
Connect a VGA cable and an audio cable from the PC.
Connect a USB 2.0 device port for browsing photos, listening music and watching
recorded movies.
USB
LAN
Connect an ethernet cable to access a network or the Internet.
LAN
OR
Outdoor
Antenna
Antenna Cable (75
Ω
)
•
To select the HDMI / Component / AV
Press [Source] button, when the list of Input Source appears,
press [▲/▼] to select the
source [HDMI] / [Component] / [AV], then press [OK] to connect.
The Installation Guide Menu appears the first time you turn on the TV. It will assist you to
specify the Remote Pair, Language Setting, Country Setting, Time Zone Setting (just for
Australia area), Use Mode, Network Setting and Channel Search
•
Press [POWER] to turn on your TV, it will go straight into Setup Wizard menu
•
Press [
▲
/
▼
/
◄
/
►
] buttons to navigate the menu and change the settings. Press [OK]
button to confirm.
Remote Pair -
Match your remote control with your TV according to the instructions.
Language Setting -
Select your desired language to be displayed on the menu.
Country Setting -
Select the country where you will operate the TV.
Time Zone Setting -
Select the local time zone according to your region.
Use Mode -
Select your Mode Setting: Home Mode or Shop Mode.
Home Mode is the recommended setting which offers full functionality of the television.
Network Setting -
Connect an Ethernet cable to access a network or the Internet. TV also
features wireless connectivity. For more information, see “Using the Network Menu”.
Channel Search -
Search and store all available TV channels automatically.
TV Bottom Panel
Botton
View
VHF/UHF Antenna
ANT OUT
Video Camera/
Set-top Box/
Satellite Receiver
LAN
PC
•
To select the VGA: Press [Source] button, when the list of Input Source appears,
press [
▲/▼
] to select the source [VGA], then press [OK] to connect.
•
To select the USB device: Press [Source] button, when the list of Input Source
appears, press [▲/▼] to select the source [HiMedia], then pre
ss [OK] to connect.
Or press [HiMedia] to directly enter the HiMedia menu
Connect an optical cable from an external digital audio system (Toslink optical cable
is needed).
DIGITAL AUDIO OUT
Portable Storage
Device
Speaker
Headphone
•
If the item is not specif ied in the accessories list, it should be provided by customer.
•
Recommend the active shutter 3D glasses model FPR3D16. Other brands 3D
glasses may not be supported.
MAKING CONNECTIONS
4
Power Consumption
500 W
Power Supply
100V - 240V 50Hz/60Hz
L
AUDIO
Y
VIDEO
P
B
P
R
R
COMPONENT IN
AV IN
Dial: 1800 447 367 (Toll Free) http://www.hisense.com.au
3
Take out the stand accessories, Insert
the stand cover into the base plate, and
secure them with 13 provided screws
(M5 x 12).
3D
Still
Zoom
Text
PVR
Picture Sound
Source
CH
VOL
Info
Menu
Sleep
Last
Return
Mute
Subtitle
AudioI/II
T.shift
Mix
Size
Return to the previous channel
Return the previous menu
Select picture mode
Fast access to your saved favorite
channels
Display the main menu
/ Back menu display
Switch between different audio
only applicable when the TV program
has the feature
Freeze a picture on screen
Adjust the volume
Enter the Opera browser
Remote sensing window
Select input sources
Set the TV sleep timer
3D button
Confirm the selection / Display a list of
channels saved in TV tuner memory
Display TV program and input source
information
Mute and restore sound
Select sound mode
Exit the menu
Display the Electronic Programming
Guide in DTV mode
Special function buttons
Adjust aspect ratio / Adjust Teletext size
Enter the YouTube app
Time shift of images on USB devices
Start video recorder in DTV mode
Turn Subtitles on or off
Select a channel
Open the HiSmart Hub
HiMedia (digital multimedia player) button
Select a channel or input numbers
▲/▼/◄/►:
Up/Down/Left/Right
Media player controls: Rewind,
Play / Pause, Fast Forward, Previous,
Stop and Next
Power Standby button: Power on
/ Standby
HDMI 1 (UHD)
HEADPHONE
ANT
VGA
PC IN
AUDIO
USB 3
USB 2
USB 1
DC 5V 0.5A(MAX)
DEBUG
DIGITAL AUDIO OUT
HDMI 4/ARC
HDMI 3
HDMI 2
LAN
L AUDIO
Y
VIDEO
P
B
P
R
R
COMPONENT IN
AV IN
DIGITAL AUDIO OUT
ES-G130472
TV Side Panel
Base Plate
Stand Cover
Enter the Teletext mode
/ Mix Teletext with TV pictures
Base Stand
Sources of UHD (4K) content must be connected to the HDMI-1 input. For the
moment digital television channels do not deliver UHD content.
Features, appearance and specifications are subject to change without notice.
2
Secure the base stand to the TV with
the 6 provided screws (M6 x 25).
MENU
SOURCE
VOL
VOL
CH
CH
FRONT
To confirm the direction of the base
stand.
ERF-32910
1
FRONT