background image

Содержание Excalibur RADEON 9550 Series

Страница 1: ...1 L 1 Z 1 ...

Страница 2: ...se harmful interference to radio or television reception which can be determined by turning the equipment off and on the user is encouraged to try to correct the interference by one or more of the following measure Reorient or relocate the receiving antenna Increase the separation between the equipment and receiver Connect the equipment into an outlet on a circuit different from that to which the ...

Страница 3: ...dbuch Einleitung Abschnitt 1 Hardware Installation Abschnitt 2 Software Installation Abschnitt 3 Nutzung der TV Ausgabe Abschnitt 4 Nutzung des Video Eingangs Abschnitt 5 Guide de l utilisateur en fran9ais Introduction Section 1 Installation du materiel Section 2 Installation du logiciel Section 3 Utilisation de la sortie television Section 4 Utilisation de l entree video Section 5 n ...

Страница 4: ...s for unprecedented video quality 1 1 Features At a glance Features ATI s TRUFORM 2 0 SMARTSHADER 2 0 and SMOOTHVISION 2 1 and HYPER Z 111 technologies SMARTSHADER 2 0 technology supports DirectX 9 0 and enables more complex and realistic lighting effects Sharper looking 3D graphics with ATI SMOOTHVISION 2 1 technology TRUFORM 2 0 technology that makes the outlines of 3D characters and objects loo...

Страница 5: ...64 128MB 64 128 256MB DDR memory DDR memory 64bit interface 64 128 bit interface Connectors 15 pin VGA connector for CRT monitor S Video or Composite connector for TV VCR DVI I connector for Digital Flat Panel External DVI I to VGA connector for Secondary CRT monitor Drivers Included Windows XP 2000 Board Layout 15 pin VGA Connector S Video Connector e DVI I Connector AGP Bus Note This illustratio...

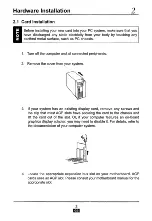
Страница 6: ... cover from your system 3 If your system has an existing display card remove any screws and the clip that most AGP slots have securing the card to the chassis and lift the card out of the slot Or if your computer features an on board graphics display adapter you may need to disable it For details refer to the documentation of your computer system 4 Locate the appropriate expansion bus slot on your...

Страница 7: ...5 Insert the card carefully and press it in firmly until the card is fully seated 6 Fasten the mounting bracket to the chassis Make sure the card is properly aligned 7 Replace the cover on your system ...

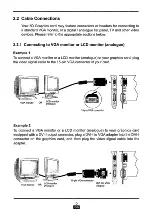
Страница 8: ...logue Example 1 To connect a VGA monitor or a LCD monitor analogue to your graphics card plug the video signal cable to the 15 pin VGA connector of your card 15 pin VGA connector Example 2 To connect a VGA monitor or a LCD monitor analogue to your graphics card equipped with a DVI 1 output connector plug a DVI I to VGA adapter into the DVI I connector on the graphics card and then plug the video s...

Страница 9: ...d equipped with a DVI output connector plug the DVI connector from monitor to the DVI connector of your card 2 2 3 This connection is optional depending on wether or not the card has a S Video connector Connecting to Video Devices with S Video or Composite In e g TV VCR TV set with Composite In ...

Страница 10: ...retrieve the said document a Auto Installation figure 1 Your graphics card package contains the display driver CD ROM with Autorun features the Autorun dialogue box figure 2 automatically appears after inserting the CD ROM into the CD ROM drive Please click Video Adapter Easy Install to start installation figure 2 If the dialogue box does not appear double click or run Atisetup exe figure 3 at the...

Страница 11: ...cations can occupy their own specific monitor Manual Installation Instructions 1 Start Windows 2 Click Start 3 Click the RUN menu item 4 Click Browse Browse to the HVision directory 5 Double click Setup exe figure 4 6 Follow the on screen instructions to complete the installation m yann Type the name of a program folder document or Internet resource and Windows will open it for you Open Dj Install...

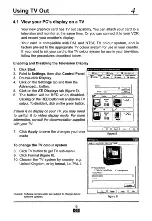
Страница 12: ...2 Point to Settings then click Control Panel 3 Double click Display 4 Click on the Settings tab and then the Advanced button 5 Click on the ATI Displays tab figure 5 6 The button will be RED when disabled Clicking on the RED button will enable the TV output To disable it click on the green button If there is no display on your TV you may need to switch it to video display mode For more information...

Страница 13: ...ilar to these Use S V DEO OUT or COMPOSITE VIDEO OUT S Video will provide better results COMPOSITE S VIDEO OUT OUT Connecting Your video device 1 Turn off your computer and your VCR camcorder or laser disk player 2 Ensure your graphics card is installed correctly 3 Locate the S Video Output or the Composite Output on your VCR camcorder or laser disk player 4 Looking at the back of your computer lo...

Страница 14: ...llose Video Qualitat 1 1 Eigenschaften auf einem Blick Verfugt uber TRUFORM 2 0 SMARTSHADER 2 0 und SMOOTHVISION 2 1 Techniken vonATI und uber die HYPER Z lll Technik Die SMARTSHADER 2 0 Technik unterstiitzt DirectX 9 0 und ermoglicht kompliziertere und realistische Lichteffekte Scharfer aussehende 3D Grafiken mit der SMOOTHVISION 2 1 Technik von ATI TRUFORM 2 0 Technik die die Umrisse von 3D Zeic...

Страница 15: ...4 bit interface 64 128 256MB DDR Speicher 64 128 bit interface Anschlusse 15 poliger VGA Stecker fur CRT Bildschirm S Video Oder Composite Stecker fur TV Videokassettenrecorder DVI I Stecker fur Digital Flat Panel Externer DVI l VGA Adapter fur sekundaren CRT Bildschirm Treiber Windows XP 2000 Anordnung der Leiterplatte 0 15 poliger VGAStecker 0 S Video Stecker 0 DVI I Stecker 0 AGP Bus Anmerkung ...

Страница 16: ... eine Grafikkarte hat entfernen Sie alle Schrauben und die Klammer mit der die Karte von den meisten AGP Steckplatzen am Chassis gehalten wird und ziehen Sie die Karte aus dem Steckplatz heraus ODER wenn Ihr Computer eine in die Karte integrierte Anzeige hat mussen Sie sie deaktivieren Einzelheiten finden Sie in der Dokumentation zu Ihrem Computer 4 Bringen Sie den entsprechenden Steckplatz fur de...

Страница 17: ...Sie die Karte vorsichtig ein und drucken Sie sie test bis sie richtig sitzt 6 Bringen Sie den Befestigungsbugel am Chassis an Die Karte muss richtig ausgerichtet sein 7 Bauen Sie Ihren PC wieder ins Gehause ein ...

Страница 18: ...Monitor oder LCD Monitor analog Beispiel 1 Um den VGA Monitor oder LCD Monitor analog an die Grafikkarte anzuschlieften stecken Sie das Videosignalkabel in den 15 poligen VGA Stecker auf Ihrer Karte 15 poliger VGA Stecker Beispiel 2 Um den VGA Monitor oder LCD Monitor anaiog an Ihre Grafikkarte anzuschliefien die mit einem DVl l Ausgangsstecker versehen ist stecken Sie einen DVI I VGA Adapter in d...

Страница 19: ...Kabelstecker v U 2 2 3 Dieser Anschluss ist optional je nachdem ob die Grafikkarte einen S Video Stecker hat Oder nicht Anschluss an Video Gerate mit S Video Oder Composite In z B TV Videokassettenrecorder ...

Страница 20: ...deo Adapter leicht installieren urn die Installation zu starten Wenn die Dialogbox nicht erscheint klicken Sie doppelt Oder starten Atisetup exe im Wurzelverzeichnis der CD ROM Setzen Sie die Installation gemaft den Anweisungen auf dem Bildschirm fort 3 2 HydraVision Die Baureihe Excalibur Radeon bietet auf einer einzigen Video Karte Doppelanzeige und TV Ausgabe Die Baureihe Excalibur Radeon verwe...

Страница 21: ... 1 Klicken Sie auf Start 2 Zeigen Sie auf Einstellungen und klicken Sie dann auf Bedienungstafel 3 Klicken Sie doppelt auf Anzeige 4 Klicken Sie auf die Karteikarte Einstellungen und dann auf die Taste Erweitert 5 Klicken Sie auf die Karteikarte ATI Anzeigen 6 Der Knopf ist ROT wenn er nicht aktiv ist Wenn Sie auf den ROTEN Knopf drucken wird der TV Ausgang aktiviert Durch Klicken auf den grunen K...

Страница 22: ...usgangs Stecker an Ihrem Videokassettenrekorder Camcorder oder Anschluss Ihres Video Gerats 1 Schalten Sie Ihren Computer Videokassettenrecorder Camcorder oder Laserdiskplayer aus 2 Oberzeugen Sie sich dass die Grafikkarte richtig installiert ist 3 Machen Sie an Ihrem Videokassettenrecorder Camcorder oder Laserdiskplayer den S Video Ausgang oder Composite Ausgang ausfindig 4 Schauen Sie hinten in ...

Страница 23: ......

Страница 24: ...r une qualite video sans precedent 1 1 Apergu des fonctionnalites Elies comportent les technologies TRUFORM 2 0 SMARTSHADER 2 0 et SMOOTHVISION 2 1 et HYPER Z 111 de ATI La technologie SMARTSHADER 2 0 gere DirectX 9 0 et permet des effets d 6clairage plus complexes et realistes Des images graphiques plus nettes en 3D avec la technologie SMOOTHVISION 2 1 de ATI Une technologie TRUFORM 2 0 qui rend ...

Страница 25: ...terface 64 128 256MO de memoire DDR 64 128 bit interface Connecteurs Connecteur VGA 15 broches pour moniteur a tube cathodique connecteur S Video ou composite pour tdevision magnetoscope connecteur DVI I pour 6cran plat numerique connecteur externe DVI I VGA pour moniteur secondaire a tube cathodique Pilotes Indus Windows XP 2000 Presentation de la carte Connecteur VGA 15broches Connecteur S Video...

Страница 26: ...ede une carte d affichage existante retirez toutes les vis et I attache que possedent la plupart des emplacements slots AGP qui fixent la carte au chassis et retirez la carte en la soulevant de I emplacement OU BIEN si votre ordinateur est livre avec des fonctionnalites d affichage graphique embarqu6es il vous faudra les d sactiver Pour les details referez vous a la documentation de votre systeme ...

Страница 27: ...te et introduisez la en exercant une pression jusqu ce que la carte ait pris entierement son assise 6 Fixez la bride de montage au chassis Assurez vous que la carte est alignee correctement 7 Replacez le couvercle sur votre systeme ...

Страница 28: ...Branchement sur un moniteur VGA ou un moniteur LCD anaiogique Exemple 1 Pour brancher un moniteur VGA ou un moniteur LCD anaiogique sur votre carte graphique branchez le cable de signal vid6o sur le connecteur VGA 15 broches de votre carte Exemple 2 Pour brancher un moniteur VGA ou un moniteur LCD anaiogique sur votre carte graphique equipee d un connecteur de sortie DVI I enfichez un adaptateur D...

Страница 29: ... connecteur DVI du moniteur dans le connecteur DVI de votre carte 2 2 3 Ce branchement est une option selon que la carte possede un connecteur S video ou non Branchement sur des appareils video avec une entree S video ou composite par exemple television magnetoscope Poste de television avec prise d entree S video Poste de television avec prise d entree composite ...

Страница 30: ...o Adapter Easy Install pour commencer I installation Si la boTte de dialogue n apparaTt pas double cliquez ou faites executer Atisetup exe dans le repertoire racine du CD ROM Continuez avec I installation en suivant les instructions a I ecran 3 2 HydraVision La serie Excalibur Radeon offre la fonctionnalit6 de double affichage et une sortie television a partir d une seule carte video La serie Exca...

Страница 31: ...ste de television 1 Cliquez sur Start Demarrer 2 Mettez le curseur sur Settings Parametres puis cliquez sur Control Panel Panneau de configuration 3 Double cliquez sur Display Affichage 4 Cliquez sur I onglet Settings Parametres puis sur le bouton Advanced Avance 5 Cliquez sur I onglet ATI Displays Affichages ATI 6 Le bouton apparaitra ROUGE lorsqu il est inactif En cliquant sur le bouton ROUGE la...

Страница 32: ...ires a ceux ci Employez la sortie S VIDEO ou sortie VIDEO COMPOSITE S video donnera de meilleurs rdsultats Branchement de votre appareil video 1 Mettez votre ordinateur et votre magnetoscope camescope ou lecteur de disque laser hors tension 2 Assurez vous que votre carte graphique est installee correctement 3 Reperez la sortie S video ou la sortie composite sur votre magnetoscope camescope ou lect...

Страница 33: ......

Страница 34: ...alibgr 3500 pro kcQ 1 5 DROO L AWARD HIS EnsHburSEOP XT Turbo T2BMEJ PC WORLD Origi nal Design AWARD he Excaiibiir 9 eoo PRO IceQ 123M6 Editors Choice HIS Excall bur 9S0Q PRO ICtQ Top Product AWARDS HIS ExcalJburpgtH FRO r o STAMP OF EXCELLENCE AWARDS HIS Exealibur 9600 PRO IcaQ Editor s Choice AWARDS HIS ExcaliburSaM PRO fceO PRODUCT OF THE YEAR HIS 9TQQ PRO PRODUCT OF THE TEAR HIS 9700 PRO _ CiM...

Отзывы: