background image

6

ANTI-CODE RESTORE

After the fault has been cleared the panel may display ‘Anti-Code Restore Required’. If this occurs, observe the following 
procedure:
1.  Note down the number displayed (including the ‘G’) and call the ARC.
2.  Quote the number and record the six digit number received.
3.  Press 

x

 so that the home screen is displayed and enter the six digit number.

4.  The OK LED should stop flashing and the panel should return to normal.

USER MENU CODE CHANGE

1.  Press 

d

 then enter your user code.

2.  The screen will display ‘CHANGE CODE?,’ press 

t

3.  Press 

c

 to delete the old user code. The LCD will now display ‘CHANGE CODE?’.

4.  Press 

t

, enter your new user code and press 

t

.

ENABLING & DISABLING CHIME

If enabled on zones by the engineer, press 

c

 whilst the panel is in day mode to toggle through the three chime options. The 

current chime mode will be indicated in the bottom right corner of the LCD.

‘blank’ - chime is off

c - keypad chime

(Capital) C - keypad and speakers chime

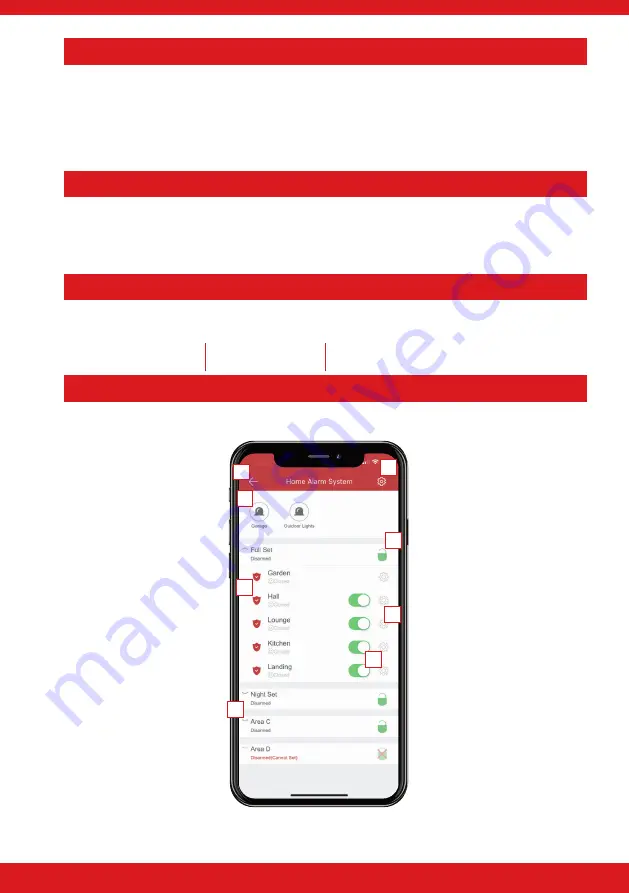
HIK-CONNECT OVERVIEW

10:09

2. PGMS

Tap the PGM to trigger it. Whilst 
triggered, the icon will turn red. 
Tap to turn off.

1. DISCONNECT FROM SYSTEM

Tap this to disconnect from the 
system and return to the 
homescreen.

4. ZONES IN AREA

Tap this to view the dropdown 
of all the zones allocated in the  
area.

3. ZONE STATUS

Displays the status of the zone 
such as open, closed, tamper or 
bypassed.

5. CONTROL PANEL SETTINGS

Tap here to view the system ID, 

change the alias, view 

history/logs and delete control 

panel.

6. ARM/DISARM PADLOCK

Displays whether the area is 

armed or disarmed. To arm the 

area, tap the padlock and once 

armed, the icon will change to a 
red closed padlock. Tap again to 

disarm the area.

8. BYPASS ZONE SLIDER

If the zone has been 

programmed so it can be 

bypassed, this is used to operate 

that function. Tap to slide on 

and off. Whilst the bar is green, 

the zone is active.

7. ZONE INFORMATION

Tap the picture of the  ‘cog’ to 

view information about the 

zone such as the areas it has 

been allocated in, the device 

location and its status.

1

2

3

4

5

6

7

8

Содержание Pyronix MX-SERIES

Страница 1: ...Document SAP 102022973 01 MX SERIES USER GUIDE GUIDA UTENTE GU A DEL USUARIO MANUEL DE L UTILISATEUR...

Страница 2: ...MARIO Dettagli dell installazione 9 Funzioni di base 9 Tastierino Portachiavi Inserimento e disinserimento da tastierino 10 Inserimento Disinserimento Esclusione di una zone 10 Visualizzazione dei reg...

Страница 3: ...18 Usuarios de desarmado especial 18 GU A DE USUARIO AMPLIADA 18 TABLE DES MATI RES Installation d taill e 19 Op ration de base 19 Pav num rique Porte cl s Armer et d sarmer partir du pav num rique 2...

Страница 4: ...y default only if enabled by the engineer t Selects and enters menus and items Starts the arming procedure x Scrolls forward though main menus and sub menus headers Move from one option to another whe...

Страница 5: ...or multiple zones 4 Press x to return to arming Please note This only bypasses the zone for this arm cycle only The next time the area is armed the zone will be active unless bypassed VIEWING THE LOGS...

Страница 6: ...c keypad chime Capital C keypad and speakers chime HIK CONNECT OVERVIEW 10 09 2 PGMS Tap the PGM to trigger it Whilst triggered the icon will turn red Tap to turn off 1 DISCONNECT FROM SYSTEM Tap thi...

Страница 7: ...k Remote Arming Blocks any attempt to arm the system remotely via upload download software Block UDL Blocks any attempt to connect to the control panel with any programming software ADDING EDITING USE...

Страница 8: ...tween 4 When finished press x Please note Once the control panel is armed and then disarmed The 24 hour zones will become active again UNABLE TO ARM If Unable To Arm is displayed it indicates that an...

Страница 9: ...nita disponibile solo se tale opzione stata abilitata dal tecnico t Selezione e accesso a menu e opzioni Avvio della procedura di inserimento x Scorrimento in avanti dei titoli dei menu principali e d...

Страница 10: ...ento Nota questa procedura permette di escludere la zona solo per il ciclo di inserimento corrente Al successivo inserimento dell area la zona sar attiva a meno che non venga di nuovo esclusa VISUALIZ...

Страница 11: ...la segnalazione acustica tastierino e altoparlanti PANORAMICA HIK CONNECT 10 09 2 PGM Toccare le uscite PGM per attivarle Durante l attivazione l icona diventa rossa Toccare di nuovo per disattivarle...

Страница 12: ...lle sirene Consente il test di tutte le uscite PGM programmate come uscite di sirene esterne Accesso al menu del tecnico Consente e blocca l accesso al menu del tecnico Verifica credito Permette di ve...

Страница 13: ...l indicazione ESCLUDERE ZONE quindi premere t 3 Inserire la zona 24 ore da escludere quindi premere t In caso di esclusione di pi zone inserirle una alla volta e premere t tra l una e l altra 4 Al te...

Страница 14: ...ado t Selecciona y accede a men s y elementos Inicia el procedimiento de armado x Se desplaza hacia adelante a trav s de los encabezados de men s principales y men s secundarios Se mueve de una opci n...

Страница 15: ...se vaya a anular y pulse t repita para m s zonas 4 Pulse x para regresar al armado Tenga en cuenta esto anula solamente la zona para este ciclo de armado La pr xima vez que se arme el rea la zona est...

Страница 16: ...tono est desactivado c tono de teclado may scula C tono de teclado y altavoces ESQUEMA DE HIK CONNECT 10 09 2 PGMS Pulse en el PGM para activarlo Si est activado el icono estar en rojo P lselo para de...

Страница 17: ...tivas del sistema Prueba de sirena Prueba todos los PGM programados como salida de sirena externa Autorizar men de ingeniero Autoriza y bloquea el acceso al men de ingeniero Comprobar saldo Comprueba...

Страница 18: ...asta que en la pantalla aparezca ANULAR ZONAS y pulse t 3 Introduzca la zona de 24 horas que se vaya a anular y pulse t Si se van a anular varias zonas introd zcalas una a una pulsando t despu s de ca...

Страница 19: ...activ e par le technicien t Pour s lectionner et acc der aux menus et aux l ments de menu Pour d marrer la proc dure d armement x Pour faire d filer les en t tes des menus principaux et des sous menus...

Страница 20: ...ur la touche x pour revenir l armement Remarque cette op ration ne suspend la zone que pour ce cycle d armement uniquement La prochaine fois que le secteur sera arm la zone sera active moins qu elle s...

Страница 21: ...au niveau du pav num rique et des haut parleurs VUE D ENSEMBLE DU SERVICE HIK CONNECT 10 09 2 SORTIES PROGRAMMABLES PGM Appuyez ici pour activer la sortie programmable L ic ne est rouge tant que la so...

Страница 22: ...ties programmables PGM programm es comme sorties de sir ne externe Acc s au menu du technicien Pour autoriser et bloquer l acc s au menu du technicien V rifier le cr dit Pour v rifier le cr dit sur un...

Страница 23: ...sable principal 2 Appuyez sur la touche x tant que l cran LCD n affiche pas SUSPENDRE DES ZONES puis appuyez sur la touche t 3 Saisissez la zone 24 heures suspendre puis appuyez sur la touche t Si plu...

Страница 24: ......

Отзывы: