background image

Chapter 4 Manage Keyboard

4.1 Manage Device

4.1.1 Add and Edit Device

Add Device Manually

You can add devices manually by inputting device parameters. Up to 8,000 devices can be added by

the admin.
Steps

1. Click Keyboard.

2. Click   .

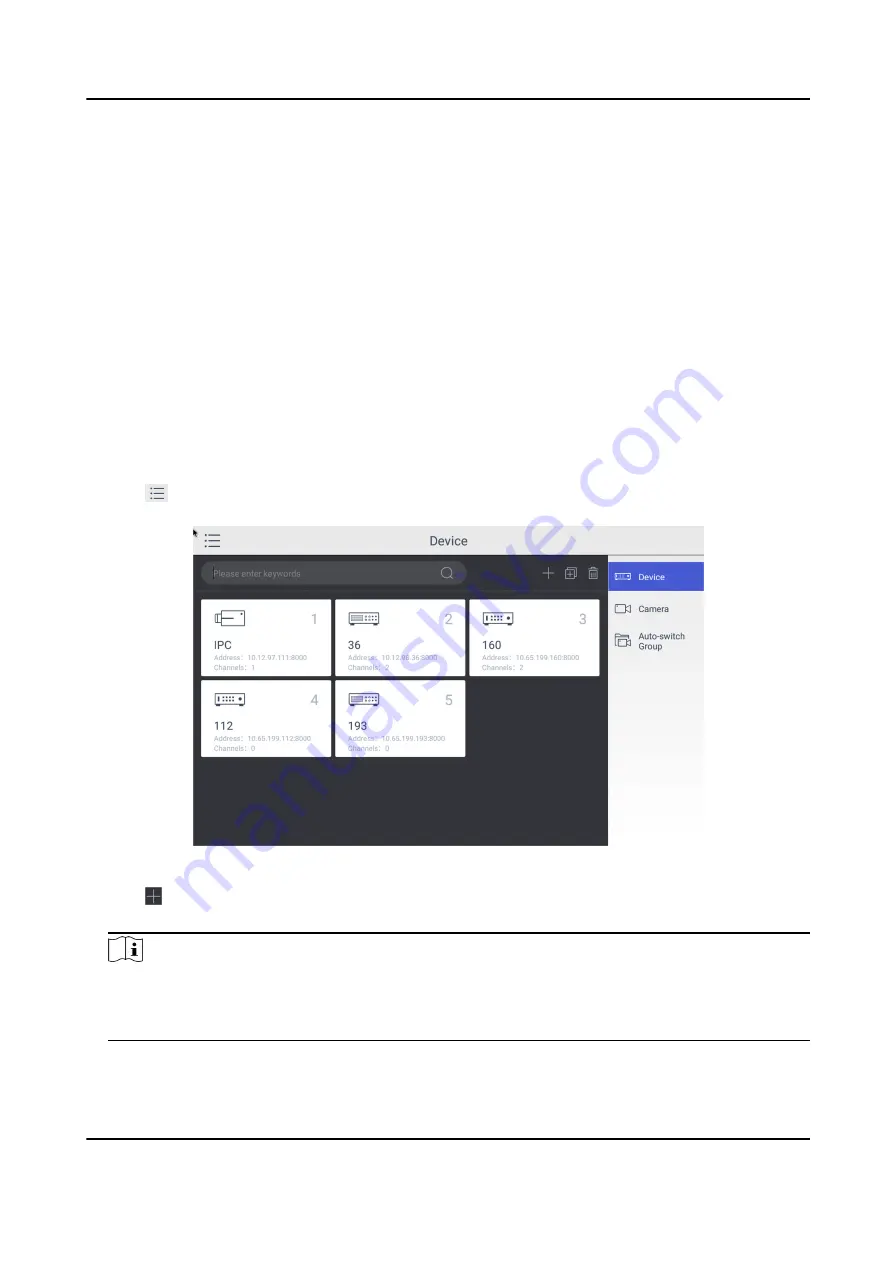
3. Click Device.

Figure 4-1 Device Management Interface of the Admin

4. Click   to enter the Add Device interface.

5. Input device parameters including NameAddressPortUser NamePassword, and Protocol.

Note

• It will keep using the original device name if you leave Device Name empty.

• In Protocol, you can select Default for same brand devices, or select ONVIF for devices from

other manufacturers.

DS-1600KI Keyboard Quick Start Guide

7

Содержание DS-1600KI

Страница 1: ...DS 1600KI Keyboard Quick Start Guide ...

Страница 2: ...VENT WILL HIKVISION BE LIABLE TO YOU FOR ANY SPECIAL CONSEQUENTIAL INCIDENTAL OR INDIRECT DAMAGES INCLUDING AMONG OTHERS DAMAGES FOR LOSS OF BUSINESS PROFITS BUSINESS INTERRUPTION OR LOSS OF DATA CORRUPTION OF SYSTEMS OR LOSS OF DOCUMENTATION WHETHER BASED ON BREACH OF CONTRACT TORT INCLUDING NEGLIGENCE PRODUCT LIABILITY OR OTHERWISE IN CONNECTION WITH THE USE OF THE PRODUCT EVEN IF HIKVISION HAS ...

Страница 3: ...IVITIES IN THE CONTEXT RELATED TO ANY NUCLEAR EXPLOSIVE OR UNSAFE NUCLEAR FUEL CYCLE OR IN SUPPORT OF HUMAN RIGHTS ABUSES IN THE EVENT OF ANY CONFLICTS BETWEEN THIS MANUAL AND THE APPLICABLE LAW THE LATER PREVAILS DS 1600KI Keyboard Quick Start Guide ii ...

Страница 4: ...Access Documentation Visit official website www hikvision com for user manual application SDK document etc Scan the following QR code to get more information about the operations of DS 1600KI network keyboard Symbol Conventions The symbols that may be found in this document are defined as follows DS 1600KI Keyboard Quick Start Guide iii ...

Страница 5: ...e make sure that the plug is firmly connected to the power socket If smoke odor or noise rise from the device turn off the power at once and unplug the power cable and then please contact the service center Caution Ensure unit is installed in a well ventilated dust free environment Unit is designed for indoor use only Keep all liquids away from the device Ensure environmental conditions meet facto...

Страница 6: ...meras 11 4 1 3 Manage Auto switch Group 13 4 2 Live View on Screen 15 4 2 1 View Video with Keyboard 15 4 2 2 PTZ Control 16 4 2 3 Play Video on Video Wall 17 4 2 4 Save Current Video Wall Settings as a Scene 18 4 2 5 Video Wall Playback 18 4 3 Video Playback 19 4 4 Control DVR 20 4 5 Manage User 23 4 5 1 Add New Users with Admin Account 23 4 5 2 Edit User Accounts by Administrator 24 Chapter 5 Co...

Страница 7: ... 3 Local Live View 27 5 1 4 Video Wall Playback 28 5 2 Control HikCentral 29 5 2 1 Login 29 5 2 2 Display a Camera on Video Wall 30 5 2 3 Local Live View 31 5 2 4 Video Wall Playback 33 5 3 Control KPS 34 DS 1600KI Keyboard Quick Start Guide vi ...

Страница 8: ...ding 4 ch at 1080p resolution Up to 16 division window display Supports H 265 H 264 encoding format Live view on touchscreen DVI and HDMI outputs to monitor Local playback of video Accessible to private products including DVR DVS NVR network camera speed dome etc Control of decoders for video decoding and output on video wall Accessible by platforms and matrix access gateway Supports video wall co...

Страница 9: ...oard Appearance Description Number Name Description 1 Touchscreen 10 1 capacitive touchscreen for display configuration and operation of the keyboard 2 Joystick Used for PTZ control 3 Capture Button Used for picture capture Refer to the following table for description of joystick operations Table 1 2 Joystick Operation Description Operation Function Up PTZ control mode Move the PTZ up Down PTZ con...

Страница 10: ...n are provided on the rear panel of DS 1600KI keyboard Figure 1 2 Rear Panel of DS 1600KI Refer to the following table for description of the interfaces Table 1 3 Description of Interfaces Number Name Description 1 USB Interface One for connecting to the USB device One for connecting to the joystick 2 3 DVI DVI video output connector 4 HDMI HDMI video output connector 5 LINE IN 3 5 mm connector fo...

Страница 11: ...10M 100M 1000M adaptive Ethernet interface 8 Power Input 12 VDC power input 9 Power Switch Press to wake up the touchscreen or turn the keyboard into sleeping mode Hold for 3 s to power on off or reboot the device DS 1600KI Keyboard Quick Start Guide 4 ...

Страница 12: ...password Caution STRONG PASSWORD RECOMMENDED We highly recommend you create a strong password of your own choosing using a minimum of 8 characters including upper case letters lower case letters numbers and special characters in order to increase the security of your product And we recommend you reset your password regularly especially in the high security system resetting the password monthly or ...

Страница 13: ...d dynamically 3 2 Set Wireless Network The keyboard has Wi Fi module that can connect to wireless network Before You Start A Wi Fi network must be appropriately configured Steps 1 Click on the home page and choose WLAN 2 Switch on WLAN to enable automatic acquisition of WLAN information You can obtain Wi Fi information nearby or enter Wi Fi information manually to add network 3 Connect to an exist...

Страница 14: ...k 3 Click Device Figure 4 1 Device Management Interface of the Admin 4 Click to enter the Add Device interface 5 Input device parameters including Name Address Port User Name Password and Protocol Note It will keep using the original device name if you leave Device Name empty In Protocol you can select Default for same brand devices or select ONVIF for devices from other manufacturers DS 1600KI Ke...

Страница 15: ...by Searching Online Devices You can also add devices by online searching Steps 1 Click Keyboard 2 Click 3 Click Device 4 Click to enter Auto Search interface All online devices in the same network segment will be displayed in the list DS 1600KI Keyboard Quick Start Guide 8 ...

Страница 16: ...e information from USB flash drive Before You Start You need a USB flash drive to import devices Make sure you have added at least one device Steps 1 Click Keyboard 2 Click 3 Click Camera 4 Optional If you don t know the import file format you can export a file to find out 1 Click 2 Enter the admin password 3 Select a file where you want to export 4 Click Export to export the excel file 5 Edit the...

Страница 17: ... address keywords or name Steps 1 Click Keyboard 2 Click 3 Click Device 4 You can input device ID IP address keywords or name in the text field to search device 5 Click Figure 4 4 Search Device Edit Device Property You can view and edit details of the added devices in Device interface Before You Start Ensure you have at least added one device Steps 1 Click Keyboard 2 Click DS 1600KI Keyboard Quick...

Страница 18: ...Password are editable Figure 4 5 Edit the Device 6 Click Save to confirm the modification 4 1 2 Manage Connected Cameras You can view and edit connected camera information Before You Start Ensure you have added at least one camera and logged in the admin user account Steps 1 Click Keyboard 2 Click 3 Click Device Camera DS 1600KI Keyboard Quick Start Guide 11 ...

Страница 19: ...pe Device The device name Address The IP address and port of the corresponding device Channel No The channel number of added camera Figure 4 6 Camera Management Interface 5 Modify the camera details Only Name Channel ID Protocol and Stream are editable Note The range of Channel ID is from 1 to 99999999 and the ID cannot be repeated 6 Click Save to finish modification DS 1600KI Keyboard Quick Start...

Страница 20: ...oup 4 Click 5 Enter the group parameters Figure 4 7 Create a New Group Name Enter the group name as desired Special characters including are not allowed and the length cannot exceed 32 characters No Enter the group number as desired The range is from 1 to 16 and it cannot be repeated Up to 64 cameras can be added in each group no more than 16 groups can be added Time Enter the cycle dwell time for...

Страница 21: ...uto switch group Edit Auto switch Group You can view and modify auto switch group details in Auto switch Group interface Before You Start Ensure you have groups added Steps 1 Click Keyboard 2 Click 3 Click Device Auto switch Group 4 Click on the added group DS 1600KI Keyboard Quick Start Guide 14 ...

Страница 22: ...ision mode 5 Select a display window 6 Select a camera to display by two selectable ways In keyboard panel Enter the serial number in the numeric panel and click or to play the live video of corresponding camera or camera group on the window In the list a Click List or Group b Select a camera or group from the list to play Note Up to 16 cameras can be selected for live view at the same time For gr...

Страница 23: ...ect network connection between PC running FTP server and the keyboard and set the FTP parameters of keyboard correctly Refer to Set Storage for FTP configuration Figure 4 10 Live View 4 2 2 PTZ Control You can click in the live view mode to achieve PTZ control operation The PTZ control should be supported by the added device Set and Call a Preset A preset is a predefined image position which conta...

Страница 24: ... it Note Up to 8 pre defined patrols can be called Set and Call a Pattern You can record the pan tilt movements and zoom control of the PTZ camera and call the pattern Steps 1 Tap Pattern in the PTZ control panel 2 Tap to start recording path of the desired pattern 3 Use the joystick and other buttons to control the PTZ movement including pan tilt movements zoom and focus control auto scanning etc...

Страница 25: ...TZ Control for specifications 8 Optional You can achieve functions such as capture picture record video and refresh display interface by clicking 4 2 4 Save Current Video Wall Settings as a Scene You can save your current video wall settings as a scene Steps 1 Click Keyboard 2 Click 3 Click Video Wall 4 Select a display window on the configured video wall layout 5 Click to expand the toolbar 6 Cli...

Страница 26: ...el of the selected window must be from a decoding device 8 Drag the slider to set required playback time 9 Use the toolbar to perform playback operations including stop playing video start pause playing video slow forward speed and fast forward speed 4 3 Video Playback The videos stored in the encoding device within 24 hours can be played back on the keyboard Steps 1 Click Keyboard 2 Click 3 Click...

Страница 27: ...nd fast forward speed Note To control the play speed you can also move joysticks left or right to slow or fast forward the video respectively 4 4 Control DVR The keyboard can operate the added DVR NVR and achieve PTZ control operation Steps 1 Click Keyboard 2 Click 3 Click Operate DVR 4 Select the NVR DVR from the right list as you desired 5 Apply the buttons on the control panel to achieve DVR NV...

Страница 28: ...can switch on Enable PTZ to achieve functions such as PTZ control iris control focus wiper light etc Note Ensure the device that connects to DVR NVR device supports PTZ control operation Figure 4 14 Enable PTZ DS 1600KI Keyboard Quick Start Guide 21 ...

Страница 29: ...text fields it also deletes the character in front of the cursor Checks the checkbox in the checkbox fields Adjusts the iris of the camera in PTZ control mode Generates video clips for backup in playback mode Enters exits the folder of USB device and eSATA HDD MAIN SPOT ZOOM Switches between main and spot output Zooms out the image in PTZ control mode F1 LIGHT Selects all items on the list when us...

Страница 30: ...and change your own password Steps 1 Click Keyboard 2 Click 3 Click User 4 Click to add new user 5 Enter the user name and password Caution STRONG PASSWORD RECOMMENDED We highly recommend you create a strong password of your own choosing using a minimum of 8 characters including upper case letters lower case letters numbers and special characters in order to increase the security of your product A...

Страница 31: ...d of other operator accounts Before You Start Make sure you log in with the admin account Steps 1 Click Keyboard 2 Click 3 Click User 4 Select a user account as you desired 5 You can change password or assign device permission to the user account Edit password a Click Edit b Enter new password twice c Click Save to confirm Edit device permission a Click Device b Select device permission for the ac...

Страница 32: ...e keyboard to iSecure platform to play live video on video wall watch live video or watch video playback on the local keyboard interface 5 1 1 Login Steps 1 Tap iSecure on the main page 2 Tap IP Configuration 3 Select HTTP or HTTPS mode enter the server s IP Address and tap Confirm Figure 5 1 IP Configuration 4 Enter the server s user name and password DS 1600KI Keyboard Quick Start Guide 25 ...

Страница 33: ...corner and select Video Wall and select the video wall that you want to configure All video wall resources from the platform will be listed in Video Wall Figure 5 3 Video Wall 3 Optional Tap to select desired scene from Scene list 4 Optional Tap and select Split to split the output window 5 Tap to play the live video of corresponding camera on the window You can choose one of the following ways DS...

Страница 34: ...e smart scaling function to select and zoom in the desired wall area For details about the operation see Smart Scaling on Video Wall Tap to perform PTZ control For details see PTZ Control for specifications 5 1 3 Local Live View Steps 1 Tap and select Live View to go to the local live view Figure 5 4 Live View 2 Optional Tap to select the window division mode Note You can also preview the window f...

Страница 35: ...ure to save pictures to a USB flash drive or FTP server Note You can also press the button on the joystick to capture pictures Record Select a window and tap Record to save records to a USB flash drive or FTP server View Tap View to view parameters of the camera on live view Note If you perform operations of capturing pictures or recording videos make sure to connect the keyboard with a USB flash ...

Страница 36: ...nd play from the start time by default 6 Use the toolbar to perform playback operations Icon Description Pause Start Stop 5 2 Control HikCentral You can connect the keyboard to HikCentral platform to play live videos on the video wall watch video playback or watch live video locally 5 2 1 Login Steps 1 Tap HikCentral on the main page 2 Tap IP Configuration 3 Select HTTP or HTTPS mode enter the ser...

Страница 37: ... enter password next time 6 Tap Login 5 2 2 Display a Camera on Video Wall Steps 1 Tap HikCentral on the iSecure main page and select Video Wall 2 Tap in the upper right corner and select Wall and select the video wall that you want to configure All video wall resources from the platform will be listed in Wall DS 1600KI Keyboard Quick Start Guide 30 ...

Страница 38: ...corresponding camera on the window Tap to preview the live video of the previous input camera channel on the selected output monitor Tap to preview the live video of the next input camera channel on the selected output monitor 6 Other operations Select a non BNC window tap and select Open to open a new window above non roaming windows Tap to perform PTZ control For details see PTZ Control for spec...

Страница 39: ... to stop previewing Tap to preview the live video of the previous input camera channel on the selected output monitor Tap to preview the live video of the next input camera channel on the selected output monitor 6 Optional Tap to close all the live view windows You can tap to perform the following operations Icon Description Full Tap Full to have a full screen preview of the live video of correspo...

Страница 40: ...server and the keyboard and set the FTP parameters of keyboard correctly Refer to Set Storage for FTP configuration 5 2 4 Video Wall Playback Steps 1 Tap in the upper right corner to watch video wall playback Figure 5 10 Video Wall Playback 2 Select the date 3 Select the channel You can choose one of the following ways Tap Shortcut and enter the serial number in the numeric panel and tap Tap List ...

Страница 41: ...latform 3 Click Login to enter the platform interface Note You can check Remember Password to remember the login password in next time Figure 5 11 Platform Management 4 Click in the upper right corner and select Video Wall and select the video wall that you want to configure Note All video wall resources from the platform will be listed in Video Wall 5 Click Shortcut enter the serial number of win...

Страница 42: ...List 7 Optional Click or to preview the live video of the previous or next input camera channel on the selected output monitor 8 Optional Click to select desired scene from Scene list 9 Optional Click to split the output window 10 Optional Click to perform PTZ control For details see PTZ Control for specifications DS 1600KI Keyboard Quick Start Guide 35 ...

Страница 43: ...UD17856B ...

Отзывы: