Hi Sharp HS-ML22M1 Скачать руководство пользователя страница 1

Thank you for purchasing our product. 

Please read this User’s Manual before 

using the product. Change without notice 


22” 

Mouse Control LCD Monitor 

for CCTV


                                                                                                          User’s Manual 


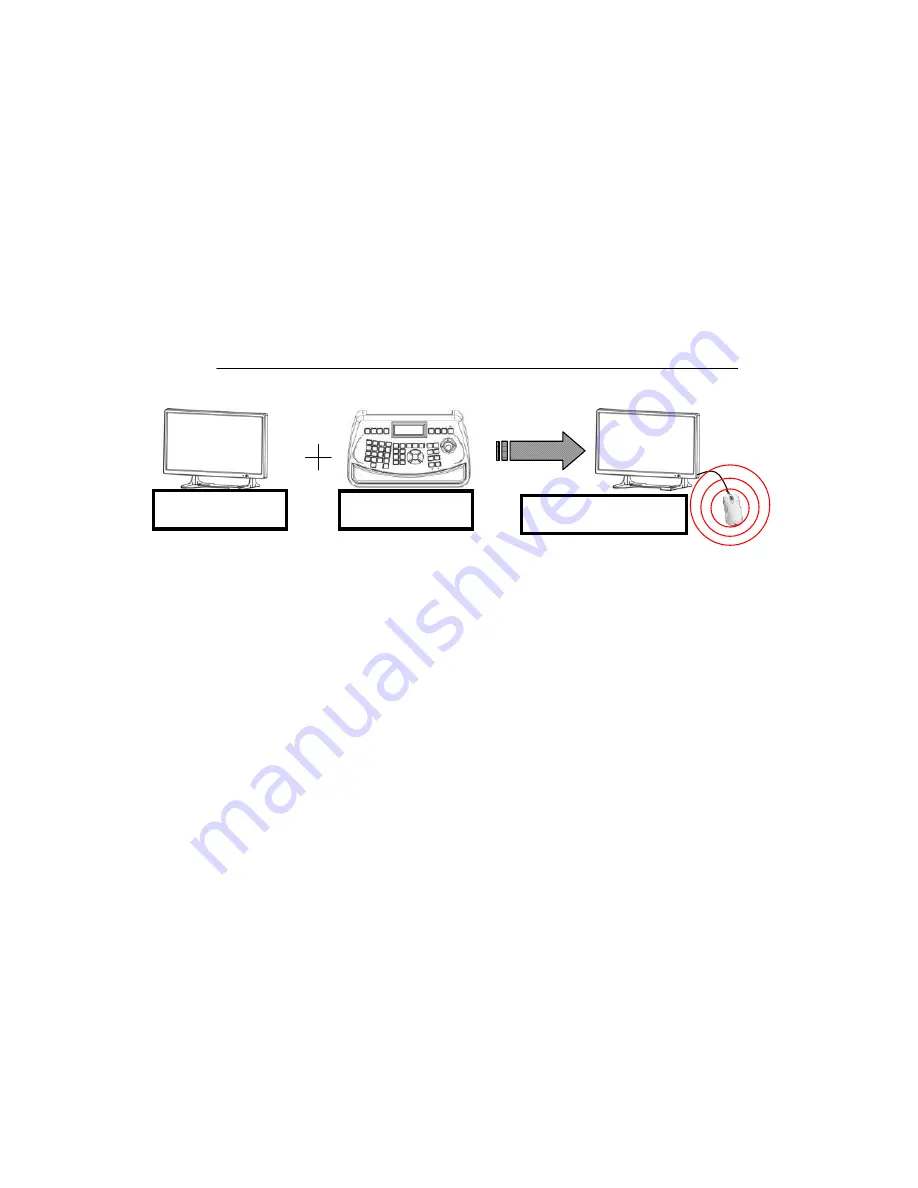
This Powerful equipment provides the GUI to direct control the speed dome, DVR, and 

matrix functions, therefore the 

Mouse control monitor

 will act as a control center to remote 

control all of your devices in CCTV system, just by an unsophisticated USB mouse and friendly 

GUI operation! 


Accessories 

(a) Power cord   


x1 

(b) Adapter                             x1 

(c) User Manual  


x1 

(d) Bracket 

                  x1 

(e) Remote controller      x1 

(f) RS-485 cable       

x1 

(g) USB extension cord  x1 

(h) USB optical mouse   x1 


22’’ LCD Monitor 

Keyboard 

Mouse control monitor


Содержание HS-ML22M1

Страница 1: ...the speed dome DVR and matrix functions therefore the Mouse control monitor will act as a control center to remote control all of your devices in CCTV system just by an unsophisticated USB mouse and f...

Страница 2: ...arnings indicated on the unit itself as well as the safety suggestions listed below Keep them handy for future reference 1 Power source The unit operates on DC12V 5A of power 2 Power cord protection A...

Страница 3: ...ly or exhibits a marked change in performance or The unit has been dropped or the enclosure damaged 9 Replacement Parts Use only manufacturer specified parts Unauthorized substitutions may result in f...

Страница 4: ...1 4 1 Matrix mode 12 5 OSD illustration 13 5 1 Catalog of GUI symbol guidance 13 5 1 1 Root menu 13 5 1 2 LCD menu 13 5 1 3 Camera menu 14 5 1 4 DVR1 DVR2 with CAM ID mapping table 14 5 1 5 DVR menu 1...

Страница 5: ...050 75Hz Pelco P D protocol supported Tiny 1W 2 speaker Provides the Key Lock function to protect your all of setting PIP and Side by Side scale mode at your preference Selectable 6500 K and 9300 K co...

Страница 6: ...nt 4 Down Button Use this button to select the menu item and adjust the item decrement 5 Source Button Source The button use to select input source while the all of OSD is off 6 Select Button AUTO Use...

Страница 7: ...irect to select the DVI source input 11 MUTE Audio mute 12 VOLUME Adjust the volume down 13 VOLUME Adjust the volume up 14 DISPLAY Displays the source information 15 5 Use this button to select the me...

Страница 8: ...8 1 4 OSD message description Confirm OSD No Signal input OSD CDS Power off OSD Going to sleeping mode OSD VGA auto adjusting OSD Signal out of range OSD Volume adjustment OSD...

Страница 9: ...trol To increase the value of the selected item within the OSD area while the OSD appears z Scroll down Zoom out for speed dome control To decrease the value of the selected item within the OSD area w...

Страница 10: ...2 loop output Audio Audio 2 input 6 Port 1 Port 2 remote control socket A socket of Ctrl mode RS 485 Protocol with RJ 11 connector DVR mode PTZ Camera connect to port 1 DVR connect to port 2 Matrix m...

Страница 11: ...Port2 is suitable Notice DVR ID and CAM ID have tightly relative mapping Refer to section 5 1 4 DVR1 DVR2 with CAM ID mapping table 2 Hardware setup Caution DVR mode must be includes DVR and Camera S...

Страница 12: ...P T Z Dome up to 256 DVR up to 16 Multi user can view and control each camera P T Z Dome DVR via each monitor at different place RS 485 RJ 11 pin define 3 2 Notice User please follows the above instal...

Страница 13: ...13 5 1 Catalog of GUI symbol guidance 5 1 1 Root menu a DVR Mode b Matrix Mode 5 1 2 LCD menu a Adjustment page b Advanced page 5 OSD illustration...

Страница 14: ...DVR channel capacity Status board Left site is show command explanation Right site is show key in number by virtual keyboard 5 1 4 DVR1 DVR2 with CAM ID mapping table DVR 1 Ch CAM ID 0 Ch 4 Ch 8Ch 16...

Страница 15: ...15 5 1 5 DVR Menu a HS_TYPE A b HS_TYPE B c HS_TYPE C v DVR Protocol Model Appearance Remark HS TYP A HS TYP B HS TYP C...

Страница 16: ...H Position Adjustment V Position Adjustment Video Setting Cam Mode On Off Brightness Adjustment Contrast Adjustment Clock VGA only Adjustment Phase VGA only Adjustment H Position VGA only Adjustment...

Страница 17: ...DVI Aspect Ratio Full 4 3 Color Temperature 6500 9300 Channel Display On Off Key Lock On Off CDS Control On Off Power Off Level 0 100 Lx Power On Level 200 500 Lx Mouse Main Button Left Right Control...

Страница 18: ...uage select English Chinese Brightness 0 100 90 Adjust Brightness value Contrast 0 100 90 Adjust Contrast value Saturation 0 100 50 Adjust saturation intensity of the color value Tint 50 50 0 Adjust t...

Страница 19: ...ction 2 types Off Auto source detection On Off PWR On Opt 6 types Off Power On source select Off AV1 AV2 S Video VGA DVI Aspect Ratio 2 types Full Aspect Ratio select Full wide screen or 4 3 Color Tem...

Страница 20: ...off or not If you want to deactivate this function immediately just press POWER key Main Key 2 types Left Mouse Main Key Left Right key DVR 0 4 8 16 0 DVR number of channel Advanced Button N A Switch...

Страница 21: ...on REW N A Rewind FF N A Fast Forward Alarm N A Entry Alarm menu Set up N A Entry Setup menu Backup N A Entry Backup menu Spot N A Entry Spot Monitor setting menu Step N A Step in playback mode Step N...

Страница 22: ...e check your setting is manual Iris Close N A Execute iris close function PS If it doesn t work please check your setting is manual Iris Open N A Execute iris open function PS If it doesn t work pleas...

Страница 23: ...Monitor number you want to see Sequential Start N A Enable sequential jump function by Matrix setting Sequential Stop N A Stop sequential jump function Relay On 2 types Enable External Output Relay c...

Страница 24: ...operation menu Common Icon Close N A Close current page or menu Hand N A Select function is available Busy N A System busy and wait a moment Mouse N A Indicate where you are PT center N A Indicate Pa...

Страница 25: ...then select CAM Setting in full screen The control interface is shown as Fig PTZ_A b Click the mouse Middle button Scroll button then select CAM Setting in full screen The control interface is shown...

Страница 26: ...release the button to deactivate it z IRIS Close Push the mouse main button on the Iris close icon to activate the iris close control and then release the button to deactivate it z IRIS Open Push the...

Страница 27: ...p for twice command process successfully If you want to call this shortcut function just click it or you want to reset your commands please dial your command number then click this button again Some c...

Страница 28: ...R operation enviroment a Click the mouse Right button there mouse main key is Left then select DVR Setting in full screen The control interface is shown as Fig DVR_A b Click the mouse Right button the...

Страница 29: ...Zoom icon Menu Control Click the mouse main button on the Menu icon to pop up the DVR OSD and control the OSD by the virtual keypad Esc Enter Up Down Left Right Freeze Click the mouse main button on...

Страница 30: ...Click the mouse main button on the Time Search icon DVR Pop up Menu control it by the Virtual Keypad SEL click the mouse main button on the SEL icon Audio Click the mouse main button on the Audio icon...

Страница 31: ...ft then select Matrix Setting in full screen b You should login your Matrix first and default password is 12121212 reference by virtual keyboard c Start your Matrix application all functions have list...

Страница 32: ...Format Compatible NTSC PAL Input Signal 1Vp p composite video Input Impedance 75 ohm Output Impedance 75 ohm Auto Termination VGA DVI Up to 1680 x 1050 75Hz Protocol Pelco P D Hisharp Protocol PIP POP...

Страница 33: ...evice should be the same both Check DVR ID setting RS 485 its DVR ID should be the same as Mouse control monitor setting Check DVR name setting with Mouse control monitor its DVR number corresponding...

Страница 34: ...s well check your DVR user manual and entry its menu to confirm all setting is correct Matrix control No action Check cable connections video out connect to Mouse control monitor video in remote contr...

Страница 35: ...luster 2 Mouse control monitor RS 485 Port1 PTZ Cluster 2 video out DVR2 video in PTZ Cluster 2 RS 485 twist together with PTZ Cluster 1 Mouse control monitor RS 485 Port1 DVR1 video out Mouse control...

Страница 36: ...ng a Call root menu to click Setting Wizard whether Control mode is DVR or Matrix mode b Wizard page1 could easily select language Control Mode and Main key Wizard page2 could easily select Speed dome...

Страница 37: ...When you want to change DVR or Speed dome screen please key Remote ID first then click DVR or Speed dome icon Select DVR ID and call DVR Ex DVR ID is 1 your command sequence should click num 1 then pr...

Страница 38: ...n 9Ch 9Ch Split Screen 16Ch 16Ch Split Screen Zoom Zoom in out Play Playback Stop Stop Record Record Freeze Freeze Screen Sequential Screen jump by timing control Menu Entry Menu function REW Rewind F...

Страница 39: ...eed dome Speed Dome function Icon Mode Notice Zoom in Execute zoom in function Zoom Out Execute zoom out function Focus Far Execute focus far function PS If it doesn t work please check your setting i...

Страница 40: ...eed function PS If it doesn t work please check your device is support PTZ Preset Function ID corresponding table reference Preset ID ID Call 76 Start auto pan 92 Set line scan left stop 93 Set line s...

Отзывы: