SETTING UP THE
4006F17 & 4007F17
1) Prepare a suitable location for your new fountain. Set its
basin on that location with the power cord notch at
bottom facing your power supply. Once
positioned, now stand the basin up on one
side with the cord exit facing up.
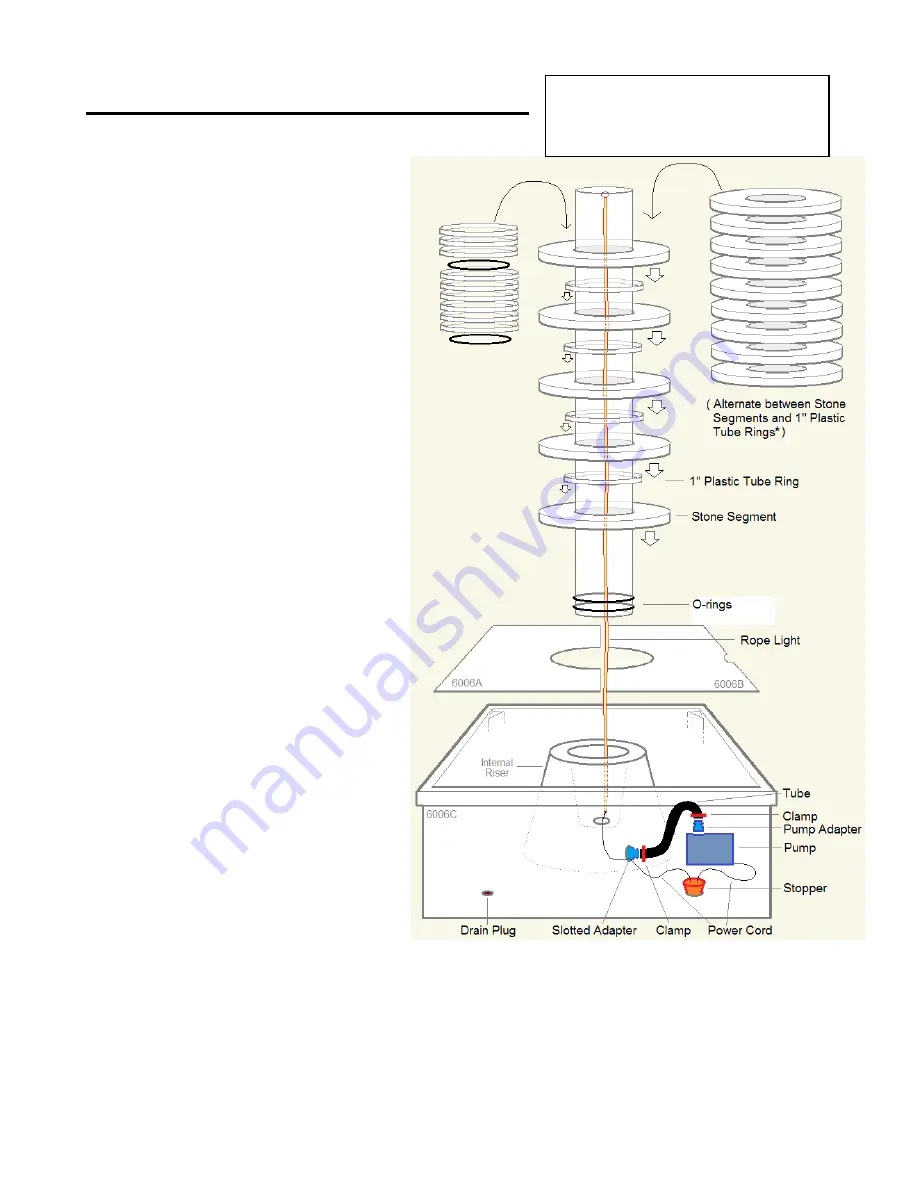
2) From underneath, push the Rope Light
up through the large hole in the basin’s floor
and into the hole in the side of the basin’s
interior riser. Continue to push the Rope
Light until it can be grasped above the top
opening of the riser section. The gently pull
the Rope Light all the way through the riser,
stopping once the thin, black power cord
begins to pull out of the top as well.
3) Find the plastic barbed adapter which has
a slot cut along one side. Hole it close to the
internal riser and push the light’s thin power
cord into the slot. Then carefully thread this
adapter into the side of the internal riser.
4) Set the pump inside the basin and push its
power cord through the same hole in the
basin floor. Open the slit in the rubber
stopper and place both power cords in the
provided slots. Close the stopper and push it
firmly into the basin floor’s hole. Gather the
power cords from under the basin, holding
them toward the basin’s power cord notch,
and tip the basin back down. The square rope
light controller box needs to be treated gently
and positioned outside the edge of the basin.
Make sure the basin is sitting firm and level.
5) Roll two of the large o-rings onto one
end of the 4’ long 4” wide clear tube. They
should be spaced about 1” from each other,
with one of them within ½” of the tube end.
Push the top of the rope light into the tube
(starting by the o-rings). Once your fountain is
running, the rope light will be buoyant and will stay in place without effort). Hold the tube vertical and
push it down into the basin’s internal riser. The o-rings should help it fit straight and watertight.
(If the o-
rings are still visible above the internal riser they will not provide a water tight seal. Pull tube out, reset o-rings, and insert
again until o-rings are below the top of the internal riser.)
Use a shim if needed to make it perfectly vertical.
(You may find 2 extra o-rings in your kit. If so, they will be slightly smaller than the others. If you are unable to push the
tube all the way down in the basin’s internal riser, use these smaller o-rings instead and the tube will push down easier.)
Make sure to place your fountain on a firm
area which will not settle. Note: Always
follow local electrical codes and use a
110V GFCI protected outlet.


