


27
6
6))
Display shows “VAT EMPTY” “YES NO”. Verify that vat is empty, and press “✓”
button.
7
7))
Display shows “CLEAR OLD OIL FROM OIL LINES” “✓=PUMP” “X=DONE”.
Press and hold “✓” button for a few seconds to clear old oil from lines. Once
cleared, press “X” button.
8
8))
Display shows “CLN VAT COMPLETE” “YES NO”. Once vat is clean, press “✓”
button and display shows “CLOSE DRAIN”. Push in the drain knob.
9
9))
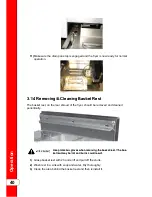
Display shows “MANUAL FILL VAT”, followed by “IS POT FILLED?” “YES NO”.
Fill vat to the lower indicator line on the rear of vat. See
. Press “✓” button and fryer returns to normal operation.
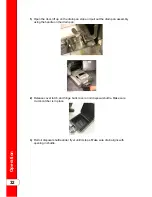
1
10
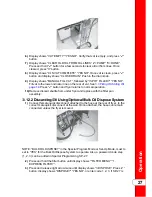
0))
Remove discard shuttle from under fryer and replace with the filter pan
assembly.
3
3..1
12
2..2
2 D
Diisscca
arrd
diin
ng
g O
Oiill U
Ussiin
ng
g O
Op
pttiio
on
na
all B
Bu
ullkk O
Oiill D
Diissp
po
osse
e S
Syysstte
em
m
1
1))
Connect female quick disconnect attached to the hose at the rear of fryer, to the
correct male quick disconnect at the wall. Once attached, the hose can remain
connected unless the fryer is moved.
NOTE: “BULK OIL DISPOSE?” in the Special Program Mode or Set-Up Mode, must to
set to “YES” for the Bulk Oil Dispose System to operate. Also, a password code step
(1, 2, 3) can be added in Special Programming, SP-27.
2
2))
Press and hold the filter button until display shows “*FILTER MENU*” “1.
EXPRESS FILTER?”.
3
3))
Press and release right arrow twice until display shows “3.DISPOSE”. Press “✓”
button; display shows “DISPOSE?” “YES NO”, or enter code 1, 2, 3, if SP-27 is
Содержание Wendy's Evolution Elite EEG-251
Страница 2: ......
Страница 5: ...Contents iii...
Страница 14: ...Introduction 2...
Страница 19: ...Installation 7 Figure 2 1 Flexible Gas Line Cable Restraint Installation...
Страница 22: ...Figure 2 2 1 Well Dimensions Figure 2 3 2 Well Dimensions Installation 10...
Страница 23: ...Figure 2 4 3 Well Dimensions Figure 2 5 4 Well Dimensions Installation 11...
Страница 24: ...Installation 12...
Страница 51: ...Operation 37...
Страница 62: ...Operation 48...
Страница 68: ...Information Mode 54...
Страница 72: ...Product Program Mode 58...
Страница 87: ...Troubleshooting 73...
Страница 88: ...Troubleshooting 74...
Страница 89: ...blank page...


