

HELTUN FAN COIL THERMOSTAT
HE-ZW-THERM-FC1 USER MANUAL V1.0
OVERVIEW
The HELTUN fan coil thermostat is a programmable electronic room heating/cooling
thermostat designed for flush mounting into most standard wall boxes. It maintains a
constant ambient temperature using internal air temperature sensor.
It is recommended for the control of air conditioning systems such as split and multi-split
systems, systems with chillers and fan coil units, central air conditioning systems, multi-zone
VRF / VRV air conditioning systems, etc. The fan speed is controlled by three relay outputs
and two more relay outputs are for the control of cooling and heating valves. The thermostat
has two independent inputs for relay channels which allow it to control fan and valves with
different power sources or to use relay outputs as dry contacts. Each relay can be loaded up
to 5A.
The thermostat has an LCD screen with auto or manual adjustable brightness, six sensitive
capacitive touch control buttons and internal air temperature, humidity and light sensors. The
thermostat is also equipped with software energy consumption logic.
The device has an integrated 5th generation secure Z-Wave Plus module which allows the
use of the device with Z-Wave Home Automation system. Non secure, S0 secure, S2
unauthorized and S2 authorized inclusion modes are supported. The thermostat can be
associated and control up to 50 different Z-Wave devices.
One of three operation modes can be selected either manually or via the Z-Wave
controller/gateway: COM, TIME, ECO. The thermostat operates in four climate modes:
Heating & Cooling, Heating only, Cooling only, Ventilation.
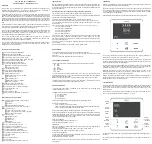
The LCD screen with white icons has a user-friendly interface, displaying: air temperature,
humidity level, user set temperature, operating mode, climate mode, fan speed, time,
weekday and Z-Wave network status.
TECHNICAL SPECIFICATIONS
Front frame dimensions: 89х89х9mm
Back dimensions: 53х53х28mm
Material: Flame retardant plastic, tempered glass
4 frame colors: Silver, Chrome, Black, White
6 glass colors: White, Black, Yellow, Green, Red, Blue
LCD: 73x42mm, black with white icons
6 sensitive capacitive touch buttons
5 relays with resistive load up to 5A each
2 relays for cooling and heating valves
3 relays for fan speed
2 independent relays input
Relays life time: 100.000 switches
Internal ambient brightness sensor
Internal temperature sensor
Measurement range: -30°C to +80°C
Accuracy: ±0.5°C
Internal humidity sensor
Measurement range: 0 – 80%RH
Accuracy: ±3.0%RH
Software energy consumption logic
Operating temperature: 0°С – +50°С
Power supply: 100V – 230VAC, 50Hz/60Hz
Power consumption: 1.5W
IP class: IP21
Z-Wave Plus SDK: V6.71
Security: S0, S2 unauthorized, S2 authorized
FUNCTIONAL SPECIFICATIONS
Inclusion/exclusion into/from z-wave network
Non Secure
S0 secure
S2 unauthorized, S2 authorized
Association control of 50 devices from network
3 operation modes:
COM - comfort (full power) mode,
TIME - 4 time schedule for 7 days of the week,
ECO - energy saving mode
4 climate modes:
Heating & Cooling,
Heating only,
Cooling only,
Ventilation
3 levels for Fan speed control
Auto or manual Fan speed control
Temperature sensors calibration
Temperature set intervals: 4.0°C to 37.0°C
Choosing a temperature hysteresis
Choosing a degree (Celsius / Fahrenheit)
Adjustable LCD brightness: Auto or Manual
LCD standby mode
Child lock
Power consumption logic
Factory reset
OTA function (Firmware update over the air).
INSTALLATION
We recommend the installation conforms to your local regulations and is undertaken by a
qualified electrical engineer. Positioning of the thermostat is of the utmost importance and
must be away from sunlight and sources of direct heat. We recommend installation about 1.5
metres above the floor.
Electrical power must be switched off during all aspects of installation.
1. Remove the front cover and back plate of the thermostat from the main box.
2. ENSURING THE POWER IS OFF and using a small cross head (Phillips) screwdriver
connect the wires to the thermostat terminals:
a) POWER is for the device lead power source. It can be 110VAC – 240VAC
b) Connect the required power source for Fan (Relays 1, 2 and 3 outputs) to terminal IN-1-3.
c) Connect the required power source for Heating / Cooling valves (Relays 4 and 5 outputs)
to terminal IN-4-5.
d) Connect the loads to relays output terminals OUT-1, OUT-2, OUT-3, OUT-4, OUT-5:
OUT-1 for the Fan low speed
OUT-2 for the Fan middle speed
OUT-3 for the Fan high speed
OUT-4 for the cooling valve
OUT-5 for the heating valve
5. Making sure “TOP” is uppermost secure the back plate into the wall mounting box using
the screws provided. Install the thermostat body by carefully aligning the top snap
connectors and then pushing on the front cover with gentle pressure ensuring it snaps firmly
into position all the way round.
6. Switch On the main power and the thermostat will start up showing the original default
factory settings.
7. Remove protective film by pulling the tab in the top right hand side.
DISASSEMBLY
1. ENSURE POWER IS SWITCHED OFF AND SCREEN IS BLANK.
2. To remove thermostat body grasp firmly and pull back from the bottom until all tabs
disconnect.
3. Remove screws from back plate and disconnect the wires.
TOUCH PANEL OPERATION
The touch panel has six touch buttons which require minimal pressure to operate.
Plus
Minus
Time
Climate
Fan Speed
Mode
“ “ key will increase set point temperature by 0.5°C (or 1°F), and “ “ key will decrease set
point temperature by 0.5°C (or 1°F). The set point temperature is displayed in the bottom left
corner of the display as “SET TEMP”.
Note:
The minimum set point is 4.0°C (39°F) and the maximum set point is 37.0°C (99°F).
The thermostat has four working mode – HEATING, COOLING, VENTILATION and IDLE.
The state is displayed in the center at the bottom of the screen.
OPERATING MODES
The thermostat current mode is displayed in the middle right line of display under
“OPERATING MODE” section.
The thermostat can operate in 4 climate modes:
– Heating & Cooling
– Heating only
– Cooling only
– Ventilation only
Change the climate mode by touching the key and reselecting as above.
And it has 3 operating modes:
COM – general comfort (full power) mode.
TIME – time mode allows to set a different temperature for different periods of the day
ECO – economy (power efficient / energy saving) mode.
Change the operating mode by touching the MODE key and reselecting as above.
Each operating modes have individual temperature set points. The thermostat will operate
automatically depending on the current SET TEMP point. To change the set point values
choose the desired mode and press “+” key to increase or press “-” key to reduce the value.
Alternatively control from the Z-wave gateway.
COM (comfort) MODE
This mode is recommended for normal comfort.
Factory default set point is 25.0°C (77°F)
TIME MODE
Allows to set up time and different temperature for Morning, Day, Evening, Night period for
each 7 days of the week.
Factory defaults: Morning time = 06:00, t =24.0°C, Day time = 09:00, t =20.0°C,
Evening time = 18:00, t =23.0°C, Night time = 23:00, t =18.0°C
ECO (energy saving) MODE
Use this mode if lower energy consumption is required. It can also be used when absent from
all or part of the property for a length of time.
Factory default set point is 20.0°C (68°F)
Note:
The minimum set point for each mode is 4.0°C (39°F) and the maximum set point is
37.0°C (99°F).
TIME MODE
Adjust home temperature according to personal habits by reducing it whilst away from home
and increasing in the evenings and early mornings.
The thermostat can be set individually for morning, day, evening and night. For example, it
can be assigned for Morning period start at 7.00, then Day starting at 9.00 (when absent for
work etc.), then Evening starting at 18:00 (half an hour before occupants return). The Night
regime then begins at 23.30 (bedtime).
Separate temperature settings can be made for all 4 periods for every day of the week.
To set up the time and temperature for each period go to the Time menu by pressing and
holding the key for 3 seconds. The display will show the Time menu.
To set up the start time for each period choose the period by pressing the key than adjust
the time by pressing the SPEED key for increase or MODE key for decrease. Do this action
for all 4 periods: Morning, Day, Evening and Night.
The temperature for each period is displayed in the left bottom corner. To set up it choose the
week day by pressing the key, choose the period by pressing key and adjust the
temperature by pressing “+” or “–“ keys. Do this action for every day of the week.
Note:
TIME mode works only in case of the correct time being set. The time can be
automatically corrected by polling from your gateway if the Parameter 8 value is 1 or set
manually in Parameters 10, 11 and 12 in the settings menu.
Note:
In the TIME mode the SET POINT of the thermostat will be automatically changed
depending on the period. The SET POINT can be adjusted manually out of the TIME menu
but it will be effective only until the next period.
SETTINGS MODE
To activate the settings mode, press and hold the key for 3 seconds. The display will show
the settings menu. In the top left corner is the parameter display indication (the parameter
name), in the left center is the parameter number and in the left bottom corner is the
parameter value.
To scroll the menu navigation just press the SPEED key to go up and the MODE key to go
down. To change the parameters value press the “+” or “-” keys.
To leave the Settings mode to go to the main display mode press and hold the key for 3
seconds.
The thermostat will automatically leave to the display mode if no action is detected for 10
seconds.
Param
number
increase
Param
number
reduce
Param
Value
Reduce
Param
Value
Increase
Param
number
Param
value
Param
name