


9
9
3-90-30007480
Hearth and Home Technolgies • Oxford Direct/Natural Vent Installation Manual_R3 • 02/19
Examples for Extended Run/Restrictor Plate Settings
Vertical 20’
(6 m), 90°
elbow, out 8’
(2.4 m)
Vertical 11’
(3.4 m), 90°
elbow, out 2’
(610 mm)
Vertical 40’
(12 m)
Vertical 5’
(1.5 m), 90°
elbow, out 5’
(1.5 m)
Restrictor plate measurement from top of plate to
center of screw:
2
3
⁄
4
” (70 mm)
from center
of screw to
top edge of
plate
Plate down
to top of slot
Plate down
to top of slot
2
3
⁄
8
” (60 mm)
from center
of screw to
top edge of
plate
Vertical Termination
A vertical vent system must terminate no less than 8’ (2.44 m)
and no more than 40’ (12 m) above the appliance flue collar.
(Refer to Figure 2.8) Adjust the restrictor plate according to
recommendations in Figure 2.10. A vertically terminated vent
system must also conform to the following criteria:
•
No more than three 90° elbows may be used.
•
Two 45° elbows may be substituted for one 90° elbow.
No more than six 45° elbows may be used.
•
Vent must rise a minimum of 2 feet (305 mm) before
offset is used.
•
Termination height must conform to roof clearance as
specified in Figure 2.8.
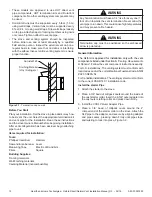
Restrictor Plate Adjustment for Extended Pipe Runs
The Oxford stove is shipped with a restrictor plate in the Parts
Bag. Adjustments can be made by loosening the adjustment
screw to allow the restrictor plate to slide up or down. (Figure
2.9) A guide for usage is shown in Figure 2.10.
NOTE: Some installations may require some adjustment by
the installer for optimum flame appearance. Optimum flame
appearance is a flame that is not subject to tall, dirty yellow
flames producing soot or flames lifting off of the ember bed
ports.
Restrictor Plate Adjustment
•
Remove the screw in the back wall of the firebox.
•
Install restrictor plate as shown in Figure 2.9 with cut out
on left side. Secure with adjustment screw.
•
Measure from center of screw to top edge of diverter
(Figure 2.9) to adjust plate according to guidelines in
Figure 2.10.
•
Tighten attachment screw.
•
Install logs following log installation instructions.
Figure 2.10
ST917
restrictor plate
6/07
Adjustment Screw
Figure 2.9
- Loosen screw to adjust restrictor plate.
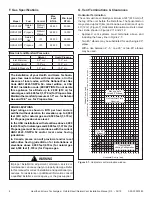
Figure 2.8
- Vertical vent termination window.
20
19
18
16
15
14
13
12
11
10
9
8
7
6
5
4
3
2
1
0
20
1
2
3
4
5
6
7
8 9
10 11 12 13 14 15 16 17 18 19
Ver
tical Run (in f
eet)
(Measure from the appliance flue collar to the top of the v
ent pipe
.)
Horizontal Run (in feet)
21
22
23
24
25
26
27
28
29
30
31
32
33
34
35
36
37
38
39
40
ST132a
FDV28
Vertical
vent run
12/3/99 djt
area
modified
1/11/00 djt
All Vertical Termi
-
nations in this area
Require use of the
2
1
⁄
4
"
Restrictor Plate*
Vertical terminations
must be within this area
Unacceptable Venting
Configuration
No Restrictor Plate