


16
16
3-90-30007480
Hearth and Home Technolgies • Oxford Direct/Natural Vent Installation Manual_R3 • 02/19
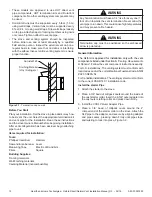
Figure 3.2
- Attach inner assembly to flue collar.
SLP
CCSLP
Starter
Pipe
Assemble Slip Sections
The outer flue of the slip section should slide over the outer
flue of the pipe section and into (inner flue) the last pipe
section, Figure 3.4.
Slide together to the desired length, making sure that a 1-1/2”
outer flue overlap is maintained between the pipe section
and slip section.
The pipe and slip section need to be secured by driving two
1/2 in. screws through the overlapping portions of the outer
flues using the pilot holes, Figure 3.5.
This will secure the slip section to the desired length and
prevent it from separating. The slip section can then be
attached to the next pipe section.
If the slip section is too long, the inner and outer flues of the
slip section can be cut to the desired length.
WARNING
!
Risk of Fire/Explosion! DO NOT
break seals on slip
sections. Use care when removing termination cap from
slip pipe. If slip section seals are broken during removal
of the termination cap, vent may leak.
Secure the Vent Sections
Vertical sections of SLP pipe must be supported every 8 feet.
The SLP firestop includes tabs that may be used to secure
vertical sections.
The vent support or plumber’s strap (spaced 120° apart) may
be used to secure the vertical sections of pipe, Figure 3.6.
Horizontal sections of vent must be supported every 5 feet
with a vent support or plumber’s strap, Figure 3.7.
INCORRECT
CORRECT
Figure 3.3
- Make sure the seams are not aligned to prevent
unintentional disconnection.
Figure 3.4
- Slip Section Pilot Holes
Figure 3.5
- Screws into Slip Section