


15
15
3-90-30007480
Hearth and Home Technolgies • Oxford Direct/Natural Vent Installation Manual_R3 • 02/19
Before You Start
Plan your installation. Set the stove in place and survey how
to best vent the unit. Select the appropriate termination kit
and vent pipe for the installation. Read these instructions
and the stove Owner’s Manual before beginning installation.
After vent configuration has been decided, begin attaching
pipe to unit.
Items required for installation:
Tools:
Phillips screwdriver
Hammer
Saw and/or saber saw Level
Measuring Tape
Electric drill and bits
Pliers
Square
Building Supplies:
Framing materials
Wall finishing materials
Caulking Material (noncombustible)
• These models are approved to use HHT direct vent
pipe components, HHT termination kits and DuraVent
components. No other venting system components may
be used.
• Horizontal runs must be supported every 5 feet (1.5 m)
using wall straps. Vertical runs must be supported every
8 feet (2.4 m) using wall straps. Slip wall straps loosely
on to pipe. Attach straps to framing members using nails
or screws. Tighten nut/bolt to secure pipe.
• The stove and venting system should be inspected
before initial use and at least annually by a qualified
field service person. Inspect the external vent cap on a
regular basis to make sure that no debris is interfering
with the airflow. Inspect entire venting system to ensure
proper function.
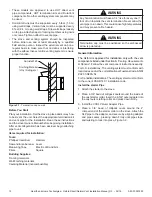
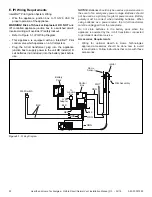
Outside Wall
Finishing Material
(Vinyl Siding, etc.)
Figure 3.1
- Termination cap on wall
General Information
The Oxford is approved for installation only with the vent
components listed under Section A
“
Venting Requirements
& Options”
. Fo
llow the vent component instructions exactly.
For U.S. installations: The venting system must conform with
local codes and/or the current National Fuel Gas Code, ANSI
Z223.1/NFPA 54.
For Canadian installations: The venting system must conform
to the current CSA B149.1 installation code.
Install the starter Pipe
1. Attach the starter to the stove.
2. Place a 3/8” bead of millpack caulk around the inside of
the cast starter collar. Insert the 6-5/8” outer adapter into
the cast outer starting collar and press down firmly.
3. Install the CCSLP Outer Adapter Pipe.
4. Place a 3/8” bead of millpack caulk around the 4”
crimped end of the starter collar on the stove. Attach the
SLP pipe to the adapter, and secure by aligning adapter
and pipe seams, pressing down firmly until pipe stops,
and twisting to lock into place, Figure 3.2.
WARNING
!
Any horizontal run must have a 1/4” rise for every one (1)
foot of run towards the vent termination. Never allow the
vent pipe to run down. This could cause high temperatures
and may present a fire hazard.
WARNING
!
Termination cap must be positioned so the embossed
arrow is pointed up.