background image

PNT152-B

SETUP & OPERATION

MAINTENANCE & STORAGE

20

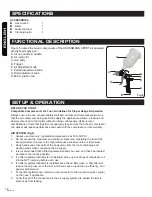
OPERATING THE AIR-POWERED GRAVITY-FEED SPRAY GUN

1.    Always keep the gun at a right angle to the workpiece.

2.    Keep the nozzle about 6” to 12” from the work surface. Grip the gun keeping it 

perpendicular with spraying area, then move it in a parallel fashion – keeping it 

an even distance from the surface being painted.  Stopping sprayer movement in 

mid-stroke will cause a build-up of paint and result in runs. Do not fan the gun 

from side to side while painting. This will cause a build-up of paint in the centre of 

the stroke and an insufficient coating at each end.

3.    Trigger control: Always start the gun moving BEFORE SQUEEZING THE 

TRIGGER and release the trigger BEFORE STOPPING GUN MOVEMENT at the 

end of the stroke. This procedure will blend each stroke with the next without 

showing overlap or unevenness.

4.    The amount of paint being applied can be varied by the speed of the stroke, 

distance from the surface and adjustment of the fluid control knob.

5.    Overlap strokes lightly, just enough to obtain an even coat.

6.    Use a piece of cardboard as a shield to capture the loss of spray paint to the 

ends of the piece to paint to protect the other surfaces.

!

NOTE: 

Two thin coats of paint will yield better results and have less chance of runs 

than one heavy layer.

!

WARNING!


Never use metal or other objects that could damage the holes in the 

nozzle and cap. Never immerse the spray gun completely in solvent. Never use 

components or parts that are not manufacturer originals.

MAINTENANCE

Incomplete cleaning could cause function failures and uneven paint sprays. Always 

clean the spray gun immediately after use, to avoid paint dryouts.

1.    Remove any remaining paint by pouring it into another container.

2.    Disassemble the spray gun, making sure to remove the needle before 

disassembling the nozzle to avoid damage to the housing of the nozzle closure.

3.    Clean all paint passages and the nozzle. Clean the other components using a 

brush soaked in solvent.

4.    Reassemble the spray gun and spray a small quantity of solvent to eliminate any 

residues in the paint passages.

Fig.8

Coating will be 

light at this 

point

Coating will be 

heavy at this point

6 to 12 inches

WRONG

RIGHT

Travel of 

gun

Start 

stroke

Release 

trigget

End of 

stroke

Pull 

trigger

Coating should be even 

and wet when spraying

ENGLISH

Содержание 68125029

Страница 1: ...for future reference QUESTIONS 1 866 206 0888 Notre personnel du service à la clientèle est disponible pour vous aider Pour obtenir de l aide pour le montage de votre produit pour signaler des pièces endommagées ou manquantes ou pour toute autre information veuillez composer notre numéro sans frais 1 866 206 0888 Enregistrez votre produit Nous vous invitons à enregistrer votre produit en ligne afi...

Страница 2: ...ec écrans latéraux ou un écran facial lors de l utilisation du produit Risque de dommages auditifs Portez toujours une protection auditive lors de l utilisation de cet outil afin de prévenir les pertes auditives et autres dommages à l ouïe AVERTISSEMENT Les mises en garde et les précautions dont il est question dans le présent manuel ne couvrent pas toutes les conditions et les situations possible...

Страница 3: ... de l utilisation de l outil Portez des vêtements appropriés Évitez de porter des vêtements amples ou des bijoux Attachez les cheveux longs Gardez les cheveux Ies vêtements et Ies gants à l écart des pièces mobiles Les vêtements amples bijoux ou cheveux longs pourraient se prendre dans les pièces mobiles Enlevez les clés de réglage avant de démarrer l outil Un outil ou une clé laissée sur une pièc...

Страница 4: ...le Les accessoires adaptés à un outil peuvent devenir dangereux s ils sont utilisés sur un autre outil ENTRETIEN L outil ne doit être réparé que par un réparateur qualifié Pour réparer l outil n utilisez que des pièces de rechange identiques aux pièces originales Utilisez uniquement les pièces autorisées Utilisez uniquement le lubrifiant pour outils pneumatiques fourni et ou recommandé par le fabr...

Страница 5: ...limentation d air avant d effectuer tout entretien de l outil et lorsque vous ne l utilisez pas Il est recommandé d utiliser une soupape à bille près de l alimentation d air du pistolet en cas d arrêt d urgence et pour éviter un fonctionnement imprévu 5 Utilisez de l air comprimé propre sec et régulé entre 35 et 50 lb po2 ne dépassez jamais la pression d utilisation maximale de 80 lb po2 voir la F...

Страница 6: ...T DE COMMENCER Compresseur et outil pneumatique compatibles directives pour un usage et un fonctionnement adéquats Assurez vous toujours d utiliser le bon compresseur d air avec l outil pneumatique Le compresseur d air utilisé doit être en mesure de fournir à l outil le volume la pression et le débit d air sans qu on ait à le faire fonctionner continuellement L utilisation d un outil ou d une comb...

Страница 7: ...raccords les boulons etc avant d effectuer l entretien de l appareil 2 Mélangez et diluez bien la peinture en suivant les instructions du fabricant de la peinture Vous pouvez pulvériser facilement la plupart des matériaux s ils sont dilués correctement 3 Filtrez les matériaux à l aide d un filtre d une étamine ou d un tamis à peinture avant de les verser dans le réservoir de pulvérisation 4 Rempli...

Страница 8: ...mouvement du pulvérisateur au milieu du déplacement forme une accumulation de peinture et entraîne des coulées N agitez pas le pistolet de gauche à droite lorsque vous peinturez ce qui pourrait entraîner une accumulation de peinture au centre et un revêtement insuffisant de chaque côté 3 Commande de la détente Commencez toujours à déplacer le pistolet AVANT D APPUYER SUR LA DÉTENTE et relâchez la ...

Страница 9: ...ttoyez tous les autres composants en utilisant une brosse trempée dans le solvant 4 Remontez le pistolet pulvérisateur et pulvérisez une petite quantité de solvant pour éliminer tous les résidus dans les passages de peinture ENTREPOSAGE Lorsque vous n utilisez pas le pistolet pulvérisateur pneumatique tournez le bouton de réglage du liquide dans le sens antihoraire pour l ouvrir ce qui réduira la ...

Страница 10: ...ez ouvert 3 Le liquide est trop épais 1 Vérifiez les conduites d air 2 Ouvrez le réglage du liquide 3 Diluez le liquide ou changez la pression du système d alimentation Le pistolet de pulvérise pas Merci d avoir acheté cet outil HAUSSMANN XPERT Ces outils ont été conçus pour répondre à des normes de haute qualité très strictes et sont garantis pour usage domestique contre tout défaut de fabricatio...

Страница 11: ...ndelle en cuivre Bouton de réglage du jet Vis de réglage du jet Vis Bouton de réglage de la peinture Bouchon commune Ressort du pointeau Pointeau de réglage de la peinture Modulateur Ressort d interrupteur Bloc d interrupteur Joint torique Vis Corps de pistolet Prise d entrée d air Clé de outil Clé hexagonale Brosse 27 28 29 30 31 32 33 34 35 36 37 38 39 40 41 42 43 44 AVERTISSEMENT Toutes les rép...

Страница 12: ...FRANÇAIS PNT152 B 12 ENGLISH SCHÉMA SCHEMATIC DRAWING ...

Страница 13: ...21 22 23 24 25 26 NO DESCRIPTION Copper washer Pattern Adj knob Pattern Adj screw Screw Fluid Adj knob Joint cap Fluid needle spring Fluid Adj Needle Modulator Switch spring Switch block O ring Screw Gun body Air inlet plug Tool wrench Hex wrench Brush 27 28 29 30 31 32 33 34 35 36 37 38 39 40 41 42 43 44 Please refer to the Schematic Drawing on the preceding page WARNING Repairs should be made by...

Страница 14: ... with side shields or a full face shield when operating this product Risk to hearing Always wear ear protection when using this tool Failure to do so may result in hearing loss WARNING The warnings and precautions discussed in the manual cannot cover all possible conditions and situations that may occur It must be understood by the user that common sense and caution are factors which cannot be bui...

Страница 15: ...onal injuries Do not overreach Keep proper footing and balance at all times Proper footing and balance enables better control of the tool in unexpected situations Use safety equipment A dust mask non skid safety shoes and a hard hat must be used for applicable conditions Always wear eye protection Always wear hearing protection when using the tool Extended exposure to high intensity noise may caus...

Страница 16: ...ized parts Use only the lubricants supplied with the tool and specified by the manufacturer AIR SUPPLY AND CONNECTIONS The air supply connection must not hold pressure when air supply is disconnected If an incorrect fitting is used the tool can remain charged with air after disconnecting and thus will be able to work even after the air line is disconnected possibly causing injury Do not use any ty...

Страница 17: ...flammable or combustible Please use the tool in a well ventilated area only and avoid any ignition sources such as smoking or open flames see Fig 3 4 Disconnect tool from air supply hose before doing tool maintenance and during non operation For emergency stops and prevention of unintended operation a ball valve near the gun to air supply is recommended 5 Use clean dry and regulated compressed air...

Страница 18: ... from the tool s discharge and working areas when connecting the air supply 4 It is recommended that a filter regulator lubricator be used and that it be located as close to the tool as possible 5 If a filter regulator lubricator is not installed place up to 6 drops of compressor oil into the NPT inlet plug before each use 6 If a filter regulator lubricator is installed keep the air filter clean A...

Страница 19: ...int manufacturer s thinning recommendations ADJUSTMENTS WARNING The desired pattern volume of fluid output and fine atomization can easily be obtained by regulating the pattern adjusting knob material PAINT adjusting knob and air adjusting knob Pattern adjustment Turning the pattern adjusting knob to the right until tight will make a round spray pattern round or turning it left will make an ellipt...

Страница 20: ...e a piece of cardboard as a shield to capture the loss of spray paint to the ends of the piece to paint to protect the other surfaces NOTE Two thin coats of paint will yield better results and have less chance of runs than one heavy layer WARNING Never use metal or other objects that could damage the holes in the nozzle and cap Never immerse the spray gun completely in solvent Never use components...

Страница 21: ... cap 1 Add fluid into container 2 Hold more upright 3 Tighten 4 Adjust or replace 5 Lubricate and or tighten 6 Clear vent hole 1 Tighten or replace fluid nozzle 2 Remove obstructions from holes but don t use metal objects to clean it 1 Material build up on air cap 2 Fluid nozzle is dirty or worn 1 Clean or replace air cap 2 Clean or replace fluid nozzle The centre of pattern too narrow Pattern wid...

Страница 22: ...ase This guarantee does not affect your statutory rights In case of any malfunction of your tool failure missing part etc please contact one of our service technicians at our toll free service line at 1 866 206 0888 from 8 AM to 6 PM Monday to Friday Eastern time RONA reserves the right to repair or replace the defective tool at its discretion The product is guaranteed for 36 months if used for no...

Отзывы: