1
4
2
5
3
6
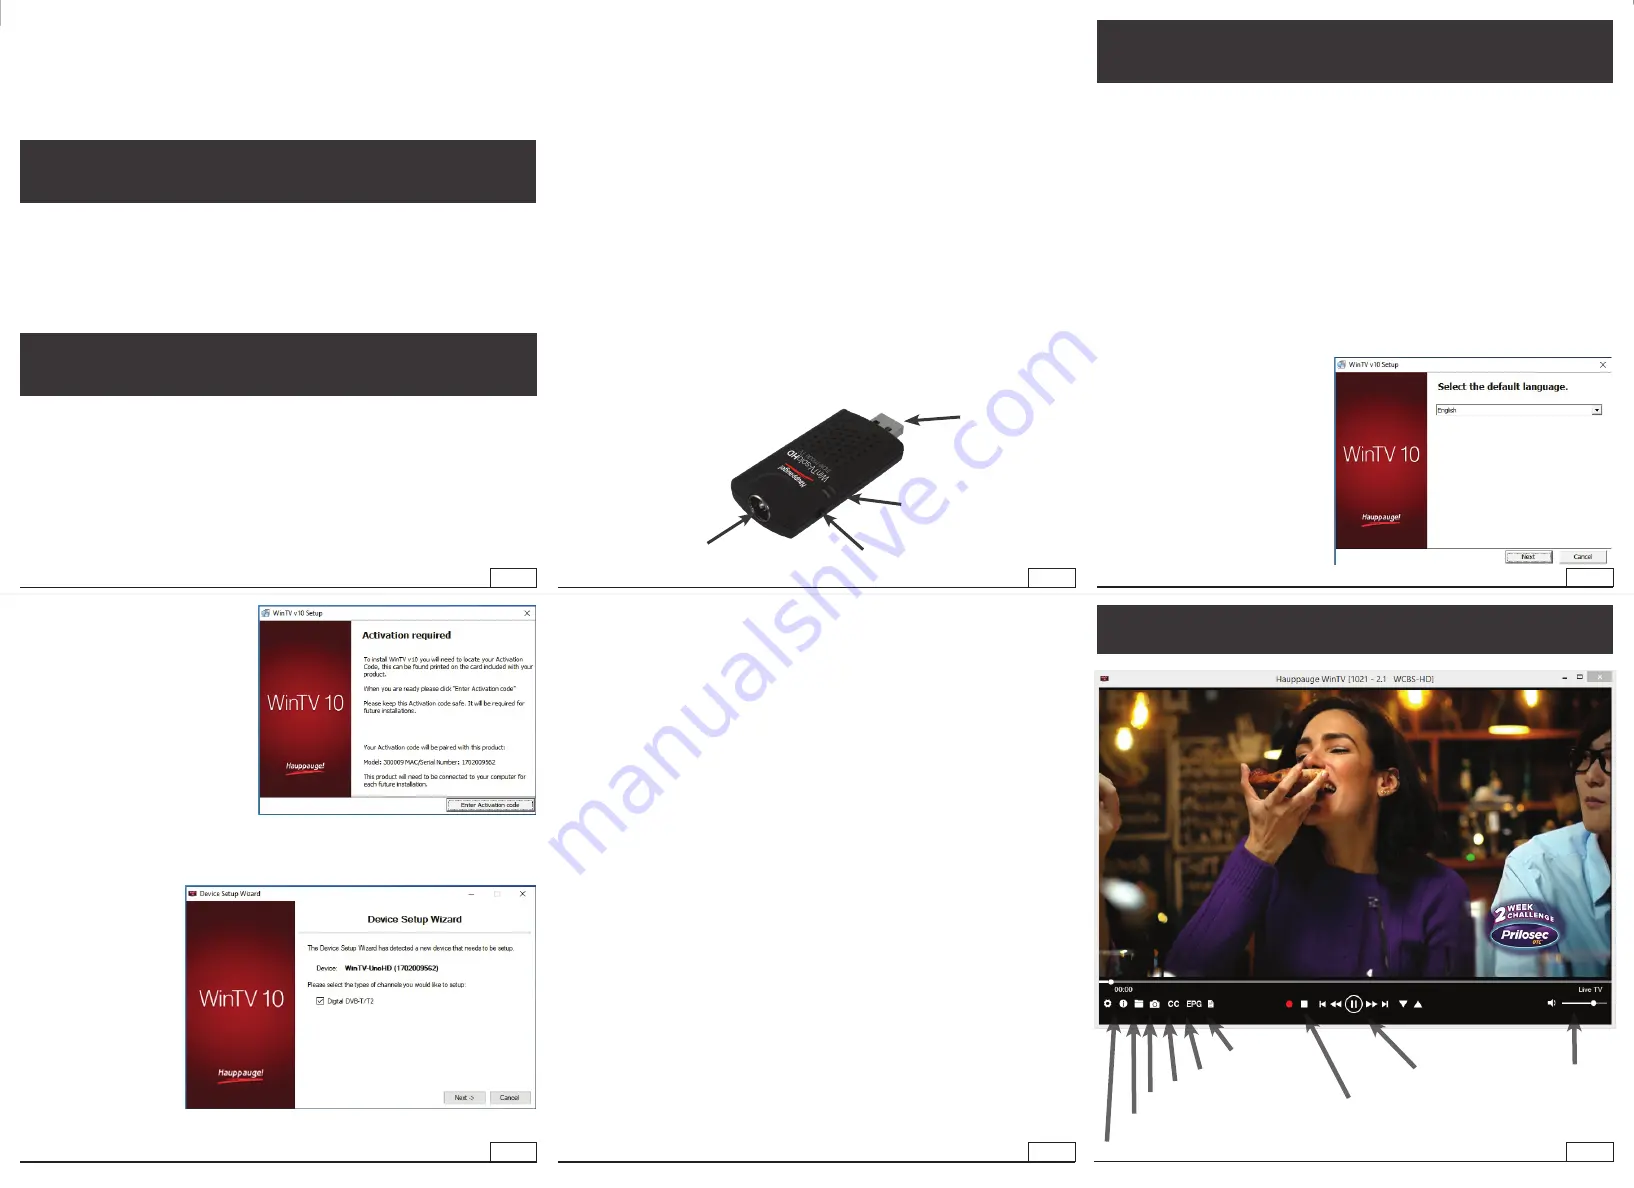
Click the RIGHT mouse button in the
live TV window to bring up the context
menu
Double click the LEFT mouse button to
bring the TV full screen. Double click
again to exit full screen
Settings menu
Program Information
Now/Next
TV recordings
folder
EPG Program
Guide
Record button
for manual
recording
Snapshot
Close Captions
Audio
Volume and Mute
Program Pause
controls
•
WinTV-soloHD
or
WinTV-dualHD
DVB-T2/T/C receiver
•
USB extension cable
• Portable
TV antenna
(on some models)
•
Remote control
•
WinTV v10 application
for Windows (download with included Activation Code)
Installation of the WinTV-soloHD / WinTV-dualHD device
Locate a free USB 2.0/3.0 port (normally located at the side or back on the laptop
or desktop). Plug the WinTV-soloHD / WinTV-dualHD into the USB 2.0/3.0 port. The
USB extension cable
can be used to position the WinTV-soloHD / WinTV-dualHD
away from your USB slot.
N
ote: we do not recommend connecting via a USB Hub.
WinTV-soloHD
WinTV-dualHD
Quick Installation Guide for Windows
click on
Enter Activation code
and enter the activation code which
was printed on the
WinTV v10
Download and Activation code
card. You do not need to enter the
dashes, and you can use upper or
lower case characters.
Step 4:
When the installation is complete,
you will find two new icons on your
Windows desktop: the
WinTV
application
icon and the
WinTV
Advanced Options
icon. The WinTV Advanced Options icon, when clicked, has
a number of useful WinTV v10 utilities such as to Empty EPG, Erase channel
database and others.
Double click on the
WinTV icon
and the
WinTV application
will run.
On the first
run of WinTV, it will
automatically go
through the TV source
selection and WinTV
will scan for channels.
Set the check mark
according to the
connected signal and
click
Next
.
Click
Next
to start the search.
Stations found are listed during the search.
When the search is complete, click
Next
to save the channels found.
N
ote: if you complete the channel scan and no channels are detected, you
can try the following: check your antenna connections, reposition your
antenna, add an antenna signal booster, or get a larger antenna. Information
on rescanning for TV channels can be found here:
www.hauppauge.com/rescan
Using the WinTV v10 application
N
ote: Please disable your antivirus software for the duration of the
software installation. We find that sometimes antivirus apps block the
temporary folders needed for the installation of WinTV
N
ote: An Internet connection is required for download and software
activation.
You will find the website and directions on the
WinTV v10 Download and
Activation code
card along with the
Activation code
for WinTV v10.
The WinTV v10 download can be found here:
www.hauppauge.com/wint10
Step 1:
Download the WinTV v10 installer by clicking the download button. The WinTV v10
Installer is normally saved in your
Download folder
Step 2:
Run
wintv10setup
from the Download
folder on your PC. Halfway through
the installation, a message will pop up
asking for you to enter the Activation
Code.
Step 3:
At the
Activation required
screen,
Installing the WinTV v10 application for Windows
Contents of the package
N
ote: the WinTV-soloHD / WinTV-dualHD will work with both USB 2.0 and
USB 3.0 ports.
Digital Terrestrial TV
The WinTV-soloHD / dualHD can receive DVB-T and DVB-T2 broadcasts from an
antenna.
Plug an antenna for DVB-T2 (FreeviewHD) or DVB-T (Freeview) TV reception into
the TV connector on WinTV-soloHD / WinTV-dualHD.
N
ote: When using FreeviewHD DVB-T2, it is recommended to connect
to a roof top aerial during the first time installation. This will provide
better signal quality then a portable antenna.
Cable TV
On a cable TV feed, the WinTV-soloHD / dualHD can receive digital TV and radio
programs (DVB-C).
Connect the TV output on the cable TV socket to the TV input on the WinTV stick,
using a high quality coax cable (not supplied).
Cable TV / Antenna
connector
Signal
indicator
USB 2.0/3.0
connector
IR
receiver


