background image

Visit our website at: http://www.harborfreight.com

Email our technical support at: [email protected]

Owner’s Manual & Safety Instructions

Save This Manual


Keep this manual for the safety warnings and precautions, assembly, 

operating, inspection, maintenance and cleaning procedures.  Write the product’s serial number in the 
back of the manual near the assembly diagram (or month and year of purchase if product has no number). 
Keep this manual and the receipt in a safe and dry place for future reference.


20g

When unpacking, make sure that the product is intact 

and undamaged.  If any parts are missing or broken, 

please call 1-888-866-5797 as soon as possible.

Copyright

©

 2020 by Harbor Freight Tools

®

.  All rights reserved.  

No portion of this manual or any artwork contained herein may be reproduced in 

any shape or form without the express written consent of Harbor Freight Tools.  

Diagrams within this manual may not be drawn proportionally.  Due to continuing 

improvements, actual product may differ slightly from the product described herein.  

Tools required for assembly and service may not be included.

Read this material before using this product. 
Failure to do so can result in serious injury. 
SAVE THIS MANUAL.

Содержание 67623

Страница 1: ...ence 20g When unpacking make sure that the product is intact and undamaged If any parts are missing or broken please call 1 888 866 5797 as soon as possible Copyright 2020 by Harbor Freight Tools All...

Страница 2: ...r and safer at the rate for which it was designed 2 Store the Carrier out of reach of children and do not allow people unfamiliar with the Carrier or these instructions to use the Carrier Use of carri...

Страница 3: ...issing contact Harbor Freight Tools for a replacement 10 Always secure the Carrier as close to your vehicle as possible minimizing the distance of the Carrier and its load from your vehicle 11 Keep Ca...

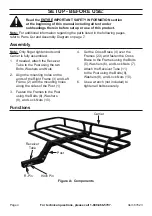
Страница 4: ...ssembled 1 If needed attach the Receiver Tube to the Post using the two Bolts Washers and Nuts 2 Align the mounting holes on the ends of the Right Frame 3 and Left Frame 2 with the mounting holes alon...

Страница 5: ...Y All persons not involved in loading or unloading the Carrier must stand clear of the unit 1 Remove the R Pin 12 from the Carrier s Hitch Pin 13 2 With assistance lift the Carrier by the Post and ins...

Страница 6: ...an the Carrier after each use Make sure dirt oil grease and debris are not on the Carrier PLEASE READ THE FOLLOWING CAREFULLY THE MANUFACTURER AND OR DISTRIBUTOR HAS PROVIDED THE PARTS LIST IN THIS DO...

Страница 7: ...rt Description Qty 8 Connecting Bolt M10x75 6 9 Flat Washer M10 6 10 Lock Nut M10 6 11 Receiver Tube 1 12 3 8 R Pin 1 13 5 8 Hitch Pin 1 2 3 8 5 6 7 4 10 9 1 11 12 13 Record Serial Number Here Note If...

Страница 8: ...amages so the above limitation of exclusion may not apply to you THIS WARRANTY IS EXPRESSLY IN LIEU OF ALL OTHER WARRANTIES EXPRESS OR IMPLIED INCLUDING THE WARRANTIES OF MERCHANTABILITY AND FITNESS T...

Отзывы: