background image

User Guide.

ELECTROSURGERY ANALIZER

Содержание 42000005

Страница 1: ...User Guide ELECTROSURGERY ANALIZER ...

Страница 2: ...2 ...

Страница 3: ...CKAGING 6 UNDERSTANDING THE DEVICE 7 TURNING ON THE DEVICE 10 TEST MODULES 13 GENERATOR OUTPUT TEST 13 EXTERNAL RESISTANCE MODULE 14 CQM 20 HF LEAKAGE CURRENT 21 SOFTWARE AND APPLICATION 29 PROBLEMS AND SOLUTIONS 30 MAINTENANCE 30 BATTERY INDICATOR 31 TECHNICAL SPECIFICATIONS 31 FAQ 33 ...

Страница 4: ...lectronic scalpel performance tests For better conservation of your device and to prolong its useful life please consider the following The data HARRISON collects provides a better analysis of different electrosurgical units in different test modalities Harrison allows the simulation of Power Crest Factor RMS Current Main Frequency ...

Страница 5: ...fe 4 Insert the connectors only into the spots intended for operation 5 Do not connect this device to the patient 6 Replace the power cord if any damage is identified 7 Replace accessories if any damage is identified 8 Do not open the device without the expertise and the manufacturer s authorization 9 Always examine the device before and after each use ACRONYMS AND DEFINITIONS RMS Effective value ...

Страница 6: ... 2 x 30 cm Banana banana connector PN 31000001 4 x 110 banana banana connector PN 31000024 1 x Resistance Module PN 31000042 1 x Transport Bag PN 12000040 1 x Power Cord Brazil PN 11000015 USA PN 11000236 Europe PN 11000237 The customer chooses the power cord standard Notes After unpacking the device connect it to the power grid to charge the internal battery ...

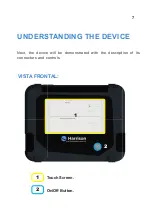
Страница 7: ...7 UNDERSTANDING THE DEVICE Next the device will be demonstrated with the description of its connectors and controls VISTA FRONTAL Touch Screen On Off Button 1 1 2 2 ...

Страница 8: ...rnal Module Connection 2 5 3 6 7 7 VISTA LATERAL ESQUERDA 1 External Module Connection 1 Scalpel Input Active Scalpel Inlet Passive Ground Pin Air Circulation Cable Connector with Fuse Holder Internal Load Connector default 200ohm External Load Connector ...

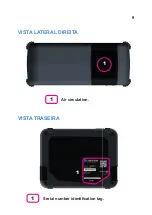
Страница 9: ...9 VISTA LATERAL DIREITA VISTA TRASEIRA 1 1 1 Air circulation Serial number identification tag 1 ...

Страница 10: ... to turn on the device The device will perform internal communication tests and display the settings screen of each module to be tested Dragging the screen downwards we have access to the menu with options Bluetooth Wifi Language Card 1 Card 2 SCREEN ...

Страница 11: ...in remote access by the factory By clicking on the icon a list of available networks will appear Just select the one you want and enter the password Language allows you to select your preferred language By clicking on the icon the available languages will be displayed Just select the language click on restart and the device will return with the information in the chosen language ...

Страница 12: ... enabled it is possible to view the Power reading module in full screen Card 2 with only this option enabled it is possible to view the frequency reading module in full screen Note with 2 Cards enabled both modules will be displayed ...

Страница 13: ...easures the performance of high frequency electrosurgical units ESU The product makes measurements and tests TEST MODULES ESU TEST 1 1 Power RMS 1 2 Current RMS 1 3 Main Frequency 1 4 Crest Factor 1 Generator Output Test 2 Contact Quality Monitor CQM Test 3 Leakage Current Test HF CF and BF ...

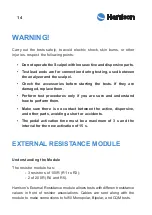
Страница 14: ...fill Monopolar Bipolar and CQM tests Do not operate the Scalpel with loose active and dispersive parts Test lead ends are for connection during testing used between the analyzer and the scalpel Check the accessories before starting the tests If they are damaged replace them Perform test procedures only if you are sure and understand how to perform them Make sure there is no contact between the act...

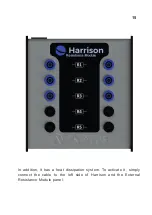
Страница 15: ...15 In addition it has a heat dissipation system To activate it simply connect the cable to the left side of Harrison and the External Resistance Module panel ...

Страница 16: ... Passive port 3 Connect the two ESU Dispersive board terminals together 4 Connect the external resistor ports to the resistor module associating to the appropriate ESU value in Monopolar mode refer to the ESU manufacturer s manual Generator Output Test Cut and Coagulation Connections MONOPOLAR Note the ideal resistance value of each test for each mode Bipolar and Monopolar must be checked by the u...

Страница 17: ...SON click on the Resistance field and indicate the resistance value adopted in the test A bar to adjust the resistance value and an icon to perform the input by a numeric keypad will be displayed Harrison Settings ...

Страница 18: ...Make the connections to perform the power test as follows 1 Connect the two ESU bipolar connectors to HARRISON s Active and Passive port 2 Connect the two ESU Dispersive board terminals together 3 Connect the external resistor ports to the resistor module associating to the appropriate ESU value in Monopolar mode refer to the ESU manufacturer s manual Notes During the test keep it on for a maximum...

Страница 19: ...SON click on the Resistance field and indicate the resistance value adopted in the test A bar will be displayed to adjust the resistance value and an icon to perform the input by a numeric keypad Harrison Settings ...

Страница 20: ...erminals to the target resistance value 2 Check the contact level on the scalpel screen or the response according to the value informed by the manufacturer Contact Quality Monitor CQM Test Connections Power Chart Power RMS Current Crest Factor Frequency Chart Main Frequency Reading Reading with the connections made and with the adjustment of the resistance value adopted it will be shown on the scr...

Страница 21: ...akage Current Test Test 1 CF Type Leakage Current Shows the total open circuit high frequency current leakage from a single electrode active and passive isolated to ground through a 200 ohm resistive test load ...

Страница 22: ...xternal resistor input A4 and A5 2 Connect the active part of the ESU B1 to Harrison s active terminal A2 3 Interconnect the ground pin A1 with the passive connector A3 and the ESU ground Passive Part 1 Connect a 200 ohm resistor A4 to A6 and A5 to A7 to the external resistor input A4 and A5 2 Connect the Passive part of the ESU B2 to Harrison s Passive terminal A3 3 Interconnect the ground pin A1...

Страница 23: ...23 CF Type Leakage Current Active and Passive Part ...

Страница 24: ...he live electrode of a BF Type ESU with reference to the ground as described in this section you will measure the total generator output not a high frequency leakage current While performing this test improperly will not damage the analyzer the resulting high frequency leakage current measurement will not be valid for a ground referenced ESU Harrison Settings WARNING Reading with the connections m...

Страница 25: ...0 ohm resistive load The following figures show the connection for the test between the ESU and HARRISON Make the connections to perform the BF type leakage current test as follows 1 Connect the dispersive part of the ESU B2 to Harrison s active connector A2 2 Connect the active part of the ESU B1 to the A7 3 Connect a 200 ohm resistor from the external module R4 or R5 C1 to A4 and C2 to A5 to the...

Страница 26: ...26 BF Type Leakage Current ...

Страница 27: ...27 ...

Страница 28: ...be shown on the screen Test 3 BF Type Leakage Current Connections It is a BF type leakage current test with reference to the IEC ground You test it by connecting a 200 ohm resistive test load from the ESU s active electrode to the ground on the analyzer Then connect a second 200 ohm resistive load from the ESU s dispersive electrode to the ground on the analyzer The figures on pages 26 27 show the...

Страница 29: ...is procedure is done automatically facilitating the progress of field procedures With the checklist prepared linked to the procedure of the device to be tested access the Arkmeds application and select the OS created After that enable Bluetooth perform the test with Harrison and enable autotest At this point the App will extract all the data captured in the test transfer it to the checklist and li...

Страница 30: ...to 9 seconds This product is a calibration and performance test instrument Any alteration made may alter its references and present dubious readings Maintenance must be performed by personnel trained and authorized by Arkmeds The manufacturer recommends annual preventive maintenance to verify calibration points adjustments and possible hardware and software updates The device has an internal batte...

Страница 31: ...on condensing Size L 261mm x H 212mm x W 88mm Screen 7 inches Communication Wi Fi and Bluetooth Supply 100 240 V 50 60 Hz Battery 12V and 6 6 Ah lasting up to 8 hours depending on the type of use Weight 2 5 kg In Harrison the battery level indicator is displayed in the upper right BATTERY Empty Half load Full Connected to the power grid Status Symbol ...

Страница 32: ...on 5 reading CURRENT Range 0 to 20000 mA Resolution 0 1 mA Variation 5 reading CREST FACTOR Range 1 to 999 9 Variation 1 INTERNAL RESISTANCE Balance 200Ω Variation 2 5 EXTERNAL RESISTANCE Balance 50Ω 100Ω 200Ω 300Ω 500Ω Variation 1 FREQUENCY Range 1kHz to 20Mhz ...

Страница 33: ...33 FAQ evolving people companies and markets ELECTROSURGERY ANALYZER In case of doubts problems or suggestions please contact the Arkmeds Customer Success Team at https www arkmeds us support ...

Отзывы: