Installation and Setup
27
Hardware Reference Manual – DXLink™ Twisted Pair 4K Transmitters/Receivers
Scenarios / DIP Switch Settings Table
The table below contains the most common scenarios for setting up DXLink Modules as a standalone pair or with other equipment.
Find the scenario in the table that you want to use and then set the DIP switches accordingly.
A detailed explanation of functions
for each toggle is provided on previous pages.
NOTE:
Toggle settings do not apply to the 4K HDMI Wallplate TX.
TIP:
Each toggle’s ON position is toward the connectors on the rear of the DXLink Modules (see page 25).
* Connect the ICS LAN 10/100 port of the DXLink unit to the network device (e.g., laptop, IP controlled projector, AMX ICSLan EXB
Device). In a standalone setup, connect the ICS LAN 10/100 port of the other DXLink unit to the network.
** In a standalone setup using NetLinx control of the DXLink serial/IR ports, only one of the DXLink units should be connected to
the network (the unit with #1 Toggle enabled).
IMPORTANT:
When connecting a Receiver Module in a standalone pair setup to a Master (or Virtual Master) for upgrade purposes, #1
and #3 Toggles must be ON. #2 is only required on each module if serial and/or IR control is required from the Master.
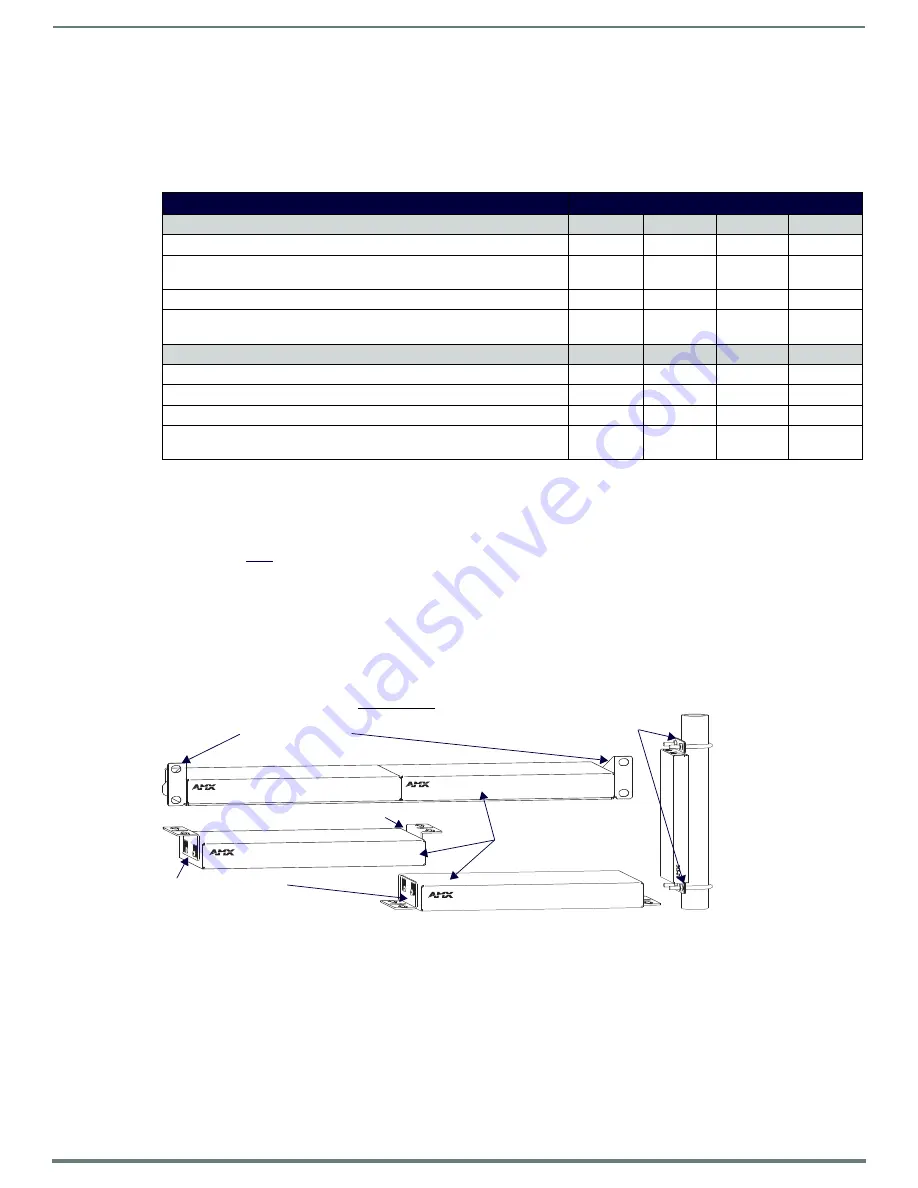
Mounting Options for Modules (Rack Trays and Mounting Brackets)
CAUTION:
To prevent overheating, avoid placing high heat producing equipment directly above or below the modules. We
recommend allowing plenty of clearance above the vent holes on top of the modules. Do not place anything directly on top of the
modules that would restrict airflow through the vent holes on top.
The DXLink 4K HDMI Receiver Module is classified as a V Style module, which has optional V Style mounting hardware. These
versatile mounting options include rack trays and mounting brackets for desktops, under desks, on walls, and on poles. For details
on V Style Mounting Kit options, see www.amx.com.
IMPORTANT:
When mounting under a surface, the module should be mounted upright and lowered in the slots to provide an airflow
gap between the surface and the vent holes. If not using V Style brackets, be sure to leave a gap between the top of the unit and the
surface for heat to escape.
Mounting Options for Wallplates
The DXLink 4K HDMI Wallplate TX mounts in a standard US single-gang back box. Standard decor style cover plates are customer
provided to allow matching the individual decor of an environment or matching other standard decor covers in a room/area
IMPORTANT:
Be sure to measure the back box and any other components used to mount the Wallplate prior to installation/
construction to ensure the unit fits (e.g., some mud rings do not work unless their corners are modified).
Common Scenarios
DIP Switch Toggle Settings
Standalone Setup – TX/RX pair direct connection
1
2
3
4
AV signals only (plus serial/IR passthrough)
OFF
OFF
OFF
OFF
AV with Ethernet passthrough to networked device* (plus serial/IR
passthrough)
ON
OFF
OFF
OFF
AV with NetLinx control of TX/RX unit and serial/IR ports**
ON
ON
ON
OFF
AV with NetLinx control of TX/RX unit and serial/IR ports, plus Ethernet
passthrough to networked device*
ON
ON
ON
OFF
Switcher Setup – TX/RX with Enova DGX/Solecis 4K Switcher
1
2
3
4
AV signals only
OFF
OFF
OFF
OFF
AV with Ethernet passthrough to networked device*
ON
OFF
OFF
OFF
AV with NetLinx control of TX/RX unit and serial/IR ports
OFF
OFF
ON
OFF
AV with NetLinx control of TX/RX unit and serial/IR ports, plus Ethernet
passthrough to networked device*
ON
OFF
ON
OFF
FIG. 13
V Style mounting hardware
V Style Single Module
Surface Mount brackets
V Style Module Tray
V Style Single Module Pole Mount
Do not mount upside down
Leave minimum gap of 3/8 in (9 mm)


