background image

23

SETUP MENU

Setup Menu

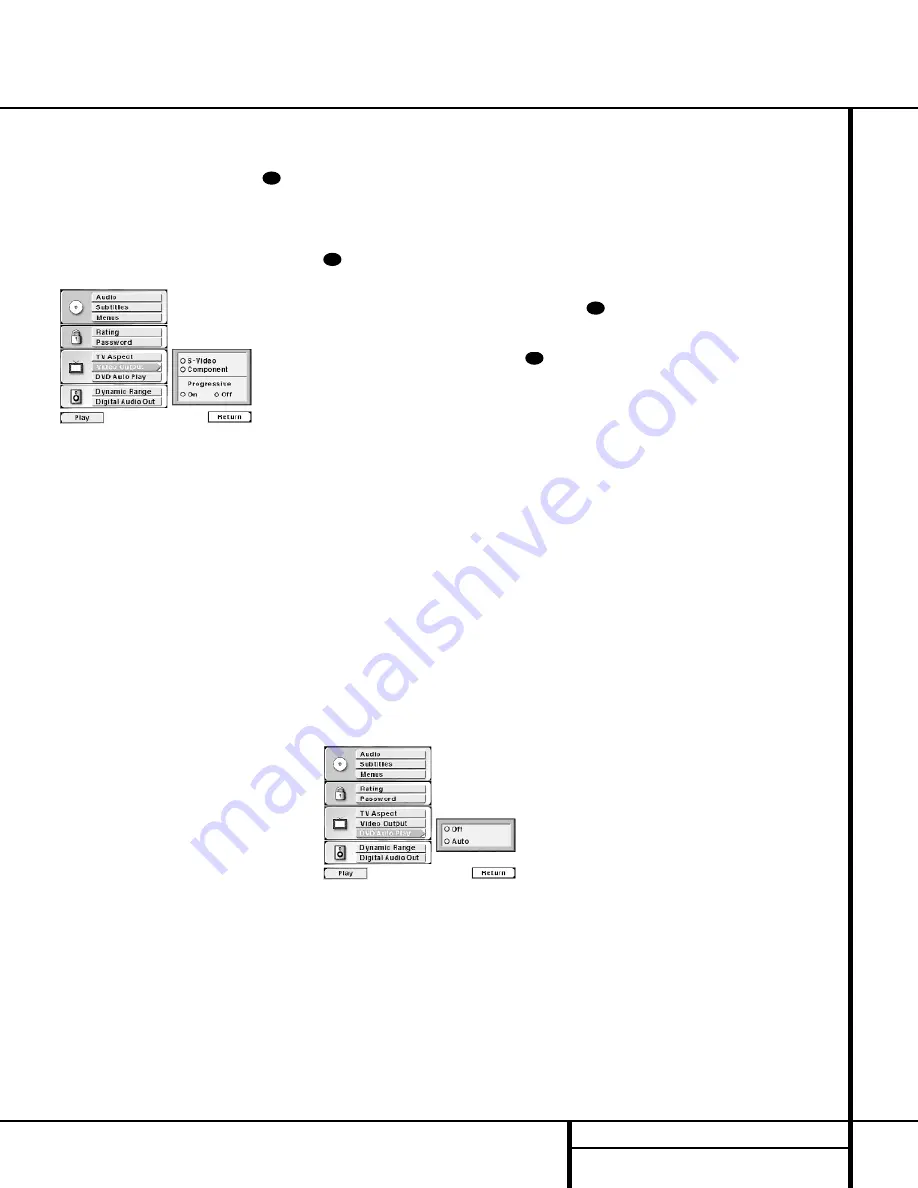
To select the Video Output you must first be
viewing the Setup Menu (Figure 1), which is
available by pressing the 

Menu Button

while the unit is in the Stop mode. At the Setup
Menu, press the 

¤

Navigation Button

e

until the Video Output option is highlighted.
Press the 

Enter Button

`

to view the

options for this selection (Figure 11).

Figure 11

If you are using the S-Video output only, no
change is required, but it is a good idea to
check this option to make certain that the circle
next to the S-Video option is orange.

If you are using the Component Video jacks, but
are connecting the DVD 50 to a standard (ana-
log) television, press the  

/

¤

Navigation

Buttons

e

so that the circle next to the

word “Component” is orange. Press the 

Enter

Button

`

to store the setting in the DVD 50’s

memory, but DO NOT change the setting in the
bottom half of the menu box. The orange circle
in the Progressive section of the menu should
be next to “Off”.

If you are using the Component Video jacks for
connection to a video display that is compatible
with a progressive scan signal, first press the ‚
Navigation button so that the circle next to 
the word “Component” is orange. Next, press
the 

Enter Button

`

, then press the 

/

Navigation Buttons

e

so that the orange

circle in the lower portion of the menu box
under the word “Progressive” is next to the
word “On”. Press the 

Enter Button

`

to

enter the setting to the DVD 50’s memory.

WARNING:

Once the setting for progressive

scan output is entered, an image will only be
visible on a progressive scan-compatible 
video display. If you change the setting to
“Progressive” Scan in error, you must reset the
unit by first pressing the 

Stop Button

j

/

!

to stop any disc that is playing. Next, press the

Stop Button

j

/

!

again and hold it for

five seconds before releasing it. Turn the unit
off and pause for a few seconds. When you turn

the DVD 50 on again, the video output will be
restored to the standard setting, and a picture
will once again be visible on a conventional
analog display.

If you have no further changes to make after
setting this default, press the 

Menu Button

to remove the Setup Menu from the

screen, or press the 

Play Button

g

/

#

to

resume playback.

To enable the Auto Play function you must first
be viewing the Setup Menu (Figure 1), which is
available by pressing the 

Menu Button

while the unit is in the Stop mode. At the Setup
Menu, press the 

/

¤

Navigation Button

e

until the Auto Play option is highlighted.

Press the 

Enter Button

`

to view the

options for this selection (Figure 12).

DVD Auto Play

The DVD 50’s Auto Play function makes it easier
and more enjoyable to view DVDs. When this
feature is activated, the unit will automatically
start playback when the Main Menu of a DVD
appears if no other button is pressed within
three seconds of the time the Main Menu
appears. In normal use, most discs stop at the
Main Menu to wait for your input, requiring
some user intervention. With Auto Play, DVD
viewing is seamless, as the start of the movie is
automatically selected unless another function
is specifically requested. Of course, even with
Auto Play in effect, you may always customize
the disc’s playback by pressing any button to
make your selection within three seconds.

Figure 12

To enable the Auto Play function, press the 

¤

Navigation Button

e

so that the circle

next to the word “Auto” is orange. Next, press
the 

Enter Button

`

to activate the feature

and store the setting in the DVD 50’s memory.
Note that the 

AUTOPLAY

Indicator

I

will light to remind you that DVD discs will go
directly into the Play mode, rather than stop at
their Main Menu.

To disable the Auto Play function, press the 

Navigation Button

e

so that the circle

next to the word “Off” is orange. Next, press
the 

Enter Button

`

to store the setting in

the DVD 50’s memory. If the setting was previ-
ously active, the 

AUTOPLAY

Indicator

I

will go out.

If you have no further changes to make after
setting this default, press the 

Menu Button

to remove the Setup Menu from the

screen, or press the 

Play Button

g

/

#

to

resume playback.

28

28

28

28

Содержание DVD 50

Страница 1: ...DVD 50 5 Disc DVD Changer OWNER S MANUAL Power for the Digital Revolution ...

Страница 2: ...nging Camera Angles 32 CD Playback 33 MP3 Playback 34 VCD Playback 35 Programmed Play 35 Random Play 36 Programmed Play 37 Bookmarks 38 DVD Language Codes 39 Troubleshooting Guide 40 Technical Specifications DVD 50 5 Disc DVD Changer Typographical Conventions In order to help you use this manual with the remote control front panel controls and rear panel connections certain conventions have been u...

Страница 3: ...wned Although many of the features of the DVD 50 resemble those of standard CD changers or players there are a number of functions that you may be unfamiliar with To ensure that you are able to take advan tage of all the power and flexibility the DVD 50 has to offer we encourage you to review this manual That small investment of your time will pay major dividends in the enjoyment you will get from...

Страница 4: ...ve or should the unit ever need repair To minimize the size of the carton in storage you may wish to flatten it This is done by care fully slitting the tape seams on the bottom and collapsing the carton down to a more two dimensional appearance Other cardboard inserts may be stored in the same manner Packing materials that cannot be collapsed should be saved along with the carton in a plastic bag ...

Страница 5: ...n to see a listing of the chapters on a disc Component Video This is a new form of video signal that eliminates many of the arti facts of traditional composite video signals by splitting the signal into a separate luminance channel and two color difference signals With a component video connection you will see greater picture resolution and eliminate many picture imperfections such as the moiré pa...

Страница 6: ...n 9 Open Close Button Press this button to open or close the Disc Tray 5 Skip Forward Reverse Press this button to move forward or backward through the music tracks on a CD disc or the chapters on a DVD disc Stop Press this button once to place the disc in the Resume mode which means that playback will stop but as long as the tray is not opened or the disc changed DVD playback will continue from t...

Страница 7: ...HDCD encoding is playing The HDCD decoder will automatically be activated to pro vide high resolution audio playback G Track Number Calendar This area pro vides a graphical display of the track numbers remaining on a CD When a disc has more than 14 tracks the indicator at the end of the cal endar display will light H Angle Indicator This indicator lights when the DVD being played has multiple angl...

Страница 8: ... flashing the disc plays at 4x normal speed When the left triangle is flashing the disc plays at 16x normal speed When both triangles are flashing the disc plays at 100x normal speed For CDs only the first three Fast Search modes are available Lights when the disc is paused Lights when the disc is in the Fast Search Reverse mode For DVDs When both triangles glow steadily the disc plays at 2x norma...

Страница 9: ...nput jack of another compatible Harman Kardon remote controlled product to have the built in Remote Sensor on the DVD 50 provide IR signals to other compatible products Analog Audio Outputs Connect these jacks to an audio input on an A V receiver or surround processor for analog audio playback Component Video Outputs These out puts carry the component video signals for con nection to analog or dig...

Страница 10: ...tton q Light Button r Check Button s Program Button t Clear Button u Zoom Button v Mark Button w Step Buttons x Pause Button y Forward Search Button z Next Button Enter Button 28 Menu Button 29 Power Off Button 30 Angle Button 31 Subtitle On Off Button 32 3 ON OFF SEARCH OPEN CLOSE SEARCH STOP PAUSE PREV MENU ENTER RETURN STATUS NEXT DVD 50 RC RANDOM DISC SKIP CLEAR PROG CHECK LIGHT A B SLOW STEP ...

Страница 11: ...dom Button Press this button to begin the playback of all tracks on a disc in random order m Disc Skip Button Press this button to move to the next available disc in the tray n Numeric Buttons Press these keys to enter data for sequential programming to enter or change the access password for parental con trol to enter a language code or to respond to menu options presented by a disc o Repeat Butt...

Страница 12: ...s this button to change the angle in use Note that this function is only available on discs that are specially prepared to take advantage of the multiple angle function and only for those parts of the disc that are recorded with multi ple angle content The DVD 50 will display a camera icon on the screen to indicate when this feature is available Subtitle On Off Button When a DVD is playing press t...

Страница 13: ...iver or surround processor Option 2 Use this setup if the video con nections will go directly to a television set or video projector but the audio connections will be made to an A V receiver or surround processor Option 3 Use this setup if all audio and video connections will be made through an A V receiver or a surround processor Important Notes on Installing the DVD 50 The following important no...

Страница 14: ...e An S Video connection is the next best quality followed by a standard composite video connection If the video display has component video inputs connect the Y Pr Pb Component Outputs on the DVD 50 to the matching input jacks on the back of your television as shown in Connection This connection is the same regardless of if the component con nection is to a digital television for progressive scan ...

Страница 15: ...input capabili ties of your video display make one of the fol lowing connections For the highest video quality use component video connections if available An S Video connection is the next best quality followed by a standard composite video con nection If the video display has component video inputs connect the Y Pr Pb Component Outputs on the DVD 50 to the matching input jacks on the back of you...

Страница 16: ... ing either an optical or coaxial cable For optical connections run the cable from the Optical Digital Output on the DVD 50 to an optical input on the A V receiver as shown in Connection For coaxial connections run the cable from the Coaxial Digital Output on the DVD 50 to a coaxial input on the A V receiver as shown in Connection Either type of connection may be used and only one is required Reme...

Страница 17: ...play If the video display has an S Video input and component video is not available connect the S Video Output on the DVD 50 to the S Video input on your video display as shown in Connection If the only video input available on your televi sion is a standard video jack connect the Composite Video Output on the DVD 50 to a matching composite video input on your video display as shown in Connection ...

Страница 18: ...ould any electrolyte leak from the batter ies inside the remote control unit wipe it away but avoid any contact If any electrolyte should come into contact with your skin wash it off thoroughly with water System Defaults The final step of the installation is to establish the system s defaults The factory settings for the unit will accommodate most requirements so it is not essential that they be c...

Страница 19: ...uage is pres ent on the DVD disc being played However when that language is not present the lan guage used will be the one preprogrammed into the disc itself Typically that default will be English for discs sold in Region 1 but the selection may vary at the discretion of the disc s producer Although the default determines the language that will be used when a disc is first put into play the langua...

Страница 20: ...r rating symbol the disc may or may not contain that rating in its software In addition to the five MPAA ratings of G PG PG 13 R and NC 17 the DVD 50 will accommodate a total of eight ratings steps as set by the creators of the DVD format These additional steps allow for more critical control of program playback for all audiences To select the permitted ratings values you must be viewing the Setup...

Страница 21: ...n to remove the Setup Menu from the screen or press the Play Button g to begin or resume playback Changing the Password If you feel that the password has become known to an unauthorized person you may change the password without unlocking the system To change a password you must be viewing the Setup Menu Figure 1 which is available by pressing the Menu Button while the unit is in the Stop mode At ...

Страница 22: ...reen or the other Note how ever that even when you select this option playing a wide screen only movie will result in black letterbox bars at the top and bot tom of the screen This is due to the way the disc was produced and it cannot be changed 16 x 9 Wide Screen Choose this setting only if you have a wide screen television set 16 x 9 aspect ratio With this setting the DVD 50 will adjust the outp...

Страница 23: ... standard setting and a picture will once again be visible on a conventional analog display If you have no further changes to make after setting this default press the Menu Button to remove the Setup Menu from the screen or press the Play Button g to resume playback To enable the Auto Play function you must first be viewing the Setup Menu Figure 1 which is available by pressing the Menu Button whi...

Страница 24: ...h both Dolby Digital and DTS multichannel soundtracks the DVD 50 also accommodates the latest 96kHz DVD recordings This menu section allows you to select how 96kHz audio pro grams are handled so that they are compatible with your A V receiver or surround processor To select a Digital Audio Output default you must be viewing the Setup Menu Figure 1 which is available by pressing the Menu Button whi...

Страница 25: ...f your A V receiver or surround processor IS capable of handling 96kHz signals select the 96kHz option When this choice is made the DVD 50 will pass each type of signal through without any further processing When a 96kHz signal is present it will be noted by the 96kHz 24 Bit Audio Indicator T Once the selection is made press the Enter Button to return to the Main Settings Menu At this point you wi...

Страница 26: ...y carousel while it is moving Do not attempt to rotate the disc tray by hand If the tray drawer or carousel tray appears to be stuck contact your local Harman Kardon authorized service center When loading discs always place the discs one at a time in the center position in the tray even if there are empty positions to the left and right of center After placing a disc in the center position press t...

Страница 27: ...ature follow these steps While the unit is stopped and no disc is playing press and hold both the Reverse Search Button h and the Next Button z simultaneously for five seconds Release the buttons when you see that the Information Display reads AUTO OFF N Press the Next Button z to toggle the display so that it reads AUTO OFF Y Press any other button on the remote to store the setting and to return...

Страница 28: ...r Playback Mode Indicator S will flash Note that there will be no audio playback dur ing fast forward or reverse play of DVD discs This is normal for DVD as A V receivers and surround processors cannot process the digital audio streams during fast play modes audio will be heard during fast play of conventional CDs For CD playback there are three fast play speeds Each press of the of the Search For...

Страница 29: ... the DVD system For example most current DVD discs do not take advantage of the multiple angle feature When you press a button and the player displays the Feature Prohibited icon this is an indication that the disc has not been programmed for that feature In addition it is common for the producers of DVD discs to block the use of certain functions during only some parts of a disc For example many ...

Страница 30: ...ntil the disc icon for the current title with the letter T underneath it is high lighted in white between yellow brackets 3 Press the Enter Button 4 Note that the number to the right of the T will be replaced with two dashes 5 Use the Numeric Buttons n to enter the number of the title to be accessed 6 The desired title will automatically be started Titles may also be selected during the playback o...

Страница 31: ...uage but they do not determine if the sub titles are actually displayed on the screen To have the subtitles appear at any time press the Subtitle On Off Button to toggle the subtitles on or off with each press of the but ton When the subtitles are active a Check mark icon will appear in the box to the right of the subtitle description as shown earlier Also note that some DVD discs do not contain s...

Страница 32: ... first track on the disc and the musical notes in the icon will change and flash 5 The unit will play the first ten seconds of each track on the disc moving from one track to the next 6 To play a track during IntroScan press the Play Button g 7 If no track is selected the disc will stop play ing when it has played the first ten seconds of each track in order Time Display Selection When playing CDs...

Страница 33: ...ck with MP3 Discs The DVD 50 is capable of creating playlists up to 60 tracks long with the MP3 files on a properly recorded disc To create a playback list for MP3 titles follow these steps Step 1 Load a compatible MP3 disc but do not put it into play Step 2 Press the Program Button s to open a playlist as indicated by the appearance of an E to the right of the word Program on the right side of th...

Страница 34: ...of functionality for any VCD will vary widely and it is ultimately determined by the way the disc was created not by the DVD 50 When playing VCD discs most standard DVD CD playback controls function as normal including Play Stop Pause Forward or Reverse Slow Play and Fast Forward or Reverse Search x2 4x and 8x speeds The indications for fast play in either direction work as described for CD playba...

Страница 35: ...from beginning to end until play back is manually stopped Repeat 1 Disc Plays a specific disc from start to finish until playback is manually stopped Repeat Title For DVD discs only this mode repeats the title currently being played until playback is manually stopped Repeat Track Chapter Repeats the CD track or DVD chapter currently being played until playback is manually stopped Repeat A B Repeat...

Страница 36: ...vigation Button e to move to the next selection area 7 The blue highlighted box will now appear in a column where the options are Add Delete Play and Done Since this is the first selection to be entered press the Enter Button and note that the selected disc track title and chapter will be added to the Play List column over a beige highlighted area The blue highlight will return to the disc box to ...

Страница 37: ...color Press the Enter Button to return to normal play Press the Clear Button t to remove the Bookmark Menu Bar from the on screen display The marked spots will remain in the DVD 50 s memory as long as the disc is not changed The Bookmark memory will remain active if the disc is stopped or the unit turned off but it will be lost if the disc is removed from the player or if the disc tray drawer is o...

Страница 38: ...ti 7185 Hausa 7265 Hebrew 7387 Hindi 7273 Hungarian 7285 Icelandic 7383 Indonesian 7378 Interlingua 7365 Interlingue 7369 Iunpiak 7375 Irish 7165 Italian 7384 Japanese 7465 Javanese 7487 Kannada 7578 Kashmiri 7583 Kazakh 7575 Kinyarwanda 8287 Kirghiz 7589 Kirundi 8278 Korean 7579 Kurdish 7585 Laothian 7679 Latin 7665 Latvian Lettish 7686 Lingala 7678 Lithuanian 7684 Macedonian 7775 Malagsy 7771 Ma...

Страница 39: ...gs DVD disc is in Fast or Slow mode There is no audio playback on DVD discs during Fast or Slow mode Picture is distorted or jumps during MPEG 2 decoding It is a normal artifact of DVD playback for pictures Fast Forward or Reverse Play to jump or show some distortion during Rapid Play Some remote buttons do not operate Function not available for this disc Some discs do not include all DVD features...

Страница 40: ... knobs and buttons Height measurement includes feet and chassis All specifications subject to change without notice Harman Kardon is a registered trademark and Power for the Digital Revolution is a trademark of Harman Kardon Inc Manufactured under license from Dolby Laboratories Dolby Pro Logic AC 3 and the Double D symbol are trademarks of Dolby Laboratories Confidential Unpublished Works 1992 20...

Отзывы: