background image

Assembly

January  1999 

Unit 2 MKIII 

18

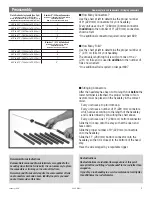
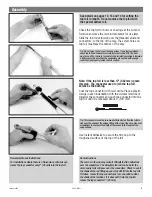
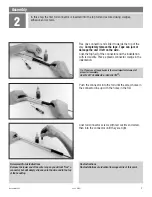
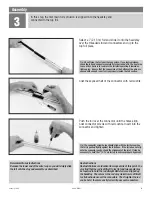
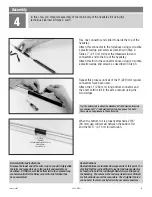
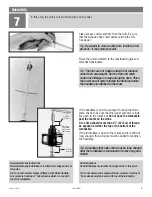
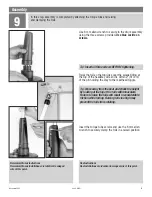
In this step, the first main foil extrusion is slipped onto the headstay and  

connected to the top foil.

3

Tip: The connector screw holes should align with the foil holes when 

the foil is pushed tightly against the foil above. If the foil does not slip 

onto the connector easily, check the alignment of the joint. It may be 

necessary to hold the 7' (2.13 m) foil up to achieve proper alignment.

Norseman/Sta-Lok Instructions


Because the lower end of the wire is open you will simply slide 
the foil onto the stay and assemble as described.

Rod Instructions


Rod installations are identical to swaged wire at this point. You 
may find that the rod is difficult to lay flat and two people may 
be required to hold the rod straight while foils are slipped up 
the headstay. The curves in the rod may make it more difficult 
to slide extrusions over the connectors. The straighter the rod 
can be held, the more easily foils will pass over connectors.

Select a 7' (2.13 m) foil and slide it onto the headstay 

over the threaded stud and connectors and up to the  

top foil piece.

Coat the exposed half of the connector with red Loctite.

Push the foil over the connector until the holes align. 

Coat connector screws with red Loctite. Insert into the 

connector and tighten.

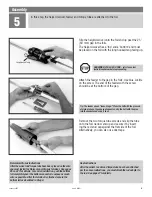
Tip: Do not force the foil over the connectors. If you feel resistence, 

check the foil and connectors carefully for burrs and dirt. The best way 

to see dirt or burrs is to look into the foil while pointing it towards a 

light source. Be sure that the connectors at the bottom of the wire are 

spaced with enough room to align properly inside the foil section.

Содержание UNIT 2 MKIII

Страница 1: ...I N S T R U C T I O N M A N U A L English Deutsch Français Italiano MKIII Jib Reefing Furling Systems UNIT 2 ...

Страница 2: ...fanlage bewiesen haben Die Anlage wird Sie zuverlässig und mit einem minimalen Wartungsaufwand begleiten allerdings setzt dies eine richtige Montage voraus Diese Anleitung ist ein wichtiger Bestandteil des gesamten Roll ReffSystems Bitte nehmen Sie sich die Zeit und lesen Sie diese Anleitung sorgfältig durch bevor Sie mit der Montage beginnen bzw die Anlage betreiben Die Anleitungen mögen abschrec...

Страница 3: ... le bateau et le rendre opérationnel Aufriggen Das Aufriggen der vormontierten Anlage an Ihrem Schiff Messa In Uso Queste sono le indicazioni su come installare sulla barca il sistema assemblato e renderlo operativo Operation 31 35 This section explains system use It also discusses tensioning the headstay and converting to racing Utilisation Ce chapitre vous montre comment on s en sert Comment ten...

Страница 4: ...form Konus Vérification de la taille Commandez la terminaison convenant à la taille de votre Rod ou de votre Câble Le Unit 2 est disponible avec un axe de chape de 16 mm 5 8 Assurez vous que vous avez la taille correcte d axe pour la taille de votre bateau Contactez votre vendeur pour avoir la chape articulée filetée cor recte et l échanger si nécessaire Harken vous conseille de ne pas repercer vo...

Страница 5: ... serti supérieur à œil Oberes Augterminal Terminale ad occhio pressato Harken Studs Terminaisons Harken Harken Terminals Terminali Harken Wire Rod Taille du Câble ou du Rod Draht o Rod Grösse Dimensione del cavo o del tondino Swage Embout à sertir Walz Terminal Terminale a pressare Sta Lok Norseman Rod Rod Rod Tondino 5 16 Part No Ref Art Nr Num 852 Part No Ref Art Nr Num 856 Part No Ref Art Nr Nu...

Страница 6: ... Art Nr HR897 1 Bottom Profil 610 mm lang Profilstück zwischen Mitnehmerhülse und Einfädler Ein Top Profil entfällt bei bestimmten Vorstaglängen Der Teile Karton enthält Teile in Blister Verpackung sowie eine Schachtel mit kleinen Teilen La scatola dell estruso contiene Parti di estruso lunghe 2 13 m Un kit standard è composto da otto pezzi di cui uno può essere stato tagliato per usarlo come part...

Страница 7: ...il box contains 8 7 2 13 m Foil Extrusions A standard kit has eight foils but one may have been pre cut for use as your top foil If your headstay is longer than 60 2 18 339 m you should order one extra foil extrusion Part 897 1 24 610 mm Special Bottom Foil Extrusion The main components box contains parts packaged on the display card plus a smaller parts box Main Components Halyard Swivel Drum Ass...

Страница 8: ... 1 Loctite rossa 1 Feeder con vite Diese Teile werden vor der Montage auf das Vorstag gefädelt Unter Umständen sind diese Teile bereits auf Ihrem Vorstag montiert und fehlen deshalb 1 Abschluss Kappe für oberstes Profil 1 Unterster Verbinder 288 mm 8 Normale Verbinder 229 mm Ist Ihr Vorstag länger als 18 618 m benötigen Sie einen zusätzlich Verbinder ArtNr HR899 Teile Für Vor Montage WICHTIG Vorst...

Страница 9: ...y be missing as the parts may have been placed on your headstay in advance 1 Top Foil Trim Cap 1 115 16 288 mm Bottom Connector 8 9 229 mm Regular Connectors If your headstay is longer than 61 1 18 618 m you will need one more connector Order part 899 IMPORTANT Note headstay terminal is sold separately Be sure that you have ordered the correct size for your boat Miscellaneous Parts Rigger Componen...

Страница 10: ...eu plus bas Ceci doit empêcher la ralingue de se prendre dans l engageur quand on affale la voile La côte mini de 914 mm s applique dans le cas du raccourcissement du profil inférieur voir page 13 Les autres installations ont une hauteur minimale de 1179 mm de l engageur Manille de point de drisse et d amure Si vous utilisez les manilles assurez vous qu elles passent dans les oeillets de la voile ...

Страница 11: ...the rest of the sail to help flatten the sail It will also help the head to roll more smoothly Note feeder height and extend the bottom of the luff tape downwards so it is below the feeder This will pre vent the luff tape from catching in the feeder as the sail is lowered The 36 914 mm minimum pertains to shortened bottom foil installation see page 13 Other installations will have a minimum feeder...

Страница 12: ...étau uniquement pour Rod ou embout à sertir Perceuse électrique pour percer à 8 mm voir page 13 Tube de mastic polysulfide marine pour Norseman ou Sta lok seulemenl N utilisez pas de mastic silicone marine Scie à métaux Lime papier de verre ou toile émeri Un rouleau de papier essui tout Cisaille pour câble Uniquement si vous devez couper vous même votre étai Décapeur thermique uniquement par temps...

Страница 13: ...e assembled on the ground and must not be assembled with the headstay in a vertical position Norseman Sta Lok or Rod Headstay Installations The assembly instructions show assembly of a swaged wire headstay Norseman Sta Lok and rod headstay installa tions differ slightly in a few areas Differences are noted at the bottom of each page in shaded boxes Heat gun only needed if you will be working durin...

Страница 14: ...werden Bei manchen Schiffen mit sehr schmalem Bug oder Bugsprit passt die Trommel nicht zwischen den Bugkorb Oft kann dieses Problem mit einem Toggel gelöst werden Die Anlage ist so konstruiert dass das Segel möglichst tief auf Deck angeschlagen ist Obwohl es manchmal notwendig ist die Trommel höher zu montieren um mehr Platz für den Anker zu schaffen sollten Sie darauf achten die Trommel nicht hö...

Страница 15: ...o raise the drum to avoid these problems The system is designed to keep the sail as close to the deck as possible While it may be necessary to raise the drum to provide clearance for an anchor or to fit inside a pulpit do not mount the drum higher than required Raising the drum reduces sail luff length and increases heeling If you need better visibility under your genoa mount the drum as low as po...

Страница 16: ...to vita più lunga in ogni caso va analizzato attentamente prima di riusarlo Sostituire lo strallo prina di montare l avvolgifiocco è molto più facile sicuro e meno costoso che usarne uno in condizioni discutibili Taglio dello strallo Prima di tagliare lo strallo ci si assicuri di aver determi nato la lunghezza perno a perno e di averla scritta sulla 4 di copertina di questo manuale per averla a po...

Страница 17: ...o determine the cut point of a wire or rod measure up from the lower measurement point of the headstay Swage Fittings Subtract 22 559 mm from your overall pin to pin length and cut the wire at this point When the headstay is shortened 22 559 mm the turnbuckle will be one half to two thirds open allowing adjustment of the headstay length If necessary you may shorten your headstay up to 24 610 mm bu...

Страница 18: ...libérer la tête de clou pour pouvoir faire la coupe au bon endroit Voir photo ci contre Le raccourcissement de 457 mm implique que le ridoir de l enrouleur soit réglé entre moitié et 2 3 ouvert pour reproduire la longueur initiale hors tout de l étai Si nécessaire vous pouvez raccourcir l étai jusqu à 508 mm mais raccourcir de plus de 457 mm limite la plage de réglage de l étai Si la longueur dédu...

Страница 19: ...f your turnbuckle but below the actual rod tap the turnbuckle up the rod to free the coldhead from the turnbuckle and cut the rod at the correct point When the headstay is shortened 18 457 mm the turnbuckle will be one half to two thirds open allowing adjustment of the headstay length If necessary you may shorten your headstay up to 20 508 mm but shortening a rod more than 18 457 mm will limit hea...

Страница 20: ...Faites sertir le câble par un gréeur digne de ce nom Quanti estrusi Usare la tabella qui a sinistra per determinare il giusto numero di estrusi da 2 13 m necessari per lo strallo La lunghezza variabile dell estruso superiore si ricava da uno dei pezzi da 2 13 m e va aggiunta al numero di pezzi dell estruso indicati nella tabella di sinistra E necessario un estruso supplementare H897 Inserimento de...

Страница 21: ...one of the 7 2 13 m foils and is used in addition to the number of foils shown at left One additional foil required order part 897 Stringing Connectors After the headstay has been cut to length but before the lower terminal is attached the proper number of con nectors must be placed on the headstay in the correct order Every unit uses a top foil trim cap Every unit uses a number of 9 229 mm connet...

Страница 22: ...nne l emplacement du trou de vis Utilisez de la bande adhésive posée autour du profil de façon à ce que son bord supérieur passe au centre du coup de pointeau Percez 2 trous de 8 mm Utiliser les pointages effec tués dans le profil comme guides Le centre de ces pointages doivent se trouver à 82 5 mm et 108 mm de la coup du profil ATTENZIONE Ogni volta che si taglia lo strallo assicu rarsi di pulire...

Страница 23: ...r the Foil After cutting foil clean all shavings from inside the foil Failure to deburr or clean the inside of the foil may cause it to seize to a connector when it is being installed Some Installations Cutting and Drilling Bottom Foil Consult the chart on page 13 to see if you need to short en the special bottom foil If you do use a hacksaw to shorten the special bottom foil by 61 2 165 mm Make s...

Страница 24: ... m 18 542 m 203 mm 12 217 m 12 192 m 12 167 m 14 351 m 14 326 m 14 300 m 16 485 m 16 459 m 16 434 m 18 618 m 18 593 m 18 576 m 279 mm 254 mm 229 mm La mise en retrait du connecteur supérieur est sans objet voir page 16 Es wird kein Top Verbinder eingeschoben siehe Seite 16 Non usare un connettore superiore nascosto di tipo interno pag 16 Ne coupez pas le profil inférieur 610 mm 610 mm unterstes Pr...

Страница 25: ...364 m 53 3 16 231 m 46 3 14 097 m 39 3 11 963 m You will not use a recessed top connector Page 16 Do not cut 24 610 mm bottom foil 11 279 mm 10 254 mm 9 229 mm 61 1 18 618 m 61 0 18 593 m 60 11 18 576 m 54 1 16 485 m 54 0 16 459 m 53 11 16 434 m 47 1 14 351 m 47 0 14 326 m 46 11 14 300 m 40 1 12 217 m 40 0 12 192 m 39 11 12 167 m 8 203 mm 60 10 18 542 m 53 10 16 408 m 46 10 14 275 m 39 10 12 141 m...

Страница 26: ... 13 132 m 15 265 m 17 399 m 19 533 m 1 194 m 13 183 m 15 316 m 17 450 m 19 583 m 1 245 m 13 233 m 15 367 m 17 501 m 19 634 m 1 295 m 13 284 m 15 418 m 17 551 m 19 685 m 1 346 m 13 335 m 15 469 m 17 602 m 19 736 m 1 397 m 13 386 m 15 519 m 17 653 m 19 787 m 1 448 m 13 437 m 15 570m 17 704 m 19 837 m 1 499 m 13 487 m 15 621 m 17 755 m 19 888 m 1 549 m 13 538 m 15 672 m 17 805 m 19 939 m 1 600 m 13 5...

Страница 27: ...3 7 13 284 m 4 3 1 295m 64 5 19 634 m 57 5 17 501 m 50 5 15 367 m 43 5 13 233 m 4 1 1 245 m 64 3 19 583 m 57 3 17 450 m 50 3 15 316 m 43 3 13 183 m 3 11 1 194 m 64 1 19 533 m 57 1 17 399 m 50 1 15 265 m 43 1 13 132 m 3 9 1 143 m 63 11 19 482 m 56 11 17 348 m 49 11 15 215 m 42 11 13 081 m 3 7 1 092 m 63 9 19 431m 56 9 17 297 m 49 9 15 164 m 42 9 13 030 m 3 5 1 041 m 63 7 19 380 m 56 7 17 247 m 49 7...

Страница 28: ...dessus Instructions pour les Norseman Sta Lok L extrémité basse du câble étant libre vous n avez pas besoin d enfiler les connecteurs sur l étai Ne tenez donc pas compte du paragraphe concernant le stockage des connecteurs grâce à de la bande adhésive au bas de l étai Instructions pour le rod Les instructions pour le rod sont identiques à celles du câble à cette phase du montage Vous aurez sans do...

Страница 29: ...ure the connectors at the bottom of the headstay with tape as shown Tip Leave at least 1 25 mm between each connector Wrap enough tape on the wire so that the connectors cannot pass over it Norseman Sta Lok Instructions Because the lower end of the wire is open you will not place the connectors on the headstay until needed so you should ignore references to taping the connectors at the bottom of t...

Страница 30: ...r un montage avec un embout à oeil Norseman ou Sta lok à l extrémité haute de l étai ne mettez en retrait que de 25 mm le connecteur supérieur par rapport au bord du profil supérieur Instructions pour le rod Si votre rod est mal redressé il sera beaucoup plus difficile de faire passer les profils sur les connecteurs Cette opération est d autant plus facile que votre rod est plus rectiligne Vérifie...

Страница 31: ...top foil Rod Instructions The curves in the rod may make it difficult to slide extrusions over the connectors The straighter the rod can be held the more easily foils will pass over the connectors Check to see if the shank of the rod fitting on your stay will fit into the top foil If it does recess the top connector as far as needed to clear the shank of the terminal If it does not fit into the to...

Страница 32: ...d sont les mêmes que pour le câble serti à cette phase du montage Libérez un connecteur et faites le monter vers le haut de l étai Enlevez complètement la bande adhésive De la bande adhésive laissée sur la câble peut gêner ou endommager l enrouleur Enduisez de Loctite rouge la moitié haute du con necteur Mettez une cale plastique dans le logement Poussez le connecteur dans le profil jusqu à ce que...

Страница 33: ...p one onto the wire and to the top of the headstay Rod Instructions Rod installations are identical to swaged wire at this point Free one connector and slide it towards the top of the stay Completely remove the tape Tape can jam or damage the unit if left on the wire Coat the top half of the connector and the indentation with red Loctite Place a plastic connector wedge in the indentation Push the ...

Страница 34: ...rrerà l estruso sui connettori Scegliere un pezzo di estruso standard di lunghezza 2 13 m e farlo scorrere sullo strallo sull asta filettata e sui connettori fino al pezzo di estruso superiore Spalmare la metà scoperta del connettore con Loctite rossa e mettere una piastrina di bloccaggio nella sede sulla parte frontale del connettore Spingere l estruso sul connettore fino al punto in cui i fori s...

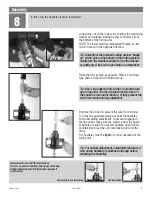
Страница 35: ...ay be required to hold the rod straight while foils are slipped up the headstay The curves in the rod may make it more difficult to slide extrusions over the connectors The straighter the rod can be held the more easily foils will pass over connectors Select a 7 2 13 m foil and slide it onto the headstay over the threaded stud and connectors and up to the top foil piece Coat the exposed half of th...

Страница 36: ...ere un pezzo di estruso standard di lunghezza 2 13 m sull asta filettata e i connettori fino in cima allo strallo Unire questo estruso al connettore che lo precede usando Loctite rossa una piastrina di bloccaggio e le viti di bloccaggio come descritto nel passaggio 3 Ripetere questa operazione fino ad avere usato tutti i connettori standard da 229 mm Unire il connettore inferiore lungo da 280 mm e...

Страница 37: ...he rod straight while foils are slipped up the headstay The curves in the rod may make it more difficult to slide extrusions over the connectors The straighter the rod can be held the more easily foils will pass over connectors Free one connector and slide it towards the top of the headstay Attach this connector to the foil above using red Loctite a plastic wedge and screw as described in Step 2 S...

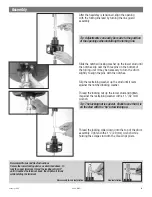
Страница 38: ... un bas et doit être installé avec la plus longue patte de fixation en forme de crochet vers le haut Astuce Quand il est dans la bonne position l autocollant Harken est dans le bon sens Placez l engageur dans l espace de 60 mm laissé entre les deux profils Mettez une goutte de Loctite bleue sur la vis La vis de fixation se trouve dans la moitié basse de l engageur quand il est placé en position no...

Страница 39: ...he rod See page 27 for details Slip the halyard swivel onto the foil and up past the 23 8 60 mm gap in the foils The halyard swivel has a top and a bottom and must be placed on the foil with the long hooked tang facing up Attach the feeder to the gap in the foils Use blue Loctite on the screw The end of the feeder with the screw should be at the bottom of the gap Remove the two torque tube screws ...

Страница 40: ...aites le rentrer dans la douille de blocage La vision des marques de couleur sur les filetage signifie un engagement insuffisant des parties filetées dans la cage du ridoir Ceci est prévu pour vous faciliter la vie et ne peut être outrepassé La seule façon positive de vous assurer que les file tages sont suffisamment engagés est de mesurer leur partie visible En aucun cas vous ne devrez avoir plus...

Страница 41: ...locking cylinder onto the threaded stud and into the locking collar split end first Thread the drum assembly onto the stay until the colored mark on the threads does not show The coloring on the threads warns of insufficient thread engagement It is provided only for your con venience and may wear off The only positive means to insure proper thread engagement is to measure the exposed threads At no...

Страница 42: ...stallazione dei terminali Norseman e Sta Lok è identica a quella per i terminali a pressare per cavo a questo punto Suggerimento per controllare il totale di filettatura scoperta con terminali Norseman e Sta Lok misu rare dalla sommità del tamburo che è pari con la sommità dell arridatoio Istruzioni per tondino L installazione dei terminali per tondino è iden tica a quella per i terminali a pressa...

Страница 43: ...il Raise the unit and attach to the masthead toggle and stemhead chainplate Tip The foils are not fragile and will not collapse under their own weight Don t let the unit catch under deck fittings or scrape along the dock Place the lower end of system inside the lifelines before the headstay is attached to the mast If the headstay is not long enough to reach the chain plate check to be sure that th...

Страница 44: ...Sta Lok e tondino Non è necessario tenere l estruso in alto Mentre si dà tensione tenere il terminale Norseman Sta Lok per impedirgli di girare Astuce Il arrive que la rondelle crantée ne tombe pas d elle même du bas de l enrouleur Faites alors bouger légèrement le panier de l enrouleur pour libérer cette rondelle crantée des petits pions ou utilisez la pointe d un couteau ou d un petit tournevis ...

Страница 45: ...n knife or screwdriver Raise the foils as high as possible Place a Vise Grips type pliers on the stud to hold them up Tip Use a rag under the Vise Grips to prevent dam age to the stud The Vise Grips serve two roles 1 they hold the foils out of the way 2 they prevent the wire from turning during adjustment Hold the Vise Grips to prevent the wire from turning Turn the line guard assembly to adjust t...

Страница 46: ... terminale Astuce L ajustement de la position définitive de cette ouverture pourra être fait très facilement lors de l installation de la drosse de l enrouleur Suggerimento la regolazione dell apertura può essere portata a termine più facilmente durante il montaggio della cima per avvolgere Avvitare il dado di bloccaggio lungo l asta e serrarlo contro la rondella con una chiave da 32 mm Astuce Cet...

Страница 47: ...tched locking washer up the lower stud until the notches slip over the three pins on the bottom of the furling unit It may be necessary to turn the drum slightly to align the pins with the notches Tip The locking nut is special Check to see that it is on the stud with the up arrow facing up Norseman Sta Lok Installation Rod Installation Slip the restraining washer up the stud until it rests agains...

Страница 48: ...ions pour le Rod sont les mêmes que pour le câble serti à cette phase In questo passaggio il montaggio viene comple tato fissando il tubo di torsione e alzando e bloc cando l estruso Usare la chiave a brugola da 6 mm per unirlo al tamburo con le tre viti fornite nella confezione Usare Loctite Blu sulle viti Suggerimento allontanarsi dalla barca e control lare questa misura guardando la parte più a...

Страница 49: ...n considerable friction while furling Raising foils too high may prevent the foils from rotating Raise the foil so the top rides over the swage fitting at the top of the headstay wire and is within 2 51 mm of the pin holding the stay to the masthead toggle Tip Insert all three screws BEFORE tightening Insert the torque tube screws and use the 6 mm allen wrench to securely clamp the foils in a rais...

Страница 50: ...hen Drehen Sie die Hülse auf das Terminal und ziehen die Verbindung satt mit dem Schlüssel fest Auch bei richtiger Montage bleiben einige Gewindegänge sichtbar Drehen Sie das Terminal zur Kontrolle nochmals auf jetzt sollten alle Drähte glei chmässig um den Konus liegen und der Kern um die vorgegebene Länge aus dem Konus herausragen Prüfen Sie dass die Drähte gleichmassig am Konus liegen und keine...

Страница 51: ... wedge Tip In most cases you will expose the core for a distance much greater than the length of the core This is okay To check fit and form wires put red Loctite on the threads to lubricate and prevent seizing Thread the stud onto the socket head and tighten firmly with a wrench to form wires Even when properly assembled a few threads will show Disassemble the terminal and check to make sure stra...

Страница 52: ...o con Loctite rossa e coppiglie Rod Terminal Montage Versichern Sie sich dass der Fallwirbel und die Mitnehmerhülse auf das Profil geschoben sind Einige Tropfen rotes Loctite auf das Gewinde der Hülse auftragen Das Terminal auf die Hülse aufschrauben bis die Löcher für die Splinte fluchten Tip Die Löcher fluchten wenn das Gewinde der Hülse ganz in das Terminal eingeschraubt ist Drehen Sie die Hüls...

Страница 53: ...euse the wedge after you ve sailed with your unit In this step the rod terminal is attached to the nosepiece and secured with red Loctite and cotter pins Rod Terminal Assembly Make sure halyard swivel and torque tube have been slipped on the foils Then apply a few drops of red Loctite to the threads of the nosepiece Screw the terminal onto the nosepiece until the flats align with the two cotter pi...

Страница 54: ...arken Hexaratchet piccolo per fornire la resistenza appropriata alla cima mentre si sta avvolgendo Questo bozzello deve essere posizionato in modo tale da rinviare la scotta di avvolgimento a uno stroz zatore in pozzetto Se la cima è stata passata correttamente si deve sentire il caratteristico rumore mentre si avvolge Altrimenti il cricco potrebbe essere disinserito inserirlo agendo sull apposito...

Страница 55: ...t a 019 little Hexaratchet or other configuration of ratchet block as the after lead block to insure proper drag on the furling line to prevent line overrides in the drum Tip Position the ratchet block so the line turns at least 90 Position a standard horn cleat in a convenient location in the cockpit 5Lead the line through the forward and after lead blocks The after block should be a little Hexar...

Страница 56: ...00 mm vom oberen Ende des Profils stehen Der Zug des Falls muss leicht nach achtern sein Falls sich das Fall um das Vorstagprofil gewickelt hat darf die Anlage nicht mit Gewalt gedreht werden Versuchen Sie vorsichtig das Segel durch abwech selndes Ziehen an der Schot und an der Reffleine auszurollen Ernsthafte Fall Umwicklungen können nur dadurch behoben werden dass man in den Mast geht und das Fa...

Страница 57: ...raised walk away from the boat and look at them asthead with binoculars Use the halyard swivel as a measuremen treference 4 100 mm is one half the length of the swivel There should be less foil exposed above the swivel than half the length of the swivel The halyard must pull slightly to the rear If a halyard wraps do not force the unit to turn Attempt to open the sail by alternately pulling the sh...

Страница 58: ...ute sa longueur la tension de la drisse n est nécessaire que pour la mise en forme pas pour prendre toute la charge du guindant Ne donnez pas plus de tension que celle nécessaire à l élimination des plis sur le guindant du foc Servez vous de la tension de drisse pour adapter la forme de la voile aux conditions dans lesquelles vous naviguez Votre drisse doit être tendue fermement mais sans excès Da...

Страница 59: ... rear On most boats the hal yard lead angle is acceptable if the halyard swivel is raised to the top of the foil On some boats the halyard sheaves are located too close to the headstay and a halyard restrainer must be used Halyard restrainers should be used only when they are required by the masthead geometry Restrainers tend to limit sail luff length and may cause problems if not properly install...

Страница 60: ...mento Togliere le due viti sulla testa e le tre sulla base del tubo di torsione Fissare il tubo di torsione vicino al feeder Sbloccare l arridatoio seguendo le istruzioni di pagina 24 in ordine opposto Fare riferimento alle pagine da 22 a 25 per le istruzioni dettagliate riguardo al tensionamento e al bloccaggio dell arridatoio Ridoirs de pataras Les ridoirs de pataras permettent de faire varier l...

Страница 61: ...s at the base of the torque tube Secure the torque tube up near the feeder Unlock the turnbuckle by following the instruc tions on page 24 in reverse order Refer to pages 22 through 25 for detailed instructions for tensioning and relocking your turnbuckle Backstay Adjusters Backstay adjusters allow headstay tension to be varied to change sail shape to match the conditions They permit a very tight ...

Страница 62: ...rosse d enrouleur tire avec une certaine intensité La force nécessaire pour son embraquage dépends de la force du vent mais un Unit 1 ne devrait jamais imposer l utilisation d un winch pour enrouler Si la voile ne s enroule pas ou si cela réclame un gros effort il y a un problème dans le système Consultez le chap itre Causes de dysfonctionnemeent page 36 N utilisez pas un winch pour forcer le syst...

Страница 63: ... it is directly below the slot at the top of the torque tube Shackle the tack of the sail to the drum Install shackle so screw pin head is on the same side as suncover See page 25 for torque tube alignment 3 Secure the genoa sheets to the clew 4 Attach genoa halyard to the halyard swivel 5 Pass luff tape through the prefeeder and feeder into the foil groove 6 Attach the head of the sail or the pen...

Страница 64: ...sti sono abituati a fare dei segni sulla base della vela in modo da avere delle misure di riduzione predeterminate Questa soluzione permette di fare dei segni corrispondenti sulla rotaia o sulla falchetta in modo da poter cambiare velocemente il punto di scotta a seconda della riduzione operata sulla vela Gli avvolgifiocco Harken sono dotati di un opzione di bloccaggio che consente di bloccare l u...

Страница 65: ...er reefing and again before the sail can be reefed further or unreefed Since one purpose of a reefing system is to allow you to change sail size while remaining in the safety of the cockpit many people will choose not to use the lock ing device Use of the locking device is not required during reefing Sails are generally reefed to balance the boat and to reduce heeling moment Sails may also be reef...

Страница 66: ...per la cima e rimuovere le due parti Fare attenzione a non perdere le viti che non sono trattenute 3 Con una chiave a brugola da 5 allentare le quattro brugole nel tamburo di plastica e rimuoverlo Démontage de l émerillon de drisse Pour une régate importante vous pourriez avoir envie de démonter l émerillon de drisse Note Il n est pas possible de démonter l émerillon de drisse sur un Unit version ...

Страница 67: ... remove the two halves Be careful screws are not captive 3 Use a 5 mm allen wrench to loosen the four screws in the plastic drum and remove Halyard Swivel Removal For serious racing you may want to remove the halyard swivel Note It is not possible to remove the halyard swivel on a unit with Norseman Sta Lok or rod adapter stud unless you disassemble the terminal stud Make sure you use a new Norsem...

Страница 68: ...sser und unter Umständen etwas Spülmittel ab Fieren Sie gelegentlich den Fallwirbel und reinigen diesen mit Wasser und Spülmittel Mindestens zweimal im Jahr sollte die Anlage durch Öffnen der Mitnehmerhülse und Auswaschen der Lager mit Seife und Wasser gründlich gereinigt werden Ist alles trocken sollte ein trockenes Schmiermittel auf gesprüht werden etwa McLube Das Profil kann mit Wasser und Seif...

Страница 69: ...ush the halyard swivel with soap and fresh water At least twice a year the unit should be cleaned more thoroughly by opening the torque tube and flushing the bearings with soap and fresh water After the unit has dried apply a dry spray lubricant such as dry McLube Foils may be cleaned by washing with soap and water A scrap of luff tape may be run up the foil to scrub inside the grooves Foils may b...

Страница 70: ...ipping halyards behind spreaders See installation instructions regarding optimal halyard angle Flush bearings with fresh water and lubricate with dry spray lubricant such as McLube Raise foils per Assembly Step 9 Ease jib halyard See installation instructions regarding optimal halyard angle It may be necessary to mount a halyard restrainer on the front of your mast to hold the halyard to the rear ...

Страница 71: ...la faisant passer derrière les barres de flèche Repassez correctement la drosse Choquez la drisse de foc La drisse de foc est trop tendue Une drisse de spinnaker s enroule avec la voile quand vous voulez réduire Remonter dans le bon sens Emerillon de drisse monté tête en bas Poulie 019 montée à l envers Larguez les écoutes du foc Faites tourner l enrouleur à la main pour emmagasiner suffisam ment ...

Страница 72: ...en wieder anziehen Reffleine ist völlig abgewickelt Schot abschlagen Vorstag drehen damit die Reffleine auf die Trommel aufgewickelt wird Reffleine läuft verkehrt durch 019 Ratschblock Leine richtig herum einführen Fallwirbel verkehrt herum montiert Fallwirbel wenden und richtig montieren Fall wickelt sich um Vorstagprofil da Winkel zwischen Fall und Profil zu klein Aus Einbauanleitung optimalen W...

Страница 73: ... terminale Alzare lo strallo seguendo le istruzioni del passaggio 9 del montaggio L estruso si sovrappone al manicotto di fermo Vedi le istruzioni di installazione riguardanti la corretta altezza della girella superiore Potrebbe essere necessario montare uno stroppo di allungamento sulla penna della vela per far lavorare la girella superiore alla corretta altezza La drizza si incattiva intorno all...

Страница 74: ...allführung falsche Montage der Vorliek Verlängerung jedes Vorgehen bei der Montage das nicht als normal oder vernünftig angesehen werden kann Was bedeutet falsche Wartung Falsche Wartung bedeutet das Nichtbeachten eines Punktes der Einbau Betriebs Anleitung Beispiele hierfür sind Lager nicht von Schmutz oder Salz gereinigt unregelmässige Kontrolle von Sperrmechanismus Profilen Vorstagdraht oder Te...

Страница 75: ...mp Screws 2 HFS335 Fastener M8x1 25x35 316 Sk Cap 939 Feeder HFS192 Fastener 10 32 x 3 8 18 8 Slt Ov order 2 HFG137 Extrusion Set 8 Long 1 Short 897 Extrusion 7 Luff 898 Extrusion 2 Luff HFG635 Fastener Set Torque Tube 3 HFS336 Fastener M8x1 25x16 A4 Sk Cap 2 Accessories 4115 Manual Furling 833 Loctite Blue 848 Line 3 8 x 100 867 Loctite 2 Red 872 Super Glue 947 Prefeeder Phenolic w Line HFG636 Fa...

Страница 76: ...iece 12 HFG193 Cotter Pin 3 32 x 1 18 8 858 17 Stud 17 Rod Adpt w Nosepiece HFG173 Stud Main Body HFG175 Nosepiece 17 HFG193 Cotter Pin 3 32 x 1 18 8 5 Drum Assembly Components HFG870 Drum Assembly Complete HFG602 Spool Assembly Complete H 14852A Fastener M6 x 1 00 6G 316 order 4 H 15070C Spool Assembly Half HFG752 Guard Assembly H 24434C Line Guard order 2 H 24435A Mylar Guard Clamp Shim order 2 ...

Страница 77: ...ing any of the procedures in the installation manual Examples include but are not limited to failure to clean dirt or salt from the bearings or other parts of the unit failure to apply proper lubri cants periodically failure to periodically inspect locking mechanisms foils headstay wires swage fittings rod fittings and Norseman or Sta Lok fittings for damage or stress corrosion What will Harken do...

Страница 78: ...SP ZOO ul Rydygiera 8 budynek 3A lokal 101 I piętro 01 793 Warszawa Poland Tel 48 22 561 93 93 Fax 48 22 839 22 75 Web www harken pl Email polska harken com Harken Sweden AB Main Office and Harken Brandstore Västmannagatan 81B SE 113 26 Stockholm Sweden Telephone 46 303 618 75 Fax 46 303 618 76 Mailing address Harken Sweden AB Box 64 SE 440 30 Marstrand Email harken harken se Harken UK Ltd Bearing...

Отзывы: