background image

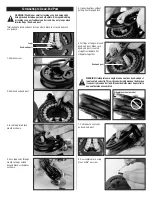
Terminating to Dead-End Post

5. Open sideplates without 

pulling line through block.

Terminating to dead-end post lets you attach block to a closed bail such  

as a padeye.

1. Remove screw..

3. Insert loop into block 

mouth as shown.

4. Pass loop ends through 

mouth so loops extend 

beyond block's sideplates  

as shown.

2. Remove dead-end post.

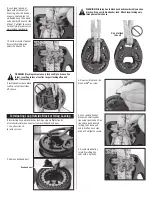
6 Part legs of loop and insert 

dead-end post. Make sure 

dead-end post is seated 

straight in sideplate. Put 

sideplates together.

7. Pull loops to seat ends  

on dead-end post.

8. Reassemble block using 

blue Loctite

®

 on screw.

Sideplates are not parallel

Loop

Dead-end post

Dead-end post

WARNING! Webbing or smaller lashings can be damaged by 

being pinched between post and sideplate. Damaged webbing 

or lashings can part suddenly under load. Use only loops when 

terminating at dead-end post.

WARNING! If sideplates are angled to one another, dead-end post 

is not seated correctly. This will cconsiderably weaken the block so 

it can easily break under load. Block sideplates must be parallel to 

one another when assembled.

Содержание 3195

Страница 1: ...ost 3195 HFS796 H 43625 3196 HFS806 H 43461 3199 HFS816 H 43759 3201 HFS814 H 43816 Specifications Sideplate A Dead End Post Roller Cage Assembly Sheave Sideplate B Screw WARNING Webbing or smaller lashings can be damaged by being pinched between post and sideplate Damaged webbing or lashings can part suddenly under load Use only loops when terminating at dead end post WARNING Knots weaken line co...

Страница 2: ...t in sideplate Put sideplates together 7 Pull loops to seat ends on dead end post 8 Reassemble block using blue Loctite on screw Sideplates are not parallel Loop Dead end post Dead end post WARNING Webbing or smaller lashings can be damaged by being pinched between post and sideplate Damaged webbing or lashings can part suddenly under load Use only loops when terminating at dead end post WARNING I...

Страница 3: ...t sheet rides off sheave Dead end post 10 Further secure stop knot by carefully melting line ends with a hot knife 3 Re assemble block Use blue Loctite on screw 5 Secure stop knot by carefully melting line ends with a hot knife 4 Lash loop to head of block with small control line using square knot Run line ends up and behind lashing then down and under itself on each side of knot Pull tight to sec...

Страница 4: ...separation Replace loop if it shows signs of UV damage or wear 4 Inspect lashing at head of block to make sure knot is holding tightly For additional safety maintenance and warranty information see www harken com manuals or the Harken catalog ALL INSTALLATIONS Anchor Point Chafing or Cutting Loops must be attached to round bails such as those found on padeyes or pins Sharp edges on many perforated...

Отзывы: