Page 7
For technical questions, please call 1-888-866-5797.
56385
SAF
eT
y
O
Pe
RA
Ti
O
n
M
A
in
Ten
A
n
C
e
Se
Tu
P
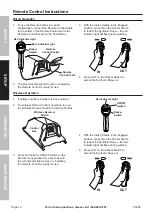
Mounting the Winch
1. Make sure the Winch will fit the chosen mounting
area. If relocating the Control Box is necessary
or desired, perform the removal and installation
of cables to the Winch before mounting. Refer
to
Relocating the Control Box
on page 8.
2. The mounting plate must be rated to
at least the Winch’s capacity.
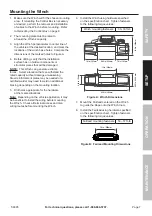
3. Align the Winch perpendicular to center line of
the vehicle at the desired location, and mark the
locations of the winch base holes. Compare the
dimensions of the marked holes to Figure A.
4. Before drilling, verify that the installation
surface has no hidden components or
structural pieces that will be damaged.
nOTe:
This Winch can generate extreme
forces. Select a location that can withstand the
rated capacity without damage or weakening.
Steel reinforcement plates may be needed or a
certified welder may need to weld on additional
bracing depending on the mounting location.
5. Drill holes appropriate for the hardware
at the marked locations.
note:
Depending on the vehicle application, it may
be beneficial to install the wiring before mounting
the Winch. Check all terminal access and plan
wiring routes before mounting the Winch.
6. Install the Winch using hardware specified
on the specification chart. Tighten fasteners
to the following torque values:
Winch mounting fasteners
30 –33 ft-lb
8.82 in. / 224 mm
7.2 in. / 183 mm
7.2 in. / 183 mm
10.0 in. / 254 mm
10 in. / 254 mm
23.2 in. / 590 mm
6.50 in. / 165.0 mm
4.49 in. / 1
14 mm
Figure A: Winch Dimensions
7. Mount the Fairlead centered on the Winch
to guide the Rope onto the Winch drum.
8. Install the Fairlead using hardware specified
on the specification chart. Tighten fasteners
to the following torque values:
Fairlead mounting fasteners
53 – 57 ft-lb
10 in. / 254 mm
Figure B: Fairlead Mounting Dimensions


