background image

A

WIRING

 (continued on next page)

6

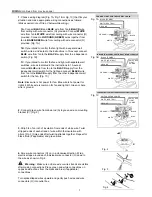
2.

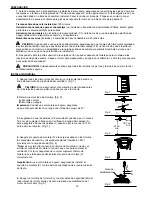
 Remove pin (Q) and clip (R) from downrod (A). Slip downrod (A) 

into housing yoke, align hole and re-install pin (Q) and clip (R). 
Tighten downrod (A) set screws and then tighten nuts. Slide yoke 
cover (G) down until it rests on top of motor housing (D). [Fig. 2]

Fig. 2

NORMAL OR ANGLE STYLE FAN MOUNTING

3.

 Install ball end of downrod (A) into mounting bracket (C) 

opening. Align slot in ball with tab in mounting bracket (C). [Fig. 3]


DANGER:

 Failure to align slot in ball with tab may result in 

serious injury or death.

Fig. 3

R

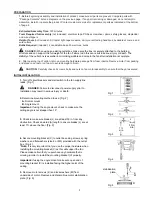
1.

 Locate safety cable (U) at top of motor housing (D). Remove vice (V) 

from safety cable (U) by loosening screw and nut. [Fig. 1A] Insert 
downrod (A) through canopy (B), canopy cover (Y) and yoke cover (G). 
[

Note: 

Canopy cover (Y) must be turned with the shiny side 

toward 

the 

motor housing (D)]. Thread wires from motor housing (D) through 
downrod (A). [Fig. 1B] Thread wires and safety cable (U) from motor 
housing (D) through downrod (A).

*Helpful Hint:

 Downrod style mounting is best suited for ceilings 8 ft. 

(2.44 m) high or higher. For taller ceilings you may want to use a 
longer downrod (not included) than the one supplied. Angle style 
mounting is best suited for angled or vaulted ceilings. Longer downrods 
are sometimes necessary to ensure proper blade clearance.

Ball

G

D


WARNING:

  To reduce the risk of fire, electrical shock, or 

personal injury, wire connectors provided with this fan are designed to 
accept only one 12 gauge house wire and two lead wires from the fan. If 
your house wire is larger than 12 gauge or there is more than one house 
wire to connect to the two fan lead wires, consult an electrician for the 
proper size wire connectors to use.


CAUTION:

 Be sure wiring box is properly grounded and that a 

ground (green or bare) wire is present.

           Warning:

 If house wires are different colors than referred to in 

following steps, stop immediately. A professional electrician is 
recommended to determine wiring.

Q

Set
Screw

C

B

A

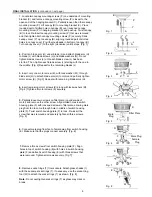
4.

 Replace vice (V) on safety cable (U) and adjust safety cable (U) 

length by loosening screw and nut on the safety cable vice (V) and 
pulling on the safety cable (U). Adjust slack in cable to a hands length 
and tighten vice (V) and nut securely. The loop at the end of the safety 
cable (U) should just fit over the threads on the wood screw. [Fig. 4] 

Test safety cable (U) by pulling on loose end with pliers. If the safety 
cable (U) slips then vice (V) and nut must be set tighter.


Fig. 4

A

B

Wood 

Screw

Screw

Loop

Nut


DANGER:


If using this fan in a DAMP location, this fan must be 

connected to a supply circuit that is protected by a Ground Fault Circuit 
Interrupter (GFCI) to reduce the risk of personal injury, electrical shock 
or death.

5.

 Find a secure attachment point (wood ceiling joist highly 

recommended) and secure safety cable (U). It will be necessary to use 
a heavy duty wood screw, washer and lock washer (not supplied) with 
the safety cable (U) loop. [Fig. 5] Extra cable slack can be left in ceiling 
area.

Fig. 5

B

Loop

Wood Joist

Wood Screw
and Washer

V

Screw

Nut

A

U

Fig. 1B

G

V

Nut

Screw

U

Fig. 1A

B

A

Y

U

V

Содержание KIAWAH

Страница 1: ...ign objects between the rotating fan blades Mount to outlet box marked ACCEPTABLE FOR FAN SUPPORT and use mounting screws provided with the outlet box Most outlet boxes commonly used for the support o...

Страница 2: ...Safety Information 3 Package Contents 4 Preparation 5 Initial Installation 5 Normal or Angle Style Fan Mounting 6 Wiring 6 7 Final Installation 8 9 Fan Operation 9 Care and Maintenance 10 Troubleshoo...

Страница 3: ...support and may need to be replaced Consult a qualified electrician if in doubt Secure the outlet box directly to the building structure The outlet box and its support must be able to support the mov...

Страница 4: ...n in motor housing yoke 1 R Clip attached to pin 1 S Pull Chain Extension in hardware pack 1 T Socket Ring pre attached to socket 4 U Safety Cable pre attached to motor 1 V Vice on safety cable 1 W So...

Страница 5: ...nd diagrams on the previous page If any part is missing or damaged do not attempt to assemble install or operate the product Contact customer service for replacement parts as indicated at the bottom o...

Страница 6: ...ly one 12 gauge house wire and two lead wires from the fan If your house wire is larger than 12 gauge or there is more than one house wire to connect to the two fan lead wires consult an electrician f...

Страница 7: ...TE GROUND SWITCHED LIGHT POWER BLUE FAN CONTROLLED BY CHAIN LIGHT BY WALL SWITCH Fig 1B BLACK POWER WHITE NEUTRAL GROUND BLACK WHITE GROUND SWITCHED LIGHT POWER BLUE Fig 1A FAN AND LIGHT CONTROLLED BY...

Страница 8: ...e plugs connect securely Fig 6 Male Plug D F E Fitter Plate D H J D F Male Plug Female Plug E D E T I W Fig 3 3 Insert only one motor screw K with lock washer M through blade arm H to attach blade arm...

Страница 9: ...with this fan MUST be UL approved for DAMP LOCATIONS Fig 10 S D S 9 Install four candelabra base 40 watt max bulbs X included Fig 9 Important When replacing bulbs allow bulb s and glass shade s to co...

Страница 10: ...d securely Fan operates but lights fail 1 Bulb s not installed correctly 1 Re install bulb s 2 Wires in canopy B not wired properly 2 Check wires in canopy B and if necessary re wire according to inst...

Страница 11: ...ustries assumes no responsibility whatsoever for fan installation during the limited lifetime warranty Any service performed by an unauthorized person will render the warranty invalid Due to varying c...

Страница 12: ...ias del ventilador Sujete a una caja de salida marcada Aceptable para sostener ventilador ACCEPTABLE FOR FAN SUPPORT en ingl s y use los tornillos de montaje proporcionados con la caja de salida La ma...

Страница 13: ...del paquete 15 Preparaci n 16 Instalaci n inicial 16 Estilo de montaje del ventilador normal o en ngulo 17 Conexi n de los cables 17 19 Instalaci n final 19 20 Funcionamiento del ventilador 21 Cuidado...

Страница 14: ...ores y es posible que sea necesario reemplazarla Consulte con un electricista calificado si tiene alguna duda Asegure la caja de salida directamente a la estructura del edificio La caja de salida y el...

Страница 15: ...motor 1 R Sujetador sujetado a la clavija 1 S Extensi n para la cadena de encendido 1 en paquete de art culos de ferreter a T Anillo de casquillo sujetado de antemano a un casquillo 4 U Cable de segur...

Страница 16: ...en graves da os o la muerte La estabilidad de la caja de salida es esencial para minimizar tambaleo y ruido en el ventilador una vez que se haya terminado la instalaci n 3 Aseg rese de que las paletas...

Страница 17: ...cable de la casa para conectar a los cables principales del ventilador consulte con un electricista para informarse sobre el tama o correcto de conectores para cable que se debe usar PRECAUCION Aseg r...

Страница 18: ...A AZUL NEGRO ENERGIA ELECTRICA DEL INTERRUPTOR A LA LUZ 1 Escoja el diagrama de instalaci n el ctrica Fig 1A Fig 1B o Fig 1C que corresponde a su situaci n y haga las conexiones apropiadas seg n lo qu...

Страница 19: ...D M K H H J 4 Atornille los conectores para cable O en el sentido de las agujas del reloj Ponga cinta aislante en cada conector para cable O hasta llegar al cable como se muestra en la Fig 4 Adverten...

Страница 20: ...LUGARES HUMEDOS 8 Quite los anillos de casquillo T de los casquillos Sujete las pantallas de vidrio I con dichos anillos de casquillo T Si es necesario use la herramienta para el anillo de casquillo W...

Страница 21: ...termostato en verano y bajarlo en invierno sin notar una diferencia en su comodidad Nota Espere a que se detenga completamente el ventilador antes de usar el interruptor de reversa 3A En un clima calu...

Страница 22: ...electricidad Afloje la cubierta B cuidadosamente y verifique que el soporte de montaje C est bien sujeto 5 El ventilador est demasiado cerca de 5 Utilice un v stago A m s largo o un techo abovedado m...

Страница 23: ...ado de la remoci n y la re instalaci n ser responsabilidad expl cita del comprador Cualquier da o accidental al ventilador o por uso inadecuado o instalaci n incorrecta o por usar piezas no producidas...

Отзывы: