background image

Questions, problems, missing parts?

 Before returning to your retailer, call our customer 

service department at 1-800-643-0067, 8 a.m. - 6 p.m., EST, Monday - Thursday, 8 a.m. - 5 p.m., 

EST, Friday.

1

ATTACH YOUR RECEIPT HERE

Serial Number _________________________     Purchase Date _________________________

Lowes.com/harborbreeze

Harbor Breeze® is a registered trademark  

of LF, LLC. All Rights Reserved.

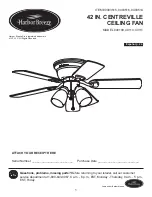
ITEM #0403515, 0403516, 0403514

42 IN. CENTREVILLE 

CEILING FAN

MODEL #40109, 40110, 40111

Español p. 24

Содержание CENTREVILLE 40109

Страница 1: ...ST Monday Thursday 8 a m 5 p m EST Friday 1 ATTACH YOUR RECEIPT HERE Serial Number _________________________ Purchase Date _________________________ Lowes com harborbreeze Harbor Breeze is a registered trademark of LF LLC All Rights Reserved ITEM 0403515 0403516 0403514 42 IN CENTREVILLE CEILING FAN MODEL 40109 40110 40111 Español p 24 ...

Страница 2: ... 3 Hardware Contents 4 Safety Information 5 Preparation 6 Initial Installation 7 Wiring 10 Final Installation 13 Using the Fan With No Light Kit Option 17 Operating Instructions 18 Care and Maintenance 19 Troubleshooting 20 Warranty 22 Replacement Parts List 23 ...

Страница 3: ... A Motor Housing 1 B Upper Mounting Bracket 1 C Extra Switch Housing 1 D Motor Assembly 1 E Light Kit Fitter 1 F Twist On Glass Shade 3 G Blade Arm 5 H Blade 5 I Bulb 3 J Switch Housing Plate preassembled to Motor Assembly D 1 K Lower Mounting Bracket preassembled to Motor Assembly D 1 ...

Страница 4: ... Pull Chain Extension Qty 2 Motor Screw Qty 10 1 extra preassembled to Motor Housing A Motor Housing Mounting Screw Qty 4 preassembled to Mounting Bracket B Light Kit Screw Qty 3 preassembled to Switch Housing Plate J Bracket Screw Qty 4 preassembled to Lower Mounting Bracket K Blade Isolator Qty 5 AA BB CC DD EE FF GG II HH ...

Страница 5: ...tch to control fan speed will cause a loud humming noise from the fan To reduce the risk of fire or electric shock do NOT use a full range dimmer switch to control the fan speed WARNING To reduce the risk of fire electric shock or personal injury mount the fan to an out let box marked ACCEPTABLE FOR FAN SUPPORT and use the mounting screws provided with the outlet box Most outlet boxes commonly use...

Страница 6: ...hat all parts are present Compare all parts with the package contents list and hardware contents list If any part is missing or damaged do not attempt to assemble the product After opening the top of the carton remove the mounting hardware package from the foam inserts then remove the motor from the packaging and place it on a soft surface such as a carpet to avoid damage to the finish Estimated A...

Страница 7: ...jury or death 1 2 Check to make sure the blades H are at least 30 in from any obstruction and at least 7 ft above the floor 2 7 ft min 30 in min H 3 Secure the upper mounting bracket B to the outlet box using screws spring washers and flat washers provided with the outlet box not included Note It is very important that you use the proper hardware when installing the mounting bracket B as this will...

Страница 8: ...re Used EE Motor Screw x 10 4 EE D 5 Remove the bracket screws HH from underneath the lower mounting bracket K Hardware Used HH Bracket Screw x 4 HH K 5 6 Place a tab on the lower mounting bracket K into a slot in the upper mounting bracket B Then slide the second lower mounting bracket K tab into the second slot on the upper mounting bracket B until all four holes are in alignment B K 6 ...

Страница 9: ...e INITIAL INSTALLATION 7 Reinstall the previously removed bracket screws HH underneath the lower mounting bracket K and into the upper mounting bracket B Securely tighten the screws Hardware Used HH Bracket Screw x 4 K HH B 7 ...

Страница 10: ... and Blue wires from the fan to the Black wire from the ceiling Connect the White wire from the fan to the White wire from the ceiling Connect all Ground Green wires together from the fan to the Bare Green wire from the ceiling Secure all wiring connections together with wire connectors CC Hardware Used CC Wire Connector x 4 120 V Power FROM CEILING BLACK WHITE GROUND GREEN BARE WHITE GROUND GREEN...

Страница 11: ...ect all Ground Green wires together from the fan to the Bare Green wire from the ceiling Secure all wiring connections together with wire connectors CC Note The Black wire is hot power for the fan The Blue wire is hot power for the light kit The White wire is common for the fan and light kit The Green Bare wire is ground Hardware Used CC Wire Connector x 4 WHITE WHITE BLACK WALL SWITCH BLACK BLACK...

Страница 12: ...g connections Place the Green and White wire connections on opposite sides of the outlet box from the Black and Blue if applicable wire connections CC 3 Important Using a full range dimmer switch not included to control fan speed will cause a loud humming noise from the fan To reduce the risk of fire or electrical shock do not use a full range dimmer switch to control fan speed 1 2 3 Dimmer Switch...

Страница 13: ...tted holes Remove the other two motor housing mounting screws FF from opposite sides of the mounting bracket B Hardware Used FF Motor Housing Mounting Screw x 4 B A FF FF 1 2 Slide the motor housing A over the motor assembly D aligning the slotted holes in the motor housing A with the loosened motor housing mounting screws FF in the mounting bracket B Twist the motor housing A to lock Then re inse...

Страница 14: ...at this step with each blade Hardware Used AA Blade Screw x 15 BB Fiber Blade Washer x 15 AA BB G H 3 4 Align a blade arm G and a blade isolator II with two holes underneath the motor D and insert two of the previously removed motor screws EE through the blade arm G and into the motor D Tighten the screws securely Repeat this step for the remaining blade arms G Hardware Used EE Motor Screw x 10 II...

Страница 15: ...ter E to the Blue wire from the switch housing plate J Ensure that the connections are secure for all wires Hardware Used GG Light Kit Screw x 3 Note If you do not wish to use the light kit proceed to the Using the Fan With No Light Kit Option section of this manual GG E J GG 5 6 Gently push the connected wires into the switch housing plate J Guide the fan pull chain through the slot on the light ...

Страница 16: ...stall three candelabra base 60 watt max bulbs I included Important When you need to replace bulbs please allow bulbs and glass shades to cool down before handling them I 8 9 Attach the pull chain extensions DD or custom pull chains extensions not included to the fan and light pull chains Hardware Used DD Pull Chain Extension x 2 DD 9 ...

Страница 17: ...g C with the holes in the light kit screws GG The wide gap in the top edge of the extra switch housing C should align with the reverse switch on the switch housing plate J for the proper fit Re insert the light kit screws GG and tighten securely with a Phillips screwdriver Hardware Used GG Light Kit Screw x 3 J GG C 2 3 Attach the pull chain extension DD to the fan pull chain Hardware Used DD Pull...

Страница 18: ...1 2 The pull chain in the center is used to turn the light ON and OFF DD J 2 3 Use the fan reverse switch located on the switch housing plate J to optimize your fan for seasonal performance A ceiling fan will allow you to raise your thermostat setting in summer and lower your thermostat setting in winter without feeling a difference in your comfort Note Wait for the fan to stop before moving the r...

Страница 19: ...eft or the right in or der for the fan to function If the reverse switch is set in the middle position the fan will not operate Fig 3A Fig 3B 3 CARE AND MAINTENANCE At least twice each year lower the canopy to check the downrod assembly and then tighten all screws on the fan Clean the motor housing with only a soft brush or lint free cloth to avoid scratching the finish Clean the blades with a lin...

Страница 20: ...n all screws that hold the fan blades to the blade arms and the motor 2 Replace the cracked blade 3 Do not use a full range dimmer switch to control the fan speed 4 Run the fan continuously for 24 48 hours on medium or high speed for a break in period 5 Ensure the outlet box is secured to the building structure 6 Ensure the mounting bracket is secured to the outlet box and that the screws are tigh...

Страница 21: ... installed correctly 2 The light kit wire plugs are not connected properly 3 There is a faulty wire connection 1 Re install the bulb s 2 Ensure that the male and female plugs in the light kit fitter are connected properly 3 Turn the power off and check all connections at the ceiling outlet box Note A small amount of wobble is normal and should not be considered a defect ...

Страница 22: ...alid Due to varying climate conditions this warranty does not cover any changes in brass finish including rusting pitting corroding tarnishing or peeling Brass finishes of this type give their longest useful life when protected from varying weather conditions Any glass provided with this fan is not covered by the warranty Any replacement of defective parts from the ceiling fan must be reported wit...

Страница 23: ... When ordering parts please have the Model or Item of the fan available PART DESCRIPTION MODEL 40109 PART MODEL 40110 PART MODEL 40111 PART A Motor Housing 403515 A 403516 A 403514 A B Upper Mounting Bracket 403515 B 403516 B 403514 B C Extra Switch Housing 403515 C 403516 C 403514 C F Twist On Glass Shade 403515 F 403516 F 403514 F G Blade Arm 403515 G 403516 G 403514 G H Blade 403515 H 403516 H ...

Страница 24: ... m y los viernes de 8 a m a 5 p m hora estándar del Este 24 ADJUNTE SU RECIBO AQUÍ Número de serie _________________________ Fecha de compra _________________________ Lowes com harborbreeze Harbor Breeze es una marca registrada de LF LLC Todos los derechos reservados ARTÍCULO 0403515 0403516 0403514 VENTILADOR DE TECHO CENTREVILLE DE 106 68 CM MODELO 40109 40110 40111 ...

Страница 25: ...ridad 28 Preparación 29 Instalación inicial 30 Cableado 33 Instalación final 36 Cómo usar el ventilador sin la opción del kit de iluminación 40 Instrucciones de funcionamiento 41 Cuidado y mantenimiento 42 Solución de problemas 43 Garantía limitada de por vida 45 Lista de piezas de repuesto 46 ...

Страница 26: ...superior 1 C Carcasa del interruptor extra 1 D Ensamble del motor 1 E Soporte del kit de iluminación 1 F Pantalla de vidrio giratoria 3 G Brazo del aspa 5 H Aspa 5 I Bombilla 3 J Placa de la carcasa del interruptor preensamblada en el ensamblaje del motor D 1 K Abrazadera inferior de montaje preensamblada en el ensamblaje del motor D 1 ...

Страница 27: ...o del motor Cant 10 y 1 adicional preensamblado en la carcasa del motor A Tornillo de montaje de la carcasa del motor Cant 4 preensamblado en la abrazadera de montaje B Tornillo para el kit de iluminación Cant 3 preensamblado en la placa de la carcasa del interruptor J Tornillo de abrazadera Cant 4 preensamblado en la abrazadera inferior de montaje K Aislador de aspa Cant 5 AA BB CC DD EE FF GG HH...

Страница 28: ...zumbido intenso del ventilador Para reducir el riesgo de incendios o descargas eléctricas NO use un regulador de intensidad de rango completo para controlar la velocidad del ventilador ADVERTENCIA Para reducir el riesgo de incendios descargas eléctricas o lesiones personales instale el ventilador en una caja de salida marcada como APTA PARA SOSTENER UN VENTILADOR y utilice los tornillos de montaje...

Страница 29: ...de tener todas las piezas Compare todas las piezas con la lista del contenido del paquete y con la lista de aditamentos No intente ensamblar el producto si falta alguna pieza o si estas están dañadas Después de abrir la parte superior de la caja retire el paquete de aditamentos para montaje de los accesorios de espuma Luego quite el motor del ensamble y colóquelo en una superficie suave como una a...

Страница 30: ...raves o la muerte 1 2 Compruebe que las aspas H estén al menos a 76 20 cm de cualquier obstáculo y al menos a 2 13 m del piso 2 2 13 m mín 76 20 cm mín H 3 Asegure la abrazadera superior de montaje B a la caja de salida con los tornillos las arandelas de resorte y las arandelas planas que se proporcionan con la caja de salida no se incluye Nota Es muy importante que use los aditamentos adecuados p...

Страница 31: ...D 5 Retire los tornillos de la abrazadera HH debajo de la abrazadera inferior de montaje K Aditamentos utilizados HH Tornillo de abrazadera x 4 HH K 5 6 Coloque una lengüeta de la abrazadera inferior de montaje K en la ranura de la abrazadera superior de montaje B Luego desplace la segunda lengüeta de la abrazadera inferior de montaje K en la segunda ranura de la abrazadera superior de montaje B h...

Страница 32: ...lva a instalar los tornillos de la abrazadera previamente retirados HH debajo de la abrazadera inferior de montaje K y en la abrazadera superior de montaje B Apriete firmemente los tornillos Aditamentos utilizados HH Tornillo de abrazadera x 4 K HH B 7 ...

Страница 33: ... TIRO Conecte los conductores negro y azul del ventilador al conductor negro del techo Conecte el cable blanco del ventilador al cable blanco del techo Conecte todos los cables de tierra verdes juntos desde el ventilador al cable desnudo o verde del techo Asegure todas las conexiones del cableado junto con los conectores de cable CC Aditamentos utilizados CC Conector de cables x 4 Alimentación de ...

Страница 34: ...l cable desnudo o verde del techo Asegure todas las conexiones del cableado junto con los conectores de cable CC Nota El cable negro le proporciona energía al ventilador El cable azul le proporciona energía al kit de iluminación El cable blanco es el cable común para el ventilador y el kit de iluminación El cable verde desnudo es de tierra Aditamentos utilizados CC Conector de cables x 4 BLANCO BL...

Страница 35: ...e las conexiones de cables verde y blanco en el lado opuesto de la caja de salida con respecto a las conexiones de cables negro y azul si corresponde CC 3 Importante El uso de un regulador de intensidad de rango completo no se incluye para controlar la velocidad del ventilador provocará un zumbido intenso del ventilador Para reducir el riesgo de incendios o descargas eléctricas no use un regulador...

Страница 36: ...os tornillos de montaje de la carcasa del motor FF de los costados opuestos de la abrazadera de montaje B Aditamentos utilizados FF Tornillo de montaje de la carcasa del motor x 4 B A FF FF 1 2 Desplace la carcasa del motor A sobre el ensamblaje del motor D alineando los orificios ranurados de la carcasa del motor A con los tornillos de montaje de la carcasa del motor aflojados FF en la abrazadera...

Страница 37: ...on cada aspa Aditamentos utilizados AA Tornillo para aspa x 15 BB Arandela para aspa de fibra x 15 AA BB G H 3 4 Alinee el brazo del aspa G y el aislador de aspa II con dos orificios debajo del motor D e inserte dos de los tornillos del motor previamente retirados EE a través del brazo del aspa G y en el motor D Apriete firmemente los tornillos Repita este procedimiento con los brazos de aspa rest...

Страница 38: ...gúrese de que todas las conexiones sean seguras para todos los cables Aditamentos utilizados GG Tornillo para el kit de iluminación x 3 Nota Si no desea usar el kit de iluminación consulte la sección Cómo usar el ventilador sin la opción del kit de iluminación de este manual GG E J GG 5 6 Suavemente introduzca los cables conectados en la placa de la carcasa del interruptor J Oriente la cadena de t...

Страница 39: ...ro de 60 vatios como máximo I incluidas Importante Cuando necesite reemplazar las bombillas deje que estas y las pantallas de vidrio se enfríen antes de usarlas I 8 9 Conecte las extensiones para la cadena de tiro DD o las extensiones para las cadenas de tiro personalizadas no incluidas con las cadenas de tiro del ventilador y la luz Aditamentos utilizados DD Extensión para la cadena de tiro x 2 D...

Страница 40: ... kit de iluminación GG El amplio espacio en el extremo superior de la carcasa del interruptor extra C debe alinearse con el interruptor de reversa de la placa de la carcasa del interruptor J para que calce correctamente Vuelva a insertar los tornillos del kit de iluminación GG y asegúrelos firmemente con un destornillador Phillips Aditamentos utilizados GG Tornillo para el kit de iluminación x 3 J...

Страница 41: ...sición OFF APAGADO DD J 1 2 La cadena de tiro del centro se utiliza para ENCENDER o APAGAR la luz DD J 2 3 Utilice el interruptor de reversa del ventilador ubicado en la placa de la carcasa del interruptor J para optimizar el rendimiento de su ventilador según la estación del año Un ventilador de techo le permitirá elevar la configuración de su termostato en verano y disminuirla en invierno sin se...

Страница 42: ...cha o hacia la izquierda para que el ventilador funcione Si el interruptor de reversa se configura en la posición del medio el ventilador no funcionará Fig 3A Fig 3B 3 CUIDADO Y MANTENIMIENTO Al menos dos veces al año baje la base para revisar en ensamble de la varilla y luego apriete todos los tornillos en el ventilador Limpie la carcasa del motor solo con un cepillo suave o un paño sin pelusas p...

Страница 43: ...ornillos que sostienen las aspas del ventilador en los brazos de las aspas y en el motor 2 Reemplace la aspa partida 3 No use un regulador de intensidad de rango completo para controlar la velocidad del ventilador 4 Haga funcionar el ventilador de 24 a 48 horas continuamente a velocidad media o alta durante el período de asentamiento 5 Revise que la caja de salida esté asegurada a la estructura de...

Страница 44: ...ables del kit de iluminación no están conectados apropiadamente 3 Una conexión de los cables no es la correcta 1 Vuelva a instalar las bombillas 2 Asegúrese de que los enchufes macho y hembra del soporte del kit de iluminación estén conectados correctamente 3 Desactive la alimentación eléctrica y revise todas las conexiones de la caja de salida del techo Nota Un cierto tambaleo es normal y no se d...

Страница 45: ...la garantía Debido a las cambiantes condiciones climáticas esta garantía no cubre cambios en el acabado de latón incluidos la oxidación las picaduras la corrosión el deslustre o el descascarado Los acabados de latón de este tipo proporcionan una vida útil más prolongada si se los protege de las cambiantes condiciones climáticas La garantía no cubre los elementos de vidrio incluidos con este ventil...

Страница 46: ...ste Cuando pida piezas tenga a mano el No de modelo o el No de artículo del ventilador disponible PIEZA DESCRIPCIÓN MODELO 40109 PIEZA MODELO 40110 PIEZA MODELO 40111 PIEZA A Carcasa del motor 403515 A 403516 A 403514 A B Soporte de montaje superior 403515 B 403516 B 403514 B C Carcasa del interruptor extra 403515 C 403516 C 403514 C F Pantalla de vidrio giratoria 403515 F 403516 F 403514 F G Braz...

Отзывы: