background image


Spider


EN


Feeding computer 

-

 Voercomputer 

-

 Fütterungscomputer 

-

 Logiciel d

alimentation


Index


                    13 

-

 46


Hanskamp AgroTech B.V. (The Netherlands)


www.hanskamp.nl/en


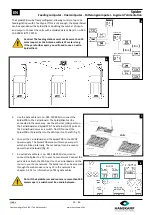
The SpiderPCB can be freely configured, allowing control of up to 16 
feeding stations with 1 feed type. If this is not enough, the SpiderServer 
can be expanded with a SpiderClient, doubling the number of inputs 
and outputs. Connect the units with a shielded data cable (art. no. 005

-

109

-

000 SF/UTP CAT5E).


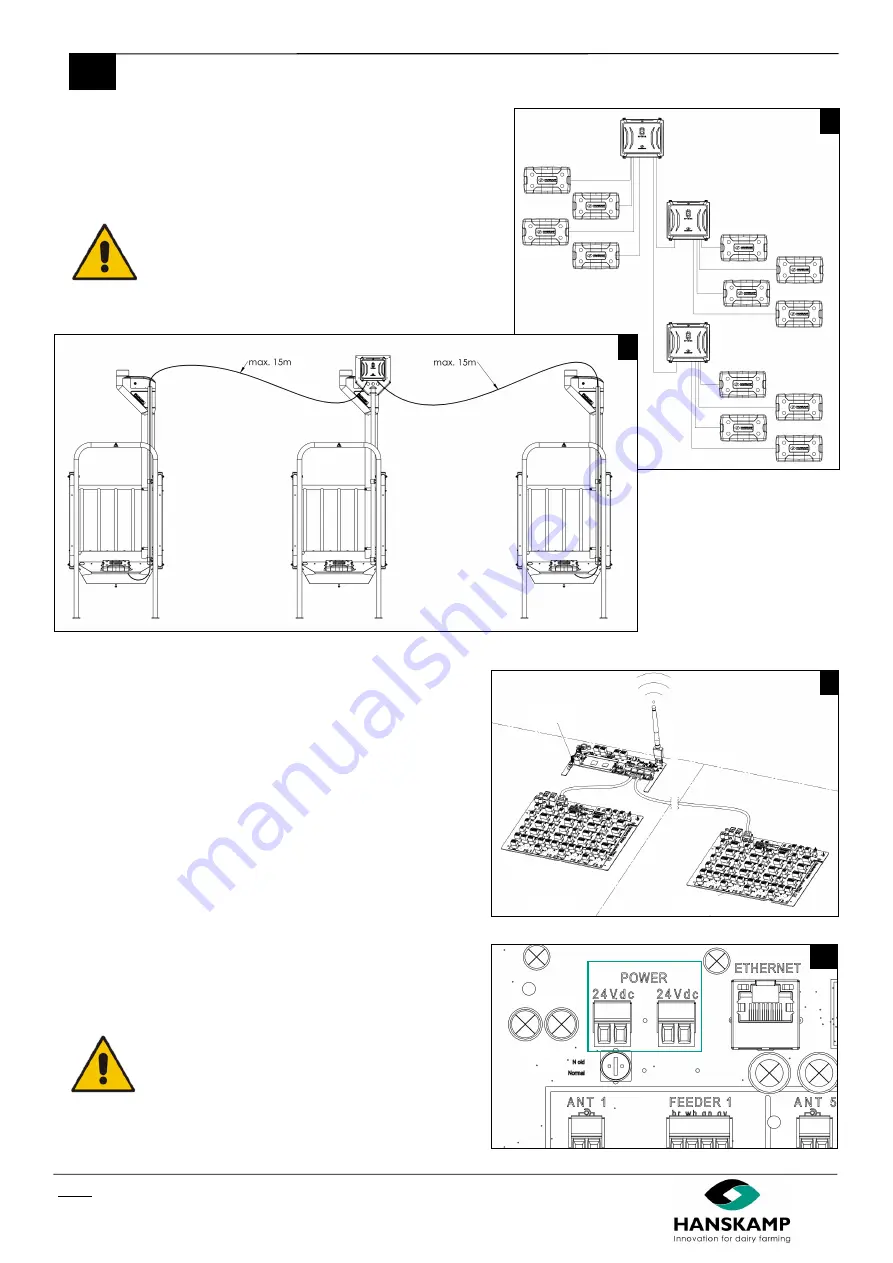
Caution! The feeding stations must not be more than 10 
meters apart, as the Antenna cable is 15 meters long.         
If they are further apart, you will need to use an extra      
SpiderClient.


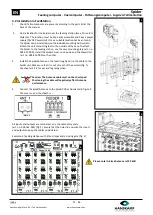
5.


Use the data cable (art. no. 005

-

107

-

000) to connect the     


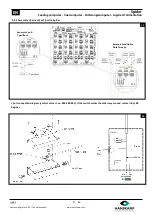
SpiderPCB to the CarrierBoard. The SpiderClient can be        


connected in the same way. Use the ethernet (LAN) ports on 


the CarrierBoard and SpiderPCB. The ethernet (LAN) ports on 


the CarrierBoard serve as a switch. Do NOT connect the      


SpiderPCB or SpiderClient to the WAN port on the left (fig. 7).


6.


Connect the CarrierBoard and the SpiderPCB to the 24VDC 


power supply. The SpiderPCB comes with two power ports 


which are linked internally. The second port can be used to 


power the CarrierBoard (fig. 8).


7.


An extra data cable (art. no. 005

-

109

-

000) is required to      

connect the Spider to a PC in your home network. Connect the 
extra data cable to the WAN port on the CarrierBoard and the 
router in your home network. The Spider can then be accessed 
through the web browser on any PC in the network. See    
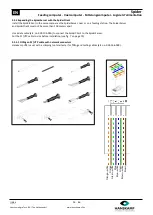
chapter 3.2.3.1 for information on fitting data cables.


Note: If the SpiderServer and router are more than 100 
meters apart, a switch must be used in between.


5


6


7


8


SpiderServer


SpiderClient


SpiderClient


LAN


CarrierBoard


SpiderPCB


SpiderPCB


SpiderServer


SpiderClient


Содержание Spider

Страница 1: ...mber 010 301 000 Date October 2021 Version 3 0 Adjusted instruction manual According to Annex 1 chapter 1 7 4 Machine guideline 2006 42 EG Doetinchem The Netherlands www hanskamp nl en Feeding compute...

Страница 2: ...Spider EN Feeding computer Voercomputer F tterungscomputer Logiciel d alimentation Index 2 46 Hanskamp AgroTech B V The Netherlands www hanskamp nl en...

Страница 3: ...e Hanskamp shall not be liable for errors or faults in this manual The recommendations are meant to serve as guidelines All instructions pictures and specifications in this manual are based on the lat...

Страница 4: ...UTP cable with network connectors 16 3 2 4 Assembly L port and or T port to Spider 17 3 3 Installation in the milking parlour 19 3 3 1 Connecting the limit switch 19 3 3 2 Examples of installation in...

Страница 5: ...ng components 35 9 1 Replacing PCB 35 9 2 Replacing Antenna 35 9 3 Replacing CarrierBoard 35 10 Extra information 36 11 Declaration 37 12 Notifications FAQ 38 12 1 Notifications 38 12 2 FAQ 39 13 Appe...

Страница 6: ...n be connected to each exit e g a motor that dispenses concentrate The electronics in a Spider box are capable of controlling four feeding stations each with four different types of feed Using one con...

Страница 7: ...f your Spider You must make sure that you and anyone else who is going to operate maintain or work in the vicinity of the Spider knows all the related safety information in this manual You are the key...

Страница 8: ...all parts of the Spider meet the local rules and regulations Replace any damaged electrical lines conduits switches and components immediately Isolate the electrical power supply before you open the S...

Страница 9: ...witch off the electrical power supply by pulling the plug out of the power point and secure the plug before you clean or do maintenance on the Spider Wear protective clothing and safety goggles when y...

Страница 10: ...rotective foil on the inside to prevent damage The Spider shall also be stored in this way See fig 1 for supply specifications Please note Always move the box carefully Please note When opening the pa...

Страница 11: ...g computer Voercomputer F tterungscomputer Logiciel d alimentation Index 11 46 Hanskamp AgroTech B V The Netherlands www hanskamp nl en 3 1 Construction overview Spider User IP generated by router see...

Страница 12: ...on use the case mounting plate art no 004 247 000 Install the SpiderServer on one side and the PowerUnit art no 002 812 000 on the other 3 Install the SpiderAntenna on the feed trough and run the cabl...

Страница 13: ...Use the ethernet LAN ports on the CarrierBoard and SpiderPCB The ethernet LAN ports on the CarrierBoard serve as a switch Do NOT connect the SpiderPCB or SpiderClient to the WAN port on the left fig...
Страница 14: ...EN Feeding computer Voercomputer F tterungscomputer Logiciel d alimentation Index 14 46 Hanskamp AgroTech B V The Netherlands www hanskamp nl en 3 2 1 Overview SpiderPCB Output gates Detection Article...

Страница 15: ...ure 10 Leg recognition ensure that the EWA Antenna Transformer unit art no 005 175 000 is located under the feed trough mounting plate and that the Antenna cannot come into contact with the feed troug...

Страница 16: ...on a feeding station The SpiderServer and SpiderClient must not be more than 100 meters apart Use a data cable art no 005 109 000 to connect the SpiderClient to the SpiderServer Cut the SF UTP cable t...
Страница 17: ...www hanskamp nl en 3 2 4 Assembly L port and or T port to Spider L port connection diagram control unit art no 002 480 001 If the switch works the other way around rotate it by 180 degrees 12 Green Br...

Страница 18: ...x0 5 LiYY 15 mtr Direction Spider Detection Brown Pink Yellow White Grey Green Green White Brown Cut off yellow wire 001 593 000 cable LiYY 8x0 34 direction Spider Gate L port cable 001 100 000 Cautio...

Страница 19: ...l The limit switch deactivates the Antennas during the switch This prevents feeding until all the cows are in the correct position The below example shows the correct set up for a 2x8 milking parlour...

Страница 20: ...re that the animal s transponder is within the boundaries of the Antenna Figure 16 17 Ear recognition Use the mounting kit art no 007 535 000 for installation on the MultiFrame 40 50 60 70 Because the...

Страница 21: ...terface If you experience problems with logging in refer to chapter 12 2 FAQ Log in 4 1 1 Signing in on a PC or via a home network optional It is also possible to connect a PC or laptop with a cable C...

Страница 22: ...shown in figure 3 Select Add if no SpiderPCB is displayed or if an additional one needs to be added Then the next screen will open figure 2 Select the number of feeding stations you want to add as wel...

Страница 23: ...will remain open Disabled The closing gate is disabled No closing gate Click Select Front gate no The exit number which the T port is connected to Note this only applies to the FeedStation Walk Throu...

Страница 24: ...ow 4 3 1 Tag tuning Tag tuning is used for automatic programming of the SpiderPCB s RFID settings every SpiderPCB must be configured separately With tag tuning all transponder settings are set correct...

Страница 25: ...will be reported and the old settings will be restored You can then manually try to read the tag by changing the SpiderPCB parameters See chapter 4 3 4 on how to change SpiderPCB parameters 4 3 2 Set...

Страница 26: ...se and decrease this value in steps of 500 to find the best setting for your situation 30002 RFID Multiplextime This is the time frame within which the Antenna is active and ready to read the tag Only...

Страница 27: ...to light up red and flash green when transponder is recognized 3 Loosen the adjusting screw in the EWA until the green LED switches off 4 Hold the transponder facing outwards approx 20 cm above the g...

Страница 28: ...ation the animal has no more feed credit or has not been recognised for a while Yellow continuous Only applicable in milking parlour If the limit switch is activated continuously the yellow LED will r...

Страница 29: ...o the internet the update can be performed by means of a USB stick This USB stick is placed in the Spider on the CarrierBoard Download the software via hanskamp nl en brochures downloads search for Sp...

Страница 30: ...layed when running the setup Choose the users who will be authorised to use the program and click Next After installation the screen can be closed with Close If the setup was launched on a computer wh...

Страница 31: ...of the cycle and the motor will stop Cycle This is the time allowed for the motor to dispense one portion A second actuation is only possible after the cycle has been completed This means that the cy...

Страница 32: ...icking Deselecting removing from selection without clicking Select a number of animals then click on Group input to perform the desired action Parlour monitor Live monitor The animals that have been r...

Страница 33: ...nd the headers A B C etc Note Any animal data on the first line will not be imported The order of notation is not important the fields can be allocated later See the image below for an example of the...

Страница 34: ...amount per visit 6 No permission to feed as she has eaten the maximum feed amount during the previous visit there must be a two hour time difference inbetween visits 7 Normal visit animal is eating m...

Страница 35: ...values noted in step 1 If the values are unknown configure them now Parameters Set default values Tag tuning see chapter 4 3 11 Test all inputs and outputs 9 2 Replacing Antenna 1 Disconnect the Anten...

Страница 36: ...have been tested However in the event of malfunctions Hanskamp AgroTech B V cannot be held liable for consequential damages No Release date Chapter s Note 1 0 12 2018 First edition 1 1 06 2019 All Up...

Страница 37: ...om Hanskamp AgroTech B V to which this declaration pertains does meet the stipulations of the following directive s Machine Directive 2006 42 EC and completely or partially meets the following essenti...

Страница 38: ...or Connect the Motor properly and or try another exit on the PCB see chapter 4 2 Motor error no feedback Motor has no feedback Connection error Motor takes to much time for rotation Change Motor setti...

Страница 39: ...er active There is no contact with wifi dongle Problem with user device laptop phone or tablet Turn wifi on device off and on again When wifi is not connectable forget wifi and search again Restart Sp...

Страница 40: ...with fastening material for Spider enclosure 1 005 107 000 Communication cable between CarrierBoard and SpiderPCB in SpiderServer 1 005 110 000 SpiderPCB FSCU Controlboard 16 feeders 16 readers 1 005...

Страница 41: ...Description of parts SpiderClient art no 005 115 000 Article number Description Number 001 347 000 Tap bolt M3x6 a2 cross recessed DIN7958 8 005 102 000 Spider enclosure with cutout 1 005 103 000 Set...
Страница 42: ...iderAntenna 134 2 kHz red 005 150 500 SpiderAntenna 134 2 kHz orange Loose parts 001 509 000 Mushroom head square neck bolt M8x60 DIN603 4 001 769 000 Prevailing torque type hexagon nut M8 a2 DIN985 c...

Страница 43: ...059 000 Nylon universal plug quattro SX 8mm ve100 1 011 090 000 Gripseal bag 80x120x0 05mm 1 Article number Description Number 001 043 100 Hexagon nut M8 a2 DIN439 4 001 347 000 Tap bolt M3x6 a2 cross...

Страница 44: ...re expensive motor and no feedback not recommended RIM Pulse Yes No More expensive motor Do not connect feedback RIM Time Yes No More expensive motor Do not connect feedback Grey motor Yes Yes Downsid...

Страница 45: ...is hollow remaining cables can be tied up inside it preventing the animals from reaching them Spider FieldTester 134 2 kHz art no 005 130 000 can be used to adjust the Antenna field for an EWA Antenna...

Страница 46: ...alimentation Index 46 46 Hanskamp AgroTech B V The Netherlands www hanskamp nl en Hanskamp AgroTech B V Broekstraat 17 7009 ZB Doetinchem The Netherlands Tel 31 0 314 393 797 Fax 31 0 314 393 826 www...

Отзывы: