background image

Safety

Page EN-7

Risks to children

Risk of suffocation!

Do not allow children to play with the 
packaging film. They may get caught 
in it or suffocate.

Prevent children from pulling small 
parts from the device or taking them 
out of the accessory bag and putting 
them in their mouths.

Risks for certain groups of people

Danger to children and persons with 
reduced physical, sensory or mental 
abilities (e.g. people with disabilities 
to some extent, older persons with im-
paired physical and mental abilities) 
or who lack experience and knowledge 
(e.g. older children).

This appliance can be used by child-
ren aged from 8 years and above and 
persons with reduced physical, senso-
ry or mental capabilities or lack of ex-
perience and knowledge if they have 
been given supervision or instruction 
concerning use of the appliance in a 
safe way and understand the hazards 
involved. 

Children shall not play with the appli-
ance and have no unsupervised ac-
cess to the appliance.

Cleaning and user maintenance shall 
not be made by children without su-
pervision.

Keep children away from the door 
glass! The glass door can become 
very hot during operation and pose a 
risk of burning!

Risks when handling heat-
generating appliances

 CAUTION

Risk of burns!
During its use, the device and its ex-
posed parts can become hot.

Please avoid touching the heating el-
ements. 

Children aged 8 years or younger must 
be kept away from the device, unless 
they are under constant supervision.

Do not touch hot parts. Always pro-
tect hands with oven gloves or pot 
holders when working on the hot 
appliance. Only use dry oven gloves 
or potholders. Wet textiles are bet-
ter heat conductors and can cause 
steam burns.

Fire hazard!

Do not cover the appliance with blan-
kets, cloths or similar, as these objects 
may become hot and catch fire.

If a fire starts, immediately turn all 
controllers to zero and switch off the 
automatic circuit breakers and/or un-
screw the fuses. To extinguish the fire, 
use a suitable fire extinguisher with 
the designation ‘F’ or a fire blanket.

Health hazard!
Improper use of this appliance can lead 
to damage to your health.

Clean the appliance regularly and re-
move any traces of food leftovers im-
mediately.

Particularly with poultry and dishes 
containing fresh egg, and when heat-
ing up meals, ensure that the food 
is fully cooked through to kill off all 
pathogens (e.g. salmonella).

Содержание 6467 5200

Страница 1: ...Einbau Backofen mit Mikrowellenfunktionen Gebrauchsanleitung Anleitung Version 1901 03152_DE_20210202 Bestell Nr 6467 5200 Nachdruck auch auszugsweise nicht gestattet 7NF30T0 E111E ...

Страница 2: ...lle Sicherheitshinweise und Anweisungen an den nachfolgenden Verwender des Pro dukts weiter Stand by Aus DE 16 Die Uhrzeit einstellen DE 16 Garraumbeleuchtung DE 17 Tipps zum Energiesparen DE 17 Bedienung Standard Funktionen DE 18 Bevor Sie beginnen DE 18 Starten unterbrechen fortsetzen und beenden DE 18 Erklärung der Funktionssymbole DE 20 Backofenbetrieb DE 21 Mikrowellenbetrieb DE 22 Kombibetri...

Страница 3: ...en Sie ob das Gerät Transport schäden aufweist 4 Sollte die Lieferung unvollständig sein oder das Gerät einen Transportschaden aufweisen nehmen Sie bitte Kontakt mit unserem Service auf siehe Seite DE 38 WARNUNG Stromschlaggefahr Nehmen Sie nie ein beschädigtes Gerät in Betrieb Verpackungs Tipps Sollten es Ihre räumlichen Verhält nisse zulassen empfehlen wir Ih nen die Verpackung zumindest während...

Страница 4: ...tik Auftau Programme 7 Slider Temperatur Gardauer Uhrzeit erhöhen verringern 8 Funktion Beheizungsart wählen 9 Schnelles Vorheizen 10 Voreinstellungen Ausschaltzeit 11 Timer Kindersicherung 12 Mikrowellenbetrieb wählen Mikrowellenleistung einstellen 13 Einstellung löschen in Standby schalten 14 Wrasenabzug Außenkühlgebläse 15 Backblechträger 16 Halterung 4 14 15 16 2 3 4 5 6 7 8 9 10 11 13 12 1 ...

Страница 5: ... bestimmungsgemäßen Gebrauch entstanden sind Die Lampe im Backofen ist nur zur Beleuch tung des Garraums vorgesehen und nicht als Raumbeleuchtung Die Backofentür darf nicht als Stütze Sitzflä che oder Trittbrett verwendet werden Begriffs Symbolerklärung Ihr Gerät kann als Mikrowelle oder als Backo fen betrieben werden Der Begriff Kombibe trieb meint die Unterstützung des Backofen betriebs durch Mi...

Страница 6: ...chkraft ausge tauscht werden Netzkabel nicht verlängern oder verändern Netzsteckerund kabelvonoffenem Feuer und heißen Flächen fernhal ten Falls der Netzstecker nach dem Ein bau nicht mehr zugänglich ist muss eine allpolige Trennvorrichtung ge mäß Überspannungskategorie III in der Hausinstallation mit mindestens 3 mm Kontaktabstand vorgeschaltet sein hierzu zählen Sicherungen LS Schalter und Schüt...

Страница 7: ...ürfen nicht von Kindern ohne Beauf sichtigung durchgeführt werden Kinder vom Türglas fernhalten Das Türglas kann im Betrieb sehr heiß werden Verbrennungsgefahr Risiken im Umgang mit hitzeerzeugenden Geräten VORSICHT Verbrennnungsgefahr Während des Gebrauchs werden das Gerät und seine berührbaren Teile heiß Vorsicht ist geboten um das Berüh ren von Heizelementen zu vermeiden Kinder jünger als 8 Jah...

Страница 8: ...eln aus rohen Kartoffelscheiben Reibeku chen usw in der Bratpfanne statt Öl besser Margarine mind 80 Fett oder Öl mit etwas Margarine verwen den Bei Backwaren hilft das Einstreichen mit Eiweiß oder Eigelb die Bildung von Acrylamid zu verringern Kipp und Verletzungsgefahr Wird die offene Gerätetür mit einem schweren Gewicht belastet kann das Gerät nach vorne kippen Es besteht Verletzungsgefahr durc...

Страница 9: ...wellenenergie sicherstellt Explosionsgefahr Flüssigkeiten oder andere Nahrungs mittel dürfen nicht in verschlossenen Behältern erwärmt werden da sie leicht explodieren können Beim Öffnen des Behälters können Sie sich verletzen VORSICHT Verbrühungsgefahr Beim Erhitzen von Flüssigkeit kann es zum so genannten Siedeverzug kom men Dabei erreicht die Flüssigkeit die Siedetemperatur ohne äußerlich sicht...

Страница 10: ...e Mikrowelle nie ohne den Gitter rost und nie ohne Speisen betreiben Spezielle Risiken bei Backofenbetrieb VORSICHT Verbrennungsgefahr Während des Gebrauchs werden das Gerät und seine berührbaren Teile heiß Den Backofen während des Grillens nicht unbeaufsichtigt lassen Kinder fernhalten Den Backofen vollständig abkühlen lassen bevor Sie mit der Reinigung beginnen Wasser nie direkt in den heißen Ba...

Страница 11: ...d beschädigt Wenn Sie Geschirr direkt auf den Garraum boden stellen möchten darf die Back ofentemperatur 50 C nicht über schreiten Vorsicht beim Hantieren mit dem Geschirr die Emaille kann leicht zerkratzt werden Stellen Sie beim Einkochen nur so viele Gläser auf einmal in der Fett pfanne dass sie sich nicht berühren Die Gläser können platzen Backblechträger und eventuell einge baute Teleskopschie...

Страница 12: ...st Um rühren oder Wenden für das gleichmäßige Durchgaren wichtig Der Garraum und die Luft darin werden nicht erwärmt Das Speisegefäß erwärmt sich hauptsächlich durch die heiße Speise Beim Erhitzen von Flüssigkeit kann es zum sogenannten Siedeverzug kommen Da bei erreicht die Flüssigkeit die Siedetempe ratur ohne äußerlich sichtbar zu kochen Schon durch eine kleine Erschütterung kann die Flüssigkei...

Страница 13: ...l len Backofen benutzt werden Töpfe mit hitzebeständigen Griffen erkenn bar an der Kennzeichnung temperaturbe ständig bis 280 C Feuerfeste Formen aus Glas Porzellan Keramik und Ton oder auch Gusseisen Insbesondere Backöfen mit Ober und Un terhitze brauchen Formen und Bleche mit guter Wärmeübertragung am besten aus schwarzlackierten Metallen Darin werden Kuchen besonders gut braun Auch Aluminiumble...

Страница 14: ...en Aufläufen usw Zusam men mit dem Gitterrost a kann es auch als Fettpfanne benutzt werden Der Gitterrost a g HINWEIS Beschädigungsgefahr Unsachgemäßer Umgang mit dem Ge rät kann zu Sachschäden führen Die Mikrowelle nie ohne den Gitter rost und nie ohne Speisen betreiben Den Gitterrost nicht direkt auf den Garraumboden stellen und nicht bis an die Rückwand des Geräteinnen raums schieben Der Gitter...

Страница 15: ...ichnung F verwenden Nach dem Erlöschen des Feuers das Gerät durch unseren Service überprü fen lassen siehe Seite DE 38 HINWEIS Aufgestaute Hitze kann die Emaille des Backofens beschädigen Bleche oder Alufolie nie direkt auf den Garraumboden stellen Wenn Sie Geschirr direkt auf den Gar raumboden stellen möchten darf die Backofentemperatur 50 C nicht überschreiten Vorsicht beim Hantie ren mit dem Ge...

Страница 16: ...t zu speichern tippen Sie auf den Sensor 14 Der Luftaustritt erfolgt durch den Wrasenab zug 14 zwischen Bedienblende und Backo fentür Der Lüfter kühlt die Backofendämpfe und Grill schwaden und verhindert dass angrenzende Möbel zu heiß werden Nach dem Gar Ende läuft der Lüfter noch einige Zeit nach um das Gerät abzukühlen Die Dauer ist abhängig davon wie heiß es im Geräteinnern ist Sobald die Innen...

Страница 17: ...en Backofen nur dann vor wenn es im Rezept oder in den mitgeliefer ten Gartabellen angegeben ist Verwenden Sie möglichst dunkle Backfor men und bleche Sie nehmen die Hitze besonders gut auf Öffnen Sie die Backofentür während des Garens bzw Backens oder Bratens mög lichst selten Mehrere Kuchen sollten Sie schnell nachei nander backen solange der Backofen noch warm ist Dadurch verkürzt sich die Back...

Страница 18: ...raturempfindliche brennbare oder feuergefährliche Gegenstände nicht im Backofen aufbewahren Den Backofen nicht unbeaufsichtigt lassen wenn Sie Speisen in Öl in Fett oder mit Alkohol zubereiten Die Spei sen können sich entzünden 2 1 Sie haben die Funktion gewählt und die wei teren Einstellungen vorgenommen Um den Betrieb zu starten fortzusetzen tippen Sie auf den Sensor 2 Die Beleuchtung schaltet e...

Страница 19: ...30 220 C Auftau Hefeteig 40 C 30 45 C Mikrowellenbetrieb Symbol Bedeutung Standard Einstellung Einstellbereich Mikrowelle 01 00 min 800 W 00 10 30 00 min 80 800 W Kombibetrieb Symbol Bedeutung Standard Einstellung Einstellbereich Einstellzeit Mikrowelle mit Heißluft 160 C 320 W 50 250 C 80 320 W 00 01 01 30 h Mikrowelle plus Inten sivgrill mit Ventilator 180 C 320 W 50 250 C 80 320 W 00 01 01 30 h...

Страница 20: ...en sowie dunklen Backformen Diese Funktion können Sie auch zum Dörren von Lebensmitteln nutzen Ober und Unterhitze mit Umluft 50 250 C Diese Beheizungsart ist gut zum Backen auf mehreren Blechen gleichzeitig geeignet Die Hitze wird von den oberen und unteren Heizkörpern erzeugt und durch den Ventilator gleichmäßig verteilt Der Ringheizkörper um den Ventilator bleibt ausgeschaltet Infrarotgrill 150...

Страница 21: ...Böden Auftauen nur Ventilator Beim Auftauen wird der Garraum le diglich von unbeheizter Luft durch strömt Auf diese Weise wird der Auftauvorgang beschleunigt Die Heizung ist während des Auftauens nicht in Betrieb siehe Auftaube trieb auf Seite DE 23 Hefeteig 30 45 C Das Spezialprogramm für das An setzen von Hefe und von Sauerteig sowie das Herstellen von Joghurt Mikrowelle 80 800 W Bei dieser Eins...

Страница 22: ...nd nutzen Sie die Sensoren oder den Slider 7 4 Um die Watt Leistung zu verändern tip pen Sie auf den Sensor 12 und nutzen Sie die Sensoren oder den Slider 7 5 Machen Sie weiter wie unter Starten un terbrechen fortsetzen und beenden auf Seite DE 18 beschrieben Kombibetrieb HINWEIS Gefahr von Sachschäden Unsachgemäßer Umgang mit dem Ge rät kann zu Sachschäden führen Backblech nicht im Kombibetrieb v...

Страница 23: ...unbeheizter Luft durchströmt Auf diese Weise wird der Auf tauvorgang beschleunigt Die Heizung ist während des Auftauens nicht in Betrieb 8 13 1 1 Tippen Sie auf den Sensor 13 um an dere Funktionen zu beenden 2 Um den Auftaubetrieb nach Zeit zu wäh len tippen Sie so oft auf den Sensor 8 bis das Display und zeigt 5 7 1 3 Um die Auftaudauer zu verändern tippen Sie auf den Sensor 5 und nutzen Sie die ...

Страница 24: ...Aufgestaute Hitze kann die Emaille des Backofens beschädigen Wenn Sie Geschirr direkt auf den Gar raumboden stellen möchten darf die Backofentemperatur 45 C nicht überschreiten Vorsicht beim Hantie ren mit dem Geschirr die Emaille kann leicht zerkratzt werden 1 Wenn die Backschüssel nicht in den Gar raum passt können Sie die Backblechträ ger entfernen um das Garraumvolumen zu vergrößern siehe Seit...

Страница 25: ...sor 4 Die Gewichtsanzeige leuchtet Das Gerät passt die Gardauer selbsttätig an 4 Bei Programmen ohne Vorheizen Stellen Sie das Gargut in den Gar raum und schließen Sie die Tür Um das Programm zu starten tippen Sie auf den Sensor 2 Die Beleuchtung schaltet ein und der Backofen heizt auf Die Gardauer Anzeige zählt herunter mit Vorheizen Tippen Sie auf den Sensor 2 um das Programm zu starten Die Bele...

Страница 26: ...sekuchen A04 40 00 Min 10 00 min 180 C Heißluft und Unterhitze Quiche A05 00 30 01 15 Std 0 5 1 0 kg 175 C Heißluft Hackbraten A06 01 20 Std 160 C Heißluft Marmorkuchen A07 35 00 Min 8 00 min 180 C Heißluft und Unterhitze Fladenbrot A08 01 00 Std 7 00 min 170 C Heißluft und Unterhitze Apfelkuchen A09 35 00 Min 8 00 min 180 C Ober und Unterhitze frische Blechpizza A10 01 00 Std 170 C Heißluft und U...

Страница 27: ...linkt die An zeige 00 00 hr 3 Stellen Sie die gewünschte Gardauer mit den Sensoren oder dem Slider 7 ein Nach kurzer Zeit leuchtet die Gardauer dauerhaft 4 Starten Sie den Backofenbetrieb mit dem Sensor 2 Nach Ablauf der eingestellten Gardauer hören Sie fünf Signaltöne und das Display zeigt End Der Backofen schaltet in Stand by Die Gardauer lässt sich jederzeit ändern Ca 6 Sekunden nach der let ze...

Страница 28: ...m Bereich von einer Minute bis 23 Stunden und 59 Minuten einstellen Bitte beachten Sie dass der Kurzzeitwecker den Backofen nicht ein oder ausschaltet Sie können den Kurzzeitwecker auch nutzen wenn der Backofen nicht eingeschaltet ist 11 7 1 1 Tippen Sie kurz auf den Sensor 11 Im Display erscheint das Symbol und die Stundenzahl blinkt 2 Um eine Start Stunde von 0 bis 23 einzu geben nutzen Sie die ...

Страница 29: ...e flache Stücke tauen schneller und gleichmäßiger auf als große dicke Trennen Sie die Teile schon während des Auftauens da freilie gende Stücke schneller auftauen Anordnung der Speisen Um ein gleichmäßiges Garergebnis zu errei chen müssen Sie die richtige Anordnung der Speisen beachten Ordnen Sie Speisen mit mehreren glei chen Stücken Kartoffeln Fleischbällchen Hamburger kreisförmig im Gefäß an un...

Страница 30: ...hren bzw schütteln dann die Temperatur an der Babynahrung direkt prüfen Insbesondere Babynahrung muss gründ lich umgerührt werden um Verbren nungen zu vermeiden Prüfen Sie die Temperatur der Speise unbedingt durch Probieren Achten Sie bei Geflügel Speisen mit frischem Ei und beim Aufwärmen von Gerichten unbedingt darauf dass sie vollständig durchgegart sind damit Krank heitserreger wie Salmonellen...

Страница 31: ...m Abkühlen gründlich mit warmem Spülwas ser oder Allzweckreiniger Für Edelstahloberflächen können Sie auch Spezialpflegemittel für Edelstahl Oberflä chen verwenden Garraum reinigen Schalten Sie zum Reinigen nur die Back ofen Beleuchtung ein Reinigen Sie den Garraum und die Back blechträger möglichst nach jedem Ge brauch mit warmem Spülwasser Reinigen Sie die Türdichtung auf die gleiche Weise seien...

Страница 32: ...r Allzweckreiniger Wischen Sie da nach alles trocken Nehmen Sie die Backblechträger her aus wenn Sie z B mehr Platz im Gar raum benötigen Backblechträger einsetzen R F 15 16 16 1 Führen Sie den Backblechträger 15 von der Seite in die Halterungen 16 ein 2 Drücken Sie den Backblechträger an schließend nach unten R F 3 Achten Sie darauf dass die Backblechträ ger auf beiden Seiten in ihren Halterungen...

Страница 33: ...blechhalterung heraus stecken Sie sie wieder richtig ein R F 16 Die Halterungen sind vorn und hinten ver schieden beschriftet vorne mit einem F für Front hinten mit einem R für Rear Die Halterungen jeweils hinten mit dem Haken in das obere Loch der Garraumin nenwand einhängen und in das untere Loch drücken ...

Страница 34: ...er zweiten Person transportieren Das Gerät vorsichtig auspacken und vor sichtig alle Verpackungsteile Kunststoff profile Klebestreifen und Schaumpolster innen außen und auf der Geräterückseite entfernen Einbau Backofen einbauen Der Backofen ist für den Einbau in handels übliche Küchen Einbaumöbel vorgesehen Er kann sowohl in einen Hochschrank als auch unter einer Arbeitsplatte eingebaut werden Bea...

Страница 35: ... des Backofens eine Schub lade angebracht wird ist ein Zwischen boden erforderlich Die Einbaunische darf keine Rückwand be sitzen sondern höchstens eine Anstellkan te von maximal 50 mm Der Einbauschrank kann wahlweise mit Leisten oder einem Zwischenboden mit Lüftungsausschnitt ausgestattet sein Die Einbaunische muss folgende Mindest größe besitzen Einbau unter einer Arbeitsplatte min 600 mm 560 56...

Страница 36: ...t werden 1 Schieben Sie den Backofen in die Einbau nische bis die Frontblende auf den Rah men des Einbauschranks trifft Dabei darf die Netzanschlussleitung nicht geknickt eingeklemmt oder auf andere Weise beschädigt werden 2 Halten Sie zwischen dem Backofen und den Möbelseitenwänden einen gleich mäßigen Abstand Verschließen Sie den Spalt über der Backofenblende nicht e d c 3 Wenn der Backofen rich...

Страница 37: ...sorgt dieser für eine gleichmäßige Ver teilung der Hitze im Innenraum Dazu schaltet er sich selbsttätig ein und aus Backofenlampe defekt Wenden Sie sich an unseren Service siehe Seite DE 38 Außenkühlgebläse läuft nicht dauerhaft Das ist keine Fehlfunktion Das Gebläse schaltet während des Gar betriebs nach Bedarf ein und aus Außenkühlgebläse läuft nach Kein Fehler Das Außengebläse läuft eine gewiss...

Страница 38: ...eparaturen und Ersatzteile Durch die Reparatur defekter Geräte können Sie Abfall vermeiden Wenden Sie sich an un seren Service Kunden in Deutschland Wenden Sie sich bitte an unseren Technik Service Telefon 0 40 36 03 31 50 Kunden in Österreich Wenden Sie sich bitte an das Kundencenter oder die Produktberatung Ihres Versand hauses Bitte beachten Sie Sie sind für den einwandfreien Zustand des Geräts...

Страница 39: ...ien und Beutel aus Polyäthylen PE Spannbänder aus Polypropylen PP Auch Energie sparen schützt vor zu starker Erwärmung unserer Erde Ihr neues Gerät verbraucht mit seiner umweltverträglichen Isolierung und seiner Technik wenig Energie Wenn Sie sich von der Verpackung trennen möchten entsorgen Sie diese bitte umwelt freundlich Abfallvermeidung Maßnahmen der Abfallvermeidung ha ben nach den Vorschrif...

Страница 40: ...2 2 170 25 30 2 160 30 35 Muffins Backblech 2 2 150 25 35 2 2 150 40 50 Apfelkuchen Springform Ø 20 cm 1 160 80 90 1 170 70 80 Brot Backblech 2 2 190 30 35 2 2 190 30 35 Toast Gitterrost 5 3 Max 2 6 5 3 Max 1 4 Hähnchen Gitterrost und Backblech Gitterrost 1 Backblech 2 2 180 75 80 12 Hacksteaks Backblech 4 240 15 6 84 Hackbraten Backblech 2 210 70 80 5 1 Einschubhöhe von unten gerechnet 2 Vorheize...

Страница 41: ...annung 230 V Frequenz 50 Hz Maximalleistung Mikrowelle 1600 W Maximalleistung Grill 2200 W Nennleistung Mikrowelle 800 W Volumen 71 L Außenmaße ohne Griff B T H 59 5 56 5 59 5 cm Netto Gewicht ca 45 kg Maximal Temperatur 250 C Technische Daten ...

Страница 42: ...Technische Daten Seite DE 42 ...

Страница 43: ...Built in oven with microwave functions User manual Manual version 1901 03152_EN_20210202 Order no 6467 5200 Reproduction even of excerpts is not permitted 7NF30T0 E111E ...

Страница 44: ...ctions on to the subsequent user of the product Setting the time EN 16 Cooking compartment light EN 17 Tips for saving energy EN 17 Modes standard functions EN 18 Before getting started EN 18 Starting interrupting continuing and ending EN 18 Explanation of the function symbols EN 20 Oven mode EN 21 Microwave mode EN 22 Combi mode EN 22 Defrost mode EN 23 Special preparation information for yeast d...

Страница 45: ...ete 3 Check whether the appliance was dam aged during transit 4 If the delivery is incomplete or the appli ance has been damaged during transport please contact our Service Centre see page EN 38 WARNING Risk of electric shock Never use a damaged appliance Packaging tips If you have sufficient space we rec ommend keeping the packaging at least during the warranty period If the appliance needs to be...

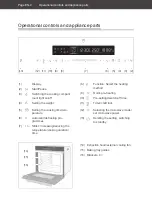
Страница 46: ...re 6 Automatic defrosting pro grammes 7 Slider Increasing reducing the temperature cooking duration time 8 Function Select the heating method 9 Quick pre heating 10 Pre settings switch off time 11 Timer child lock 12 Selecting the microwave mode set microwave power 13 Deleting the setting switching to standby 14 Extraction hood external cooling fan 15 Baking tray guides 16 Brackets 4 2 3 4 5 6 7 8...

Страница 47: ...liability for damage caused by improper use The oven light is intended solely for lighting the cooking compartment and should not be used as room lighting The oven door must not be used as a support prop seat or step Explanation of terms symbols Your appliance can be used as a microwave or an oven The term combi mode means that the oven mode is supported by micro waves The following symbols can be...

Страница 48: ...tend or modify the mains cord Keep the mains plug and cord away from naked flames and hot surfaces If the mains plug is no longer acces sible after installation an all poles disconnecting device complying with overvoltage category III must be connected to the house wiring with a contact gap of at least 3 mm this in cludes fuses circuit breakers and con tactors If all poles of the appliance cannot ...

Страница 49: ...glass The glass door can become very hot during operation and pose a risk of burning Risks when handling heat generating appliances CAUTION Risk of burns During its use the device and its ex posed parts can become hot Please avoid touching the heating el ements Children aged 8 years or younger must be kept away from the device unless they are under constant supervision Do not touch hot parts Alway...

Страница 50: ...shing baked goods with egg whites or egg yolks helps to reduce the formation of acrylamide Risk of tipping and injury If the open appliance door is loaded with a heavy weight the appliance can tip forwards There is a risk of injury from falling objects The oven door must not be used as a support prop seat or step The screws which have been supplied with the appliance must be affixed before the ove...

Страница 51: ...e liquid to suddenly spray out for example when removing it from the microwave oven Microwave heating of beverages can result in delayed eruptive boiling Therefore care must be taken when handling the container To avoid a boiling delay place a plas tic or glass spoon in the contain er The spoon must be at least 2 cm away from the interior walls of the microwave at all times Do not use tall thin co...

Страница 52: ...e ing cooked in the oven with baking parchment Do not allow food bak ing parchment and aluminium foil to come into contact with the heating elements Under no circumstances must the fan openings be covered up This may cause the appliance to overheat Do not place food to be grilled too far back near the end of the heating ele ment It is particularly hot there Fat ty foods can catch fire If the cooli...

Страница 53: ...not touch one an other The jars can burst Do not clean baking tray guides and telescopic rails in the dishwasher If a trolley is used to move the appli ance the appliance must be lifted as shown on the packaging Do not use the appliance door han dle to lift the entire oven The han dle is not designed to carry the whole weight of the appliance Risks in oven mode with timer CAUTION Fire hazard Befor...

Страница 54: ... stir or turn the dish over to ensure that it is cooked through evenly The cooking compartment and the air in this compartment are not heated The food container is primarily heated by the hot food itself When heating liquids a so called boiling delay can occur The liquid then reaches boiling temperature without any outward visible sign of boiling Even a small vibra tion may cause the liquid to sud...

Страница 55: ...n ventional oven can also be used for these heating methods Pots with heat resistant handles can be recognised by the label indicating heat re sistant up to 280 C Fire proof dishes made of glass porcelain ceramic and clay or cast iron In particular ovens with top and bottom heat require dishes and trays with good heat transfer preferably metals which have been painted black as these allow cakes to...

Страница 56: ...etc In conjunction with the oven rack a it can also be used as a dripping pan The oven rack a g NOTICE Risk of damage Improper handling of the appliance can lead to property damage Never operate the microwave with out the oven rack or without food Do not place the oven rack directly on the bottom of the cooking compart ment or push it to the rear wall of the inner compartment of the appliance The ...

Страница 57: ...pliance checked by our Service team see page EN 38 NOTICE Pent up heat can damage the oven s enamel Do not place baking trays or alumini um foil directly on the bottom of the cooking compartment If you wish to place dishes directly on the bottom of the cooking compart ment the oven temperature must not exceed 50 C Be careful when han dling cookware the enamel can be easily scratched Fan extraction...

Страница 58: ...the extraction hood 14 between the control panel and the oven door The fan will cool the steam emanating from the oven and grill and will prevent adjacent furniture from becoming too hot After the cooking time has finished the fan will continue to run for some time to cool the appliance down The length of time depends on the heat level inside the appliance Once the internal temperature has dropped...

Страница 59: ... if it is called for in the recipe or stipulated in the cooking tables provided Use dark coloured baking dishes and trays when possible They effectively absorb the heat Avoid frequently opening the oven door during cooking baking or roasting Bake several cakes one after the oth er while the oven is still warm in order to shorten the baking time for subsequent cakes If you use loaf tins place both ...

Страница 60: ... temperature sensitive combustible or flammable objects in the oven Do not leave the oven unattended while cooking food in oil and grease or with alcohol The foods may ignite 2 1 You have selected the function and config ured the other settings In order to start continue the operation tap the sensor 2 The lighting will switch on the oven will heat up Up to eight bars below the tem perature display...

Страница 61: ... heat 170 C 30 220 C Defrost Yeast dough 40 C 30 45 C Microwave mode Symbol Meaning Default setting Setting range Microwave 01 00 min 800 W 00 10 30 00 min 80 800 W Combi mode Symbol Meaning Default setting Setting range Setting time Microwave with hot air 160 C 320 W 50 250 C 80 320 W 00 01 01 30 h Microwave plus inten sive grill with fan 180 C 320 W 50 250 C 80 320 W 00 01 01 30 h Microwave in p...

Страница 62: ...will work in both light and dark bakeware You can also use this function to de hydrate food Top and bottom heat with convec tion 50 250 C This heating method is suitable for baking on several baking trays at the same time The heat is gener ated by the top and bottom heaters and is evenly distributed by the fan The ring heater around the fan re mains switched off Infrared grill 150 250 C When grill...

Страница 63: ...accelerates the defrosting process No heat is ap plied during defrosting see Defrost mode on page EN 23 Yeast dough 30 45 C The special programme for the preparation of yeast dough and sourdough and for making yogurt Microwave 80 800 W In this setting you are using the appliance like a microwave Please observe the notes in section Gen eral information about microwaves see page EN 12 Detailed infor...

Страница 64: ...EN 18 Combi mode NOTICE Risk of damage to property Improper handling of the appliance can lead to property damage Do not use the baking tray in combi mode In combi mode the microwave and the oven functions are used at the same time 12 8 13 1 1 Tap the sensor 13 to exit other func tions 2 To select combi mode first tap on the sensor 12 The display shows the symbol 3 To select the additional oven fu...

Страница 65: ...o exit other func tions 2 To select the defrost mode by time tap the sensor 8 until the display shows and 5 7 1 3 To change the cooking time tap the sensor 5 and use the sensors or the slider 7 4 Continue as described in Starting in terrupting continuing and ending on page EN 18 In order to make more room in the cooking compartment you can remove the baking tray guides and defrost the frozen food ...

Страница 66: ...the bottom of the cooking compart ment the oven temperature must not exceed 45 C Be careful when han dling cookware the enamel can be easily scratched 1 If the baking dish does not fit in the cook ing compartment you can remove the baking tray guides to increase the cooking compartment volume see page EN 31 2 Pre heat the oven to 45 C 3 Switch the oven off when the temperature has been reached 4 P...

Страница 67: ...ghted con stantly The appliance automatically adjusts the cooking time 4 Programmes without preheating Place the food in the cooking com partment and close the door To start the programme tap the sensor 2 The lighting will switch on and the oven will heat up The cooking time indicator will count down with preheating Tap the sensor 2 to start the pro gramme The lighting will switch on the oven will...

Страница 68: ...heat Cheesecake A04 40 00 min 10 00 min 180 C hot air and bottom heat Quiche A05 00 30 h 01 15 h 0 5 1 0 kg 175 C hot air Meatloaf A06 01 20 h 160 C hot air Marble cake A07 35 00 min 8 00 min 180 C hot air and bottom heat Flatbread A08 01 00 h 7 00 min 170 C hot air and bottom heat Apple cake A09 35 00 min 8 00 min 180 C top and bottom heat Fresh pan pizza A10 01 00 h 170 C hot air and bottom heat...

Страница 69: ...ll flash 00 00 hr 3 Select the desired cooking time with the sensors or the slider 7 After a short time the cooking time will light up permanently 4 Start the oven s operation with the sen sor 2 Once the pre set cooking time has elapsed you will hear five signal tones and the dis play will show End The oven will switch into standby mode The cooking time can be changed at any time The change will t...

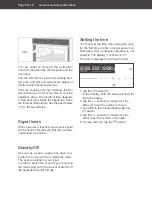
Страница 70: ...3 59 hours Please note that the countdown timer does not switch the oven on or off You can also use the countdown timer when the oven is not switched on 11 7 1 1 Tap quickly on the sensor 11 The symbol will appear on the display and the hour value will flash 2 To enter a start hour from 0 to 23 use the sensors or the slider 7 3 Tap the sensor 11 The minute indicator will flash on the dis play 4 To...

Страница 71: ...d portions Separate the defrosting parts dur ing the defrosting process as this allows the food to defrost more quickly Order of dishes In order to achieve an equally thorough cook ing result the correct arrangement of the dish must be observed Arrange dishes containing several identi cal elements potatoes meatballs ham burgers in a circle within the container and leave the middle section free Whe...

Страница 72: ...oroughly stir or shake baby food after heating then check the temperature of the food itself Baby food in particular must be stirred carefully to avoid burns Always check the temperature of the food by tasting Please ensure with poultry dishes con taining raw egg and when heating up meals that the food is thoroughly cooked in order to completely destroy pathogens such as salmonella Stirring and tu...

Страница 73: ... thoroughly clean the surfac es with warm rinsing water or all purpose cleaner For stainless steel surfaces you can also use special care products made just for stainless steel surfaces Cleaning the cooking compartment Switch on the oven light only for cleaning Clean the cooking compartment and bak ing tray guides after every use if possible and rinse with warm clean water Clean the door seal in t...

Страница 74: ... tray guides using warm water and mild dish soap or all purpose cleaner Then wipe everything dry Remove the baking tray guides when you need more space in the oven for example Inserting the baking tray guides R F 15 16 16 1 Insert the baking tray guides 15 from the side into the brackets 16 2 Then push the baking tray guides down wards R F 3 Ensure that the baking tray guides are sit ting in their...

Страница 75: ...tray bracket insert them again correctly R F 16 The brackets are labelled differently on the front and rear at the front with an F for Front at the rear with an R for Rear Hang the brackets at the rear with the hook in the upper hole of the inner cook ing compartment wall and push them into the lower hole ...

Страница 76: ...e help of a second person Carefully unpack the appliance and re move all packaging plastic moulding ad hesive strips and foam padding from the inside outside and back of the appliance Installation Installing the oven The oven is designed for installation in standard kitchen units It can be installed at eye level and underneath the worktop The following conditions must be observed Do not install th...

Страница 77: ...nstalled below the oven The installation recess may not have a rear panel at the most it may have an add on edge measuring no more than 50 mm The built in cabinet can be equipped with either ledges rails or an intermediate shelf with ventilation cut out The installation recess must have the fol lowing minimum dimensions Installation under a worktop min 600 mm 560 568 mm min 550 mm min 580 mm max 5...

Страница 78: ...rner of the oven door The glass panes can be damaged 1 Push the oven into the recess until the front fascia is flush with the installation unit The mains connection must not be kinked pinched or otherwise damaged 2 Ensure an even gap between the oven and the unit walls on both sides Do not seal the gap above the oven fascia e d c 3 If the oven is correctly set up open the open the oven door and sc...

Страница 79: ...ensure the heat is evenly spread around the oven interior It will switch itself on and off independently The oven light is defec tive Contact our service team for this see page EN 38 The external cooling fan does not run permanent ly This is not a malfunction The fan will switch on and off during the cooking process as required External cooling fan keeps running No error The external cooling fan w...

Страница 80: ... further accessories Repairs and spare parts You can prevent waste by having your defec tive appliances repaired Please contact our customer service regarding this Customers in Germany Please contact our technical service Telephone 0 40 36 03 31 50 Customers in Austria Please contact your mail order company s customer service centre or product advice centre Please note You are responsible for the ...

Страница 81: ...ulded parts made of foamed CFC free polystyrene PS Films and bags made of polyethylene PE Tension bands made of polypropylene PP Saving energy also protects against exces sive global warming Your new appliance uses little energy due to its environmentally friendly insulation and technology If you would like to dispose of the packag ing please dispose of it in an environmentally friendly way Waste ...

Страница 82: ... cm 2 2 170 25 30 2 160 30 35 Muffins Baking tray 2 2 150 25 35 2 2 150 40 50 Apple cake Springform Ø 20 cm 1 160 80 90 1 170 70 80 Bread Baking tray 2 2 190 30 35 2 2 190 30 35 Toast Oven rack 5 3 Max 2 6 5 3 Max 1 4 Chicken Oven rack and baking tray Oven rack 1 Baking tray 2 2 180 75 80 12 patties Baking tray 4 240 15 6 84 Meatloaf Baking tray 2 210 70 805 1 Rack height calculated from below 2 P...

Страница 83: ...ions Rated voltage 230 V Frequency 50 Hz Maximum power microwave 1600 W Maximum power grill 2200 W Rated output power microwave 800 W Oven capacity 71 L External dimensions without handle W D H 59 5 56 5 59 5 cm Net weight ca 45 kg Maximum temperature 250 C ...

Страница 84: ......
Отзывы: