


Note:
1. Images are for illustration purposes only.
2. All the cables illustrated above are not
provided by Hannspree.
Note:
Images are for illustration only and may vary
according to the model and region.
Source
1
2
3
4
5
6
7
8
9
10
11
12
TV
DTV
AV
S-VIDEO
YPbPr
PC
HDMI1
HDMI2
HDMI3
HDMI4
SCART1
SCART2
Running Setup Wizard
The Setup Wizard is displayed on the screen when you turn on your LCD TV for the first time.
Note: Use the
,
to move through the menu. Press
OK
to select
.
Initial Setup
Language
Please select your language:
Exit
Menu
Next
Ok
Select
English
Italiano
Español
Português
Français
Deutsch
Magyar
Polski
Nederlands
Initial Setup
Country
Please select your Country:
Back
Menu
Next
Ok
Select
UK
Initial Setup
Time Zone
Please select time zone:
Back
Menu
Next
Ok
Select
GMT
Initial Setup
Channel Scan
Connect the antenna first.
Start channel scan now?
Back
Menu
Next
Ok
Select
Scan
Skip Scan
Channel
48.25 MHz
1
Initial Setup
Complete
Congratulations.
Complete Initial Setup.
Please press [Menu] to exit the wizard.
Exit
Menu
1. Select the Language for the
on-screen display (OSD).
2. Select the Country.
3. Select the Time Zone.
4. Press
OK
for channel scan.
5. The channel scan may take a while to
complete.
6. Press
Menu
when channel
scan is completed.
You can watch cable or broadcast TV,
play DVD or connect to your PC. To
display the Input Source menu, press
the
INPUT
button on the remote
control or the
INPUT
button on the
LCD TV.
To select the source signal:
Press the numeric buttons on the
remote control; Or
Press the , buttons to
move, then press
OK
to select.
Selecting Your Content Source
Press the
P
S
or
P
T
button on
the remote control or the LCD TV to
increase / decrease the program
number; Or
Press the numeric buttons on the
remote control.
Selecting Channels
Watching Your TV
Exit
Menu
Cannel Search
Channel
Progress
28%
35 UHF
586000KHz/8M
S.No
TV Channel
S.No
Radio Channel
OK
INPUT
INFO
EPG
TEXT
MENU
MUTE
I - II
LAST
Pro.LIST
VOL
P
FAV.
FREEZE
SLEEP
ASPECT
INDEX
MIX
SIZE
SUBTITLE
HOLD
REVEAL
SOUND
PIC
OK
A
B
C
3. Insert the stem into slot then turn 90 degrees clockwise to complete
installation.
Note: the sleeves are for design only and the TV cannot be carried by it.
14
1
2
3
4
5
7
7
6
Volume Adjust
Channel Select
Menu
Input Select
Power
Remote IR Sensor/
Power Indicator
Speaker
1. Carefully place the TV face down on a soft and flat surface (blanket,foam,cloth,etc) to prevent
and damage to the TV.
2. Press the stand lock on both sides,
insert the stand into the holes.
1
2
3
4
5
6
7
Quick Start Guide
Front View
Front View
Assembling the stand base & Stem
Assembling the stand base & Stem
This guide is designed as a reference to help you start using your LCD TV quickly. Please refer to the User's Manual for more detailed installation and safety instructions.
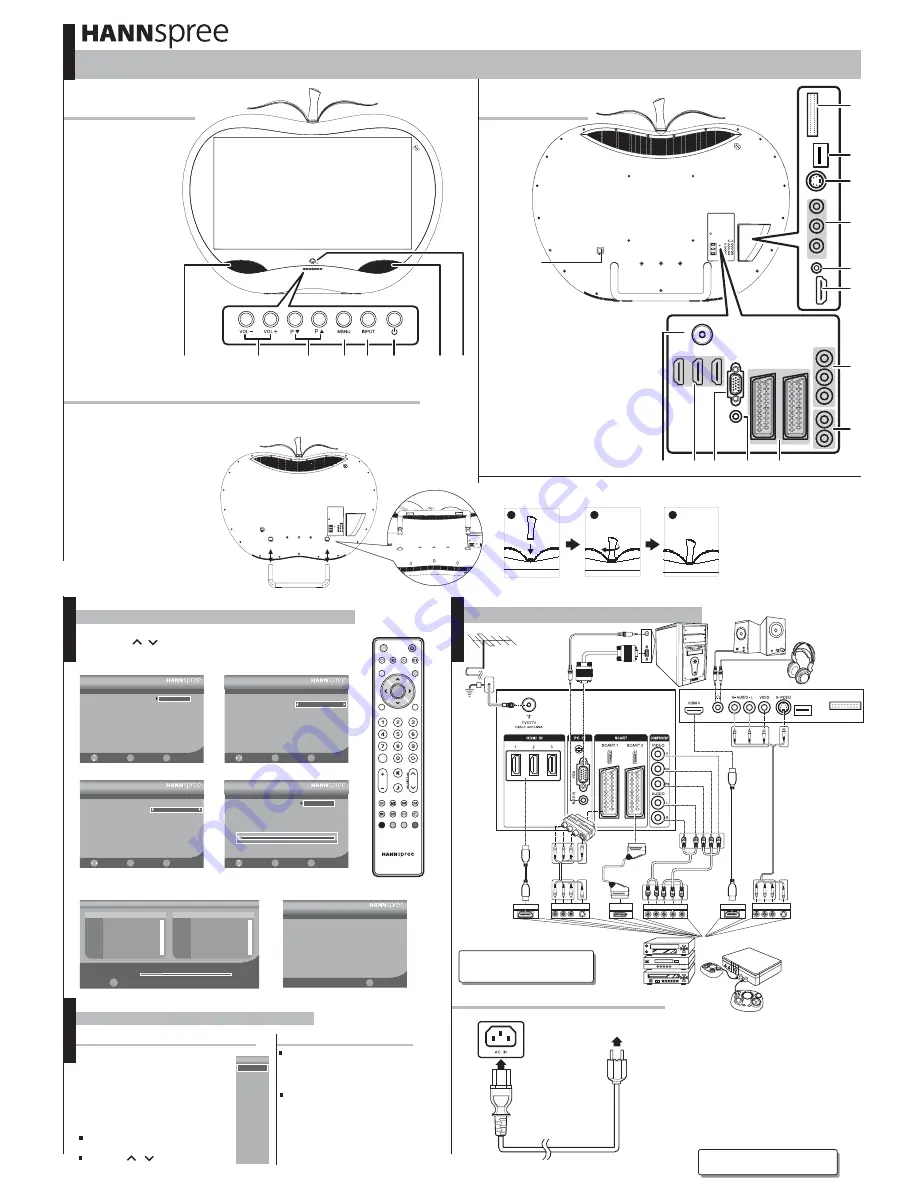
Rear View
Rear View
© Copyright 2010 Hannspree, Inc. All rights reserved.
1. Plug the power connector into the
AC IN input jack on the rear of the TV.
2. Insert the AC power plug at the other
end of the power cord into a power
outlet.
3. Press the Power button on the control
panel or the remote control to turn the
TV on.
Making Connections
Connecting the Power Cord
S_ST55F_Q_EU_V01_H
12
10
11
13
9
2
1
4
3
6
7
8
5
CI
SERVICE (For service only)
S-Video
Earphone Output
HDMI Input
Component Video Input
Component Audio Input
Scart 1 / Scart 2
PC Audio Input
VGA Input (PC)
Cable / Antenna
1
2
3
5
6
7
8
9
10
11
13
4
AV Input
12 HDMI Input
14 AC IN
SERVICE
CI SLOT
Power Outlet
Power Cord
VGA cable
Audio cable
P
R
Y
P
HDMI
R
L
B
Audio
connectors
Video
connectors
HDMI cable
HDMI
HDMI cable
VIDEO
R
L
S-VIDEO
Audio/Video
connectors
or
VCR
STB
DVD
Game System
Antenna
coaxial
cable
Antenna
R-AUDIO-L
/MONO
VIDEO
S.VIDEO
VIDEO
R
L
S-VIDEO
Audio/Video
connectors
SCART
adapter
SCART cable
SCART
All manuals and user guides at all-guides.com
all-guides.com


