background image


SmartPOS User Guide: 

PAX A920 |

 v01, 01 July 2021


|

 5

1.3 Getting started

You can choose to operate your PAX A920 either with Wi-Fi or with 
cellular connectivity. See below how to set up each connection type.

Wi-Fi connectivity

1.  Turn on the card reader by pressing and holding the power button on 

the right side for 2-4 seconds.

2.  Use the touch screen to bring the settings bar down from the top 

of the screen. You must pull it all the way down until the settings 
appear in full with icon names.

3.  Select the Wi-Fi name (below the Wi-Fi icon).
4.  Select the toggle switch to enable Wi-Fi.
5.  Once the list of available Wi-Fi networks appear, select your desired 

network.

6.  When your card reader has successfully connected to the network, it 

will confirm this action by displaying “connected” below the network 
name.

Cellular connectivity

You will be provided with a mini-SIM that is exclusively configured for 
you and is likely to be pre-installed in your card reader.
To confirm if your SIM is already installed, please follow these steps:
1.  Make sure your card reader is turned off using the power button.
2.  Push the battery cover slide latch (at the back of the card reader) to 

the right to open, remove the battery case (lifting from the bottom) 
and take out the battery (also lifting from the bottom).

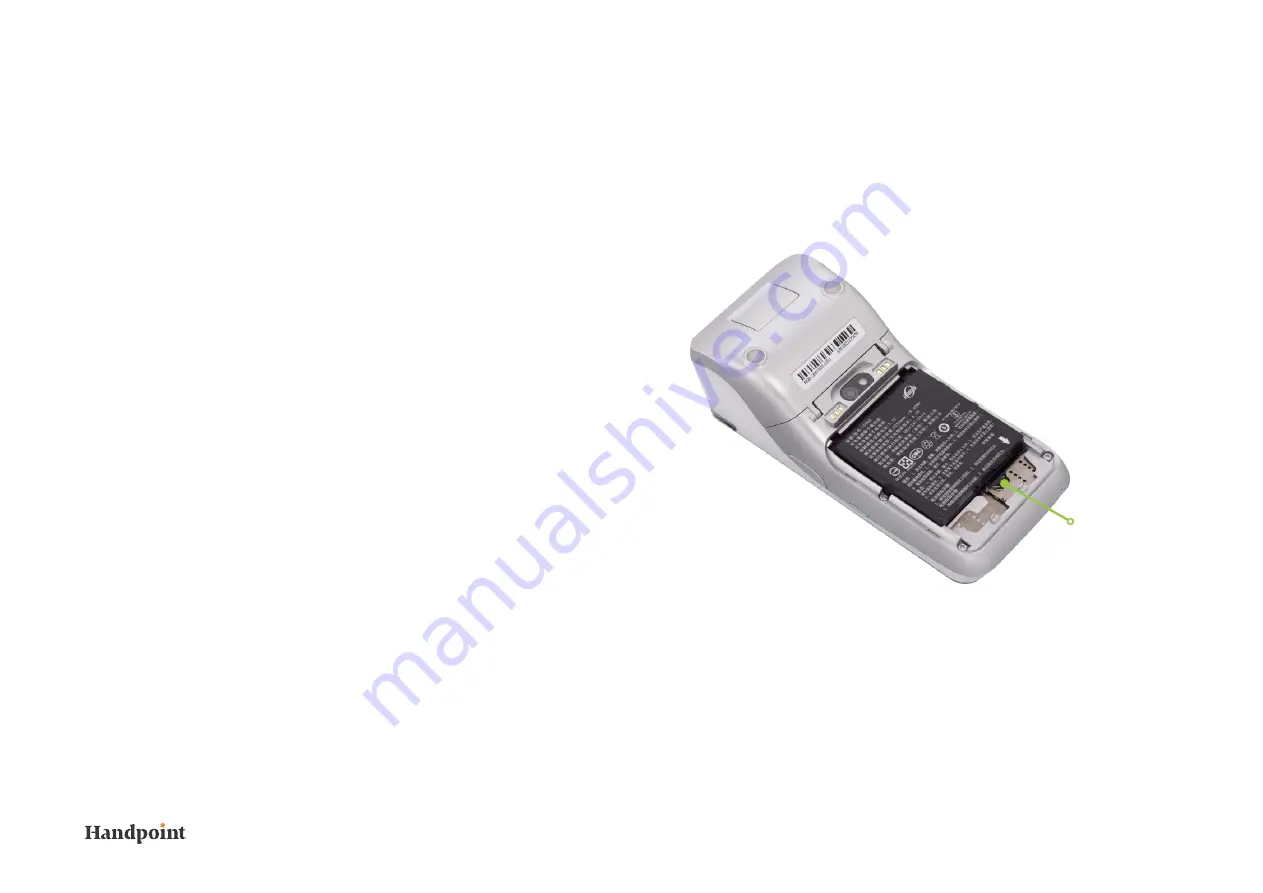
3.  Once removed, you should see your SIM card in the SIM1 card 

slot (on the left-hand side) otherwise insert it here (see the below 
image).

4.  Re-insert the battery and casing, after which you need to push the 

cover slide latch back to the left.

To activate your cellular connectivity, you will need to follow the below 
steps:
1.  Turn on the card reader by pressing and holding the power button on 

the right side for 2-4 seconds.

2.  Select the Settings application and the following steps:

SIM slot

Содержание Emerchantpay PAX A920

Страница 1: ...SmartPOS User Guide PAX A920 v01 01 July 2021 1 Handpoint SmartPOS User guide PAX A920 Version 01 01 July 2021...

Страница 2: ...User Guide PAX A920 1 Welcome 1 1 About the SmartPOS PAX A920 1 2 Terminal overview 1 3 Getting started 2 Battery 3 Security 4 Printing 5 Refunds 6 Tipping options 7 How to send the receipt over emai...

Страница 3: ...SmartPOS PAX A920 The PAX A920 is a powerful portable card reader running on Android operating system that accepts highly secure payments as part of the Handpoint Platform The Pax A920 can be used to...

Страница 4: ...on the PAX A920 MSR payments Contactless payments Volume up button Power button Micro USB charging port Volume down button Front camera fixed 0 3 MP 5 Capacitive touch screen 1280x720 EMV payments Pri...

Страница 5: ...he network name Cellular connectivity You will be provided with a mini SIM that is exclusively configured for you and is likely to be pre installed in your card reader To confirm if your SIM is alread...

Страница 6: ...arge the card reader plug the micro USB connector to the micro USB port on the left side of the terminal 3 Security Handpoint s payment platform includes stringent P2PE point to point encryption secur...

Страница 7: ...cp emerchantpay com or call us at 08001123344 Follow the steps below to perform a refund on PAX A920 Go into the transaction history tab at the bottom the second from the left Select the transaction t...

Страница 8: ...that sale transaction and select REFUND Prompt the customer to insert swipe tap their form of payment to accept the refund optional Resend the receipt Step 04 Step 05 Step 06 The refund amount can be...

Страница 9: ...age tip click Tip add your desired percentage options and click APPLY Step 01 Step 02 Step 03 6 Tipping Options Tipping options are available on your PAX A920 If you choose to enable tipping customers...

Страница 10: ...you want customers to be able to skip the tipping options altogether Your tipping options have now been finalized The next steps will describe the actual transaction process when a tip is added Enter...

Страница 11: ...altogether depending on your pre selected settings The tip will automatically be added to the total amount If Custom Amount is selected a keypad will appear to enter the flat amount to be tipped The...

Страница 12: ...through You can now print a receipt s After you complete a transaction the option SEND DIGITAL RECEIPT will be available You will be able to send the receipt as an email or message You can fill eithe...

Страница 13: ...ransactions menu and tap on the transaction you need the receipt for Choose which copy of the receipt you want to send and tap on it The device will show you the receipt for the transaction Scroll to...

Страница 14: ...oint application Step 06 Step 07 You will be redirected to the screen for the email and phone number of the recipient The recipient will receive email with the information regarding the transaction Wi...

Страница 15: ...e issue please contact us at 08001123344 It seems like my Handpoint PAX can only operate when the cable is plugged in and my battery won t charge Plastic tabs are probably covering the connection poin...

Страница 16: ...t PAX is ORANGE and says Connected The orange colour indicates that the internet connection is unstable Restart the POS app to reset the connection If you continue to see an orange cloud connection sc...

Страница 17: ...SmartPOS User Guide PAX A920 v01 01 July 2021 17 More questions We re here to help Contact us at 08001123344 or email us at helpdesk emerchantpay com emerchantpay com...

Страница 18: ...emerchantpay group emerchantpay limited is a principal member of VISA and Mastercard and an acquirer in its own right emerchantpay corporation is a registered ISO MSP of Elavon Inc Atlanta GA a wholl...

Отзывы: