


*#1
:-
Owner’s Manual
92
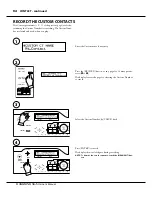
CONTACT
In this function mode, selects and edits the each contact set of the man-
ual keyboards.
WHAT IS CUSTOM CONTACT?
To sound or mute, a device called “MULTI-CON-
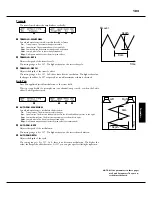
TACT” is used on the B-3/C-3’s keyboard.
To each note on the keyboard, 9 types of tonal
signals come from the Tone Wheels corre-
sponding with the harmonics (ref. P. 44), each of
which is connected or cut o
ff
with 9 contacts.
The depth of each contact di
ff
ers one by one.
And, if the surface of the contact gets stained
or if it bounds at the time of contact, it causes
a noise so-called “CHATTERING”.
The so-commonly-called “KEY CLICK” on the
Hammond Organs is due to such complicated
phenomena combined.
The contact depth and the time for the per-
fect touch can be edited and recorded upto 3
types of settings on this keyboard. It is called
“CUSTOM CONTACT”.
To activate the Custom Contact, set the Organ type in the Drawbar Function mode at
either of “A-100”, “B-3”, “C-3”, “Mellow”, and the Envelope at “Con(tact)”. (P. 74)
When you come to this mode, if the Organ Type is Vx, Farf or Pipe, the Organ Type
automatically changes to Mellow.
❶
CUSTOM NUMBER (P)
Th
is is for selecting the “CUSTOM NUMBER” to use or compile.
Th
e setting range is
F1 to F3 (not re-writable) and U1 to U3 (re-writable).
Th
e symbol “
*
” will be displayed when the Contact parameters are edited.
NOTE: This parameter is a Patch parameter only in this function pages. It is recorded into the
Patch.
❷
CUSTOM NAME (CT)
Enters name the Custom Contacts set using up to 10 letters.
Move the cursor by the [
W
] [
X
] button and choose the letters by the [VALUE] knob.
Th
e name set here, as well as the contact parameters below, will be discarded, if not re-
corded (procedure following).
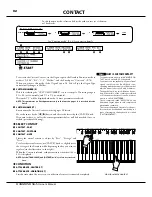
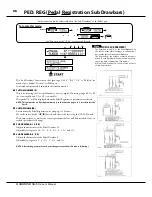
SELECT CONTACT
❸
CONTACT - PART
❹
CONTACT - FOOTAGE
❺
CONTACT - NOTE
Selects the virtual contact to adjust by “Part”, “Footage” and
“Note”.
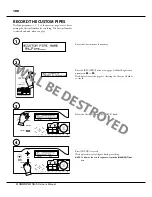
To select the virtual contact, use [VALUE] knob or, slightly move
the footage of the Drawbar while depressing the key you want to
regulate (see the illustration on the right).
When the Contact is selected, each parameter for the wheel (#6, to
#11) is displayed.
NOTE: Set the [TRANSPOSE] and [OCTAVE] at “0” to select a correct con-
tact.
CONDITION
❻
ATTACK RATE - CENTER (CT)
❼
ATTACK RATE - VARIATION (CT)
Sets the time when the note is on to until virtual contact is connected completely.
How to select a contact
LOWER A
UPPER B
MENU/EXIT
S
X
ENTER
See “Function mode” (P. 68) for operation details.
To locate this mode:
❶
❷
❸
❹
❺
❻ ❼
❽ ❾
❿
⓫
Содержание XK-5
Страница 5: ...5 Introduction INTRODUCTION...
Страница 14: ...1 Owner s Manual 14...
Страница 15: ...15 HOOK UP...
Страница 25: ...25 POWER ON AND PLAY...
Страница 39: ...39 SETTING UP...
Страница 63: ...63 USING THE CONTROL PANEL...
Страница 73: ...73 SETTING THE PARAMETERS...
Страница 101: ...101 Parameters WILL BE DESTROYED...
Страница 114: ...1 Owner s Manual 114...
Страница 115: ...115 MIDI USB...
Страница 130: ...1 Owner s Manual 130...
Страница 131: ...131 SAVE THE SETUP...
Страница 144: ...1 Owner s Manual 144...
Страница 145: ...145 FREQUENTLY ASKED QUESTIONS...
Страница 147: ...147 APPENDIX...
Страница 160: ...1 Owner s Manual 160...
Страница 162: ...1 Owner s Manual 162...
Страница 163: ...163 Appendix...
Страница 168: ...1 Owner s Manual 168...
Страница 170: ...Printed in Japan SUZUKI MUSICAL INST MFG CO LTD Hamamatsu Japan 00457 40195 V1 00 151006...