6
4. Turn the safety cap slowly a half turn and wait for the hissing noise created by any
residual steam to stop. Unscrew the cap without removing it, wait 30 seconds
and then take off the cap and allow to cool.
5. slowly pour one measuring cup of water into the steam cleaner using the funnel.
do not overfill. screw the safety cap back on the steam cleaner. Plug the steam
cleaner into electrical outlet and steam will emit shortly.
5. ATTACHMENTS
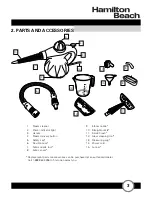
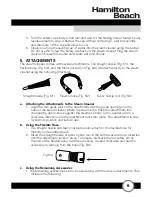
The steam cleaner comes with several attachments. The straight nozzle (fig. 5/1), the
flexible hose (fig. 5/2), and the fabric nozzle tool (fig. 5/3). all attach directly to the steam
cleaner using the following directions.
a. Attaching the Attachments to the Steam Cleaner
1. align the two guide pins on the attachment with the guide openings on the
nose of the steam cleaner where the steam exits. Push the attachment into
the opening until it stops against the steamer’s body. Turn a quarter turn in a
clockwise direction until the attachment locks into place. The attachment is now
locked into position and safe to use.
b. Using the Flexible Hose
1. The straight nozzle and fabric nozzle tool also attach to the flexible hose for
mobility and an added reach.
2. Insert the straight nozzle or fabric nozzle tool in the same way and turn clockwise
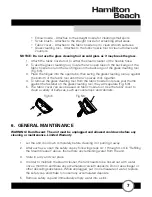
until the attachment locks in place. To release, pull back the red safety pin at
the end of the flexible hose, turn the accessory counter clockwise and pull the
accessory to remove from the hose (fig. 5/4).
c. Using the Remaining Accessories
1. The remaining accessories are to be used along with the above attachments. This
includes the following:
straight nozzle (fig. 5/1)
flexible hose (fig. 5/2)
fabric nozzle tool (fig 5/3)
fig 5/4


