background image

40

Operation

Button for side scrubbing 
unit 
(Fig. 17/7) 

This button is used 

to activate the side scrubbing 
unit. After pressing the button, 

the two brushes start or stop rotating 
and the brush is lowered or raised ac-
cordingly. When the side scrubbing unit 
is activated, the green control lamp 
lights up. 
The side scrubbing unit is an optional 
accessory. If it is not installed, the but-
ton has no function.

The side scrubbing unit can 
only be switched on when the 
circular brushes are also 
switched on.

Button for brush pressure
(Fig. 17/8) 

This button is used 

to increase the brush pres-
sure. This may be necessary 
when the area to be cleaned is 

extremely dirty. The pressing force can 
be increased to max. 47 kg. If the func-
tion is active, the green control lamp 
lights up.

Working with an increased 
brush pressure also means in-
creased brush wear. There-
fore, only press this button 
when necessary.

Button for brush drive 
(Fig. 17/9

This button serves 

to switch the brushes and solu-
tion feed on and off with simul-
taneous, respective lowering 

and raising of the brush head. If the 
function is active, the green control 
lamp lights up.

Содержание 7580.32

Страница 1: ...Instruction Manual Scrubmaster B310 R TB 1020 7580 32...

Страница 2: ...only original spare parts are used for any necessary maintenance and repair work Only original spare parts can guarantee long reliable equipment operation We re serve the right to make technical im p...

Страница 3: ...serve regulations concerning service and maintenance Maintenance work must be performed by authorized Hako service centers and confirmed in the Maintenance Report which serves as a warranty logbook Th...

Страница 4: ...Method of operation 23 3 1 1 Scrubbing unit 23 3 1 2 Squeegee 25 3 1 3 Suction turbines suction 25 3 1 4 Solution tank 26 3 1 5 Recovery tank 27 3 1 6 Traction drive 27 3 1 7 Brakes 27 3 1 8 Batteries...

Страница 5: ...ion filter 84 5 6 Recovery tank 85 5 6 1 Emptying the recovery tank 86 5 6 2 Cleaning the recovery tank 86 5 6 3 Cleaning the draining hose cap 88 5 6 4 Cleaning the air intake filter 88 5 6 5 Cleanin...

Страница 6: ...ion Safety information persons or property Safety information to prevent the development of haz ardous situations resulting from ignoring or failing to follow instructions or prescribed work procedure...

Страница 7: ...nd repaired by persons trained by Hako or authorized to do so by Hako This vehicle is not intended to be used by persons including children with limited physical or mental capa bilities or persons wit...

Страница 8: ...oven their capa bility to operate the vehicle to the contractor or person appointed by him and have been explicitly charged by him to operate the vehi cle Before starting work operating per sonnel mus...

Страница 9: ...ehicle lock the drive by removing the key from the key switch When transporting the vehicle the motors must be shutdown Only open empty recovery tanks The scrubber drier may only be driv en on hard su...

Страница 10: ...rom the accumulation of dirt viruses bacteria etc It is not permitted to use aggressive and corrosive cleaning agents Allow the vehicle to dry after being cleaned e g over the weekend The vehicle must...

Страница 11: ...nd clearing faults Switch the vehi cle off remove the key from the key switch and disconnect the battery plug In the case of faults involving the traction drive stop the vehicle imme diately and remov...

Страница 12: ...y damaged and not dam aged during the charging process The cable must not rub against any thing Do not use the charger if the insulation is damaged Ensure there are no naked flames nearby when handlin...

Страница 13: ...taminating the ground and water In accordance with symbol with the crossed out bin these batteries must not be disposed of in domestic waste Return and re cycling of old batteries must be agreed on wi...

Страница 14: ...and warning labels are attached to the vehicle where easily legible Missing or illegible labels must be replaced immediately Company logo Fig 1 1 Fig 2 1 Read the operating manu al maximum gradient an...

Страница 15: ...bottom on the flap of the left hand electrical compartment Working width in millimeters mm and inches in Fig 1 4 The working width of the machine is specified in millimeters and in inches on the defle...

Страница 16: ...Safety Information Drive direction selector Forwards or reverse Fig 2 5 Release parking brake Fig 2 6 Apply parking brake Fig 2 7 Maximum water temperature for water to be filled Fig 2 8 Fig 2 5 6 7 1...

Страница 17: ...hose which hangs to the left of this label Waste water drain age Fig 3 10 The waste water is drained via the hose which hangs to the right of this label No waste water drainage Fig 3 11 The flap serv...

Страница 18: ...pted when these units are used Before starting the vehicle up for the first time the batteries to be used must be fully charged properly by imple menting the initial battery charge routine Hako assume...

Страница 19: ...nd remove the key Installing the brushes The brush locks supplied loose in the vehicle s accessories kit must be as sembled on the brushes in accordance with Figure 6 1 Fig 5 1 Deflector 2 Deflector l...

Страница 20: ...losed Lock open Fig 7 Installing the drive plates with pad 1 Turn the drive plate over and place the pad on the contact surface press on and fix in place with the center lock 2 Lock the drive plate wi...

Страница 21: ...queegee is lifted automatically 9 Close the rear doors Adjusting the squeegee The squeegee must be set up on a level floor according to the conditions in which it is to be used The squeegee must stand...

Страница 22: ...1 Check the recovery tank empty as necessary Clean it as necessary Refer to Sections 5 6 1 and 5 6 2 2 Fill the solution tank and cleaning agent in accordance with the manu facturer s mixing directive...

Страница 23: ...hicle can only be operated when an operator is seated on the driver s seat The most important vehicle elements are described below 3 1 1 Scrubbing unit Fig 11 2 Two circular brushes which can be chang...

Страница 24: ...can be vacuumed up better The deflectors can be raised if neces sary This is the case for basic cleaning for example where the floor only needs to be scrubbed when wet and the solu tion is not vacuume...

Страница 25: ...t be checked prior to starting work when disposing of waste water and or filling the solution tank and cleared of any for eign bodies which have been vacu umed up Check that the sealing strips are in...

Страница 26: ...C and add the cleaning agent in accordance with the manufac turer s instructions Lower the cap again to close it Only use cleaning agents non foaming suitable for the vehi cle s vendor We recommend us...

Страница 27: ...t switch at the top of the recovery tank switches the suction turbine off automatically as soon as the maximum tank fill level is reached In this case the control lamp Fig 17 2 on the left operating p...

Страница 28: ...gear particularly in multi shift op eration The battery trough is provided with the necessary fitting holes Fig 13 1 The battery is provided with a battery water top up system with fill level indicat...

Страница 29: ...tery plug Fig 13 5 When the battery plug is plugged into the vehicle socket Fig 13 6 the vehicle is ready to oper ate To charge the trough battery insert the battery plug in the charger The ve hicle i...

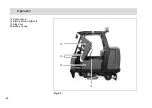
Страница 30: ...ts 2 Cab safety roof 3 Flashing beacon 4 Vacuuming tool 5 Side collision protection here short version because the side scrubbing unit option is installed 5a left hand side 5b right hand side 6 Side s...

Страница 31: ...icult to access with spraying and vacuuming tools A holder can be installed on the left hand side of the vehicle to fix the vacuuming tool Two holes are al ready drilled in the left hand side of the v...

Страница 32: ...long version is used when the scrubber drier is operated without the side scrubbing unit option in stalled long steel bar on left and right hand sides The short version is used when the side scrubbin...

Страница 33: ...em Fig 15 1 7678 70 The chemical dosing system adds a chemical cleaning agent to the fresh water The chemical cleaning agent is in a canister Fig 15 2 and is not part of the scope of delivery of the c...

Страница 34: ...in the driver s cab 1 Left hand operating panel 2 Steering wheel 3 Safety catch to release the parking brake 4 Accelerator to drive forwards or backwards 5 Service brake 6 Direction switch forwards r...

Страница 35: ...forwards and backwards Fig 16 4 The pedal on the right serves to con trol the driving speed as in a normal vehicle Before actuating the accelerator use the driving direction switch Fig 16 6 to set the...

Страница 36: ...ain Right hand operating panel Fig 16 7 This operating panel contains the key switch to switch the vehicle on and off the horn and three switches for the optionally available working lights spraying v...

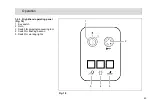
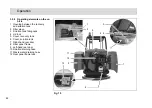
Страница 37: ...ed 5 Operating hour counter and service indicator 6 Battery and charge control indicator 7 Button for side scrubbing unit option 8 Button for brush pressure 9 Button for brush drive 10 Button for sque...

Страница 38: ...on turbine off and the squeegee is raised Indicator for parking brake applied Fig 17 3 The control lamp lights up red when the parking brake has been actuated via the pedal to the left of the steering...

Страница 39: ...s up red Section 3 5 1 provides an over view of the error codes which help you clear functional faults yourself Clear the fault before starting to use the vehi cle again If you cannot clear the fault...

Страница 40: ...ircular brushes are also switched on Button for brush pressure Fig 17 8 This button is used to increase the brush pres sure This may be necessary when the area to be cleaned is extremely dirty The pre...

Страница 41: ...con sumption used during cleaning can be regulated in seven stages Accordingly there are seven green control lamps on the keypad Each lamp relates to one stage The maximum quantity which can be used...

Страница 42: ...ogrammed last station memory even if the vehicle is switched off temporarily Green Hako button for simultaneous activation of scrubbing unit and vacuum ing function Fig 17 15 After pressing the green...

Страница 43: ...43 Operation 3 2 3 Right hand operating panel Fig 18 1 Key switch 2 Horn 3 Switch for spraying vacuuming tool 4 Switch for flashing beacon 5 Switch for working lights Fig 18 1 3 4 2 5...

Страница 44: ...e technician so that the fault can be cleared quickly For an overview of the error codes refer to Section 3 5 1 Example When a functional fault actually occurs an acoustic signal is also issued and th...

Страница 45: ...is not installed the switch has no function Switch for flashing beacon Fig 18 4 The flashing beacon is an optional accessory If no flashing beacon is in stalled the switch has no function Switch for w...

Страница 46: ...olution tank 2 Filter sieve 3 Solution tank filling neck 4 Lid lock 5 Cover recovery tank 6 Cover solution tank 7 Right hand rear door 8 Rear panel frame 9 Left hand rear door 10 Solution draining hos...

Страница 47: ...in place The lid lock functions in the same way on the solution tank and recovery tank Rear doors Fig 19 7 9 Open the rear doors to access the draining hoses for waste water and so lution Waste water...

Страница 48: ...48 Operation 13 Seat console 14 Electrical compartments 15 Side door 16 Battery trough Fig 20 12 13 14 15...

Страница 49: ...quare wrench The electrical compartments are not provided in the sense of glove compartments Side door Fig 20 14 The side doors are located to the left and right of the trough battery The doors must b...

Страница 50: ...ug to the vehicle switch the key switch to off lock posi tion 0 beforehand The vehicle is equipped with a safety shutdown via a seat contact dead man s switch This means that it is essential for opera...

Страница 51: ...er vice brake pedal to stop the vehicle and bring it to a stop Turn the key in the key switch coun terclockwise to lock position 0 and remove the key Press the left foot on the parking brake pedal to...

Страница 52: ...vehicle for leaks and that the sealing strips are in a good condition If the sealing strips are damaged change them refer to Section 5 8 4 Wet scrubbing basic cleaning If you do not want to vacuum the...

Страница 53: ...good condition If the sealing strips are damaged change them refer to Section 5 8 4 Vacuuming with the hand held suc tion hose The hand held suction hose is an op tional accessory Vacuuming with the...

Страница 54: ...ion on dos age is provided on the cleaning agent container Use the manufacturer s information as an initial basis Practical experi ence will ensure that you quickly find out which is the right Hako cl...

Страница 55: ...k refer to Sections 5 6 1 and 5 6 2 Observe the applicable laws and local regulations when dis posing of cleaning agents 4 Check the solution filter refer to Section 5 5 4 5 Check the sealing strips a...

Страница 56: ...itch has been tripped The motor has overheated foreign bodies have possibly jammed between the brush and shaft e g tape and such Check the brushes for foreign bodies and remove them as necessary Allow...

Страница 57: ...because the anti blocking system has been tripped Foreign bodies e g tape or such are blocking the side scrubbing brush Check the side scrubbing brush for foreign bodies and remove them as necessary 2...

Страница 58: ...3 5 2 Other function faults The vehicle does not work Check the fuses refer to Section 5 10 3 In the event of faults in the trac tion drive stop the vehicle im mediately apply the parking brake and re...

Страница 59: ...126 Working width Brush head cm 102 Squeegee cm 126 with side scrubbing unit option cm 118 Area coverage Theoretical at 7 5 kph m h 7650 Weights Dead weight without driving batteries without options...

Страница 60: ...wards reverse kph 8 0 4 0 Working speed maximum forwards kph 7 5 Climbing capacity drive mode max 1 min 15 Climbing capacity work mode max 5 min 6 Turning circle diameter outer m 3 35 Turning in aisle...

Страница 61: ...eight front rear N mm 1 28 0 95 Tightening torque of wheel nuts on rear wheels Nm 140 Brakes Service brake Hydraulic Drum brakes at rear with automatic adjustment diameter width mm 180 40 Brake fluid...

Страница 62: ...l increased kg 65 47 Specific contact pressure normal increased N cm 0 15 0 2 Suction turbines Power consumption speed W rpm 635 13867 Air flow rate m3 h 240 Vacuum mbar mm WS 203 2030 Electrical inst...

Страница 63: ...normal working conditions is dB A 76 5 Inaccuracy factor KpA dB A 2 Vibration The weighted effective value of the vibration established in accordance with ISO 5349 1 to which the upper limbs hand arm...

Страница 64: ...put V A 36 60 Charging time H 12 Cab safety roof including rear view mirror Order number 7582 Side collision protection Long version without side scrubbing unit option Order number 7680 10 Short versi...

Страница 65: ...ic cleaning and very heavy accumulation of dirt Order number 7590 Brushes continued SIC PA 6 12 grain 120 green 2 pieces for basic cleaning and extreme accumulation of dirt Order number 7591 SIC PA 6...

Страница 66: ...g tool Order number 7009 Vacuuming and spraying hose length 5 m Order number 7766 Tool holder and attachment part Order number 7311 10 Additional tools for using the suction hose hand held vacuum clea...

Страница 67: ...e vehicle has a long ser vice life The Hako system maintenance de scribes the specific technical work nec essary for the individual modules and defines the intervals for the mainte nance tasks Individ...

Страница 68: ...ating hours Hako System Maintenance I 1250 operating hours Workshop Stamp completed on at _________________ operating hours Hako System Maintenance II 1500 operating hours Workshop Stamp completed on...

Страница 69: ...g operation Fill the solution tank dose the cleaning agent fill fresh water o Before or after operation o Check the properties of the deflectors to the right and left and repair them or replace the de...

Страница 70: ...er the end of operation o Empty the recovery tank o Clean the recovery tank o Clean the air intake filter waste water filter o Clean the fresh water filter o Check the battery charge recharge as neces...

Страница 71: ...them as necessary o Check the side scrubbing brush and water deflectors and complete any repairs or order spare parts and replace them as necessary o Check the squeegee particularly the rear sealing...

Страница 72: ...ulic motor o Grease the rotary joint o Check the service brake for leaks check the main brake cylinder and actuating rods clear any defects o Check the brake fluid in the service brake refill and blee...

Страница 73: ...de scrubbing unit check correct function of water retaining ring fan belt side scrubbing brush functions and correct adjustment replace if necessary o Check the recovery tank particularly the lid seal...

Страница 74: ...unctions parking brake recovery tank float switch o Check the vehicle s condition visually color corrosion and presence of all signs and labels o Check the vehicle is clean clean it if necessary o Tes...

Страница 75: ...otor forwards reverse clear defects as necessary o Check the carbon brushes of the hydraulic motor replace if necessary o Check the brush motor output left and right clear defects as necessary o Check...

Страница 76: ...ar Activity Interval Every 1000 operating hours Complete all activities in Hako system maintenance I and II refer to Section 5 3 2 and section 5 3 3 o In addition o Check the brake linings on the rear...

Страница 77: ...and charge control indicator including TSG indicator in left operating panel 2 Battery connection cable 3 Battery plug in vehicle socket 4 Battery plug disconnected 5 Seat console open 6 Fill level i...

Страница 78: ...ability for damage to the battery caused by a fault when the battery is charged for the first time There must be sufficient venti lation in the charging area risk of explosion The seat console Fig 23...

Страница 79: ...vice Spilled battery acid must never enter the sewage system in its initial form it must be neutral ized beforehand e g diluted with plenty of water or ab sorbed with granulate Checking the acid densi...

Страница 80: ...afety roof lift the trough battery out on the left hand side of the bat tery The cab safety roof has a recess Fig 24 4 for the lifting gear rope 5 Guide the lifting gear from the left to the battery a...

Страница 81: ...ab safety roof is provided with a recess Fig 24 4 for the lifting gear rope When installing the trough bat tery use appropriate lifting gear The battery may only be in stalled using lifting gear by pr...

Страница 82: ...discharge signal transducer TSG is in tegrated in the electronic system and setup at the factory for battery type PzS armor plate insulation digit in the ser vice indicator No 5 If other batteries are...

Страница 83: ...tenance and Service 5 5 Solution tank 1 Lid seal 2 Cap 3 Opening to recovery tank airing and venting 4 Solution tank 5 Solution filter 6 Ball cock 7 Screw cap 8 Solution draining hose Fig 25 4 1 2 5 6...

Страница 84: ...oting the cap open fully if necessary 5 When the solution tank has been completely emptied screw the cap shut again and attach the draining hose again 6 Close the left and right rear doors When dispos...

Страница 85: ...85 Maintenance and Service 5 6 Recovery tank 1 Cap 2 Cap seal 3 Recovery tank 4 Air intake filter 5 Screw cap 6 Waste water draining hose 7 Cleaning flap Fig 26 6 4 7 3 1 2 5...

Страница 86: ...can be regulat ed by turning the cap and pivoting the cap open fully if necessary 5 When the recovery tank has been completely emptied screw the cap shut again and attach the draining hose again If t...

Страница 87: ...tronic components operating panels or seals It is not permitted to clean the vehicle with a high pressure washer or with a steam blaster because the temperature is in excess of 212 F Wear appropriate...

Страница 88: ...eaned as nec essary Fig 29 1 Pull the filter sieve from the suction pipe and clean with water Remove the filter sieve com pletely to clean it During cleaning and operation pay attention that no water...

Страница 89: ...shes according to your needs and install them on the brush head Fig 30 2 according to the instructions refer to Section 2 3 1 5 7 1 Changing the brushes Check the brushes on the brush head weekly for...

Страница 90: ...3 in the vehicle s driving direction for wards until the clamping rail hooks Fig 31 4 are freed and the clamp ing rail Fig 31 3 can be removed away from the vehicle 3 Remove the old rubber deflector s...

Страница 91: ...Insert the key in the key switch and turn the key switch on 2 Lower the squeegee Press the but ton for the squeegee and suction tur bine so that the green control lamp lights up Fig 32 3 Switch off t...

Страница 92: ...After changing the sealing strips check that the squeegee stands vertically on the floor Otherwise readjust the support rollers When the vehicle is in operation the sealing strips must be bent a littl...

Страница 93: ...r first check after 100 operating hours and subsequently every 200 hours The tightening torque for the wheel nuts Fig 34 1 is 140 Nm Changing the rear wheels To change the rear wheels the scrubber dri...

Страница 94: ...fuse the water pump and relief valve for the water supply 10A plug in fuse the hydraulic motor 160A current limiter in the drive control and the working lights and flashing bea con the key switch and...

Страница 95: ...e key The vehicle may only be cleaned us ing a water hose operating pressure approx 5 to 6 bar and only from top to bottom It is not permitted to clean the vehicle with a pressure washer or steam blas...

Страница 96: ...d weight of the scrubber drier without battery without options and without driver 710 kg Total weight of the scrubber drier with battery and filled solution tank with cab safety roof and side scrubbin...

Страница 97: ...secured against rolling away Lash the vehicle down securely The vehicle is provided with attachment points on the left and right hand side to do this Lashing eyes at the rear of the frame and on the...

Страница 98: ...98 Maintenance and Service...

Страница 99: ...and is in accordance with 2004 108 EU Reference was made to the following standards and or norms and or techni cal specifications to ensure proper im plementation of the safety and health requirements...

Страница 100: ...Advanced Technology for a Cleaner Better Environment Hako GmbH Hamburger Stra e 209 239 D 23843 Bad Oldesloe 49 4531 806 0 Fax 49 4531 806 338 88 10 3032 3100 08...

Отзывы: