background image

Index 

Technical changes reserved 

29 

A


About the fire protection enclosure • 10 
About these instructions • 8 
Assembly/Installation • 11 

C


Cable cooling tower • 18 
Cable entry • 17 

D


Disposal information • 28 

F


Fan unit 

Connection • 20 
Dismantling • 23 
technical data • 22 
Wiring diagram • 21 

Fixing system • 25 
For your safety • 3 
Functional test, safety check, maintenance • 28 

I


Instruction sheet 

Change of the stop ledge • 15 
plinth Floor-standing enclosure • 14 

V


Ventilation diagram • 19 

Index 

Содержание FB LE Series

Страница 1: ...Brandschutzgeh use Stand Wandmontage FBxxLE FBxxSE Montage und Bedienungsanleitung...

Страница 2: ...lblende Standgeh use 14 6 Montageanleitung nderung der Anschlagseite 15 7 Kabeleinf hrung 17 8 Kabelabk hlkanal 18 9 Bel ftungs Schema 19 10 L fter Einheit anschlie en 20 10 1 L fter Einheit Anschluss...

Страница 3: ...ie Batterie im Rauchmelder anzuschlie en und die Funktion des Rauchmelders zu pr fen Allgemeine sicherheitstechnische Hinweise Die Betriebs Montageanleitung ist stets am Einsatzort der Brandschutzgeh...

Страница 4: ...enen Verlustleistungen sind idealisierte Werte sie gehen von durchschnittlichen Umgebungswerten wie Temperatur Luftfeuchtigkeit Befestigungsuntergrund gleichf rmige Anordnung der Schaltelemente usw au...

Страница 5: ...so ist die Besch digung zwingend dem Spediteur auf dem Lieferschein schriftlich anzuzeigen eine reine Quittung gegen ber der anliefernden Spedition schlie t die Anerkennung eines Transportschadens au...

Страница 6: ...h use auf die Seite oder R cken gelegt werden muss Au enkanten sind entsprechend zu sch tzen Das Gewicht ist zu beachten hier die Unfallverh tungsvorschriften befolgen Geh use muss entsprechend gesich...

Страница 7: ...T ren der Brandschutzgeh use sind im laufenden Betrieb geschlossen zu halten Geh use gegen Kippen sichern Aufstellbedingungen von Brandschutzgeh usen Untergrund muss eben sein Nur zur Innenaufstellung...

Страница 8: ...en da sonst die Zulassung Gew hrleistung erlischt Die Gew hrleistung f r Montageleistungen ist vom Verbauer Aufsteller zu bernehmen Gew hrleistungs und Haftungsanspr che bei Personen und Sachsch den s...

Страница 9: ...ausgef hrt werden Das Produkt ist zur Innenraum Montage beziehungsweise zur Innenraum Nutzung bestimmt Die Transportarbeiten sind generell mit mindestens 2 Personen durchzuf hren Darstellung Bedeutung...

Страница 10: ...Au enliegende Befestigungslaschen T r in Korpus einschlagend ffnungswinkel 180 Bel ftung in der Geh user ckwand C Schienen f r die direkte Montage von Montageplatten oder Ger tetr gern Lieferumfang Un...

Страница 11: ...usziehen Schwenkhebel um 180 gegen den Uhrzeigersinn nach oben drehen T r ffnen Schlie en T r schlie en und dabei beachten dass sich der Schwenkhebel in ge ffnetem Zustand befindet T r leicht andr cke...

Страница 12: ...oder europ isch technische bewertete D bel mit Stahlschrauben die f r den Verwendungszweck geeignet sind entsprechend den statischen Erfordernissen zu verwenden Die besonderen Bestimmungen der jeweili...

Страница 13: ...e und ohne Unebenheiten sein Die Brandschutzgeh use waagrecht an der Wand ausrichten Durch die Befestigungslaschen oben die Vorbohrungen anrei en L cher f r die D bel erstellen D bel einsetzen Geh use...

Страница 14: ...itt Aktion 1 Transport und Positionierung 2 Sockelblende festhalten und durch L sen der Senkkopfschrauben A von R ckwand entfernen 3 Sockelblende mit den Senkkopfschrauben A aus Punkt 2 und dem Beipac...

Страница 15: ...blageort finden und mit Unterlagekl tzen vorbereiten z B 2 T rfl gel Demontage T rfl gel festhalten Stifte aus B nder herausziehen T rfl gel herausheben und auf Ablage positionieren 2 1 2 2 3 Scharnie...

Страница 16: ...vorbehalten Schritt Aktion 4 Scharniere mit den Schrauben auf der Gegenseite von T r und Korpus in Bohrung befestigen 4 1 4 2 5 T r auf der Gegenseite des T rrahmens einsetzen 5 1 5 2 ACHTUNG Beim Ein...

Страница 17: ...urchmesser entsprechend vorbohren Innend mmung Montageplatten und L fter beachten Vorhandene Kabel durch das Kabelschott des Geh uses einf hren Hier die notwendigen Bohrungen f r die Kabeldurchf hrung...

Страница 18: ...an der Wand wird je Winkel 1 D bel verwendet Zur Auswahl der D bel beachten Sie bitte die Angaben im Kapitel Montage dieser Anleitung Zur Befestigung am Geh use Kabelabk hlkanal werden je Winkel 2 Sc...

Страница 19: ...Bel ftungs Schema Technische nderungen vorbehalten 19 Schematische Darstellung der Bel ftung 9 Bel ftungs Schema...

Страница 20: ...Einheit EBEL VENT L230 ist mit 230V AC anzuschlie en Ger t allpolig von der Versorgungsspannung trennen bevor Sie es de montieren oder den Aufbau ver ndern VDE 0100 f r 230 V AC Netzanschluss beachten...

Страница 21: ...L fter Einheit anschlie en Technische nderungen vorbehalten 21 10 1 L fter Einheit Anschlussplan...

Страница 22: ...erbrauch 0 15A Leistung 22W L fter Drehzahl 2850 Min 1 Luftstrom 164m h Statischer Druck 8 64mmH2O L rmpegel 45 dB A Betriebstemperatur 10 70 C Thermosicherung Schutzstufe 77 C Rauchmelder Lichtalarm...

Страница 23: ...f r 230 V Netzanschluss beachten bevor mit der Demontage begonnen werden kann Spannungsfreiheit feststellen Warnung 230 V AC Gef hrliche Spannung Kann Tod schwere K rperverletzung oder erheblichen Sac...

Страница 24: ...en vorbehalten Schritt Aktion 3 L fter Einheit demontieren Die L fter Einheit mit einer Hand festhalten und die 2 Befestigungsschrauben 4 5 x 55 mm am L fter l sen 4 L fter Einheit EBEL VENT L230 und...

Страница 25: ...on univers N Innenausbausystem sind univers UN A Tragschienen zu bestellen Die Tragschienen sind auf den Befestigungswinkeln im Brandschutzgeh use zu montieren Zur Aufputz Wandmontage FBxxLE FBxxSE St...

Страница 26: ...Befestigungssystem 26 Technische nderungen vorbehalten Einbauma e f r 1 feldigen Schrank...

Страница 27: ...Befestigungssystem Technische nderungen vorbehalten 27 Einbauma e f r 2 feldigen Schrank...

Страница 28: ...k nnen ohne weiteres g ngige milde Haushaltsreiniger verwendet werden Der Schlie mechanismus der T ren ist 2 x j hrlich zu len Die Brandschutzgeh use sind gegen Wasser eindringende Feuchte oder Spritz...

Страница 29: ...fung Pflege und Wartung 28 K Kabelabk hlkanal 18 Kabeleinf hrung 17 L L fter Einheit Anschlussplan 21 Demontage 23 technische Daten 22 L fter Einheit anschlie en 20 M Montage 11 Montageanleitung nderu...

Страница 30: ...Fire Protection Enclosure FBxxLE FBxxSE Installation and Operation Instructions...

Страница 31: ...struction sheet plinth Floor standing enclosure 14 6 Instruction sheet Change of the stop ledge 15 7 Cable entry 17 8 Cable cooling tower 18 9 Ventilation diagram 19 10 Fan unit Connection 20 10 1 Fan...

Страница 32: ...etector has to be inserted and the function has to be guaranteed General safety instructions The operating installation instructions must always be kept at the installation site of the fire protection...

Страница 33: ...environmental values such as temperature humidity mounting surface uniform arrangement of the switching elements etc Please also note that what are referred to as hot spots can form depending on the...

Страница 34: ...ivery note in writing a clean receipt granted to the shipper excludes any claim of transport damage The same applies for missing packages which are listed in the delivery note It is mandatory that the...

Страница 35: ...he doors should be dismantled if the enclosure has to be placed on its side or back The outside edges must be protected accordingly Note the weight follow the accident prevention regulations The enclo...

Страница 36: ...sons must be prohibited The doors of the fire protection housing must be kept closed during operation Secure the housing against tipping Installation conditions of fire protection housings The substra...

Страница 37: ...ger since the approval warranty will otherwise be invalidated The warranty for installation services must be assumed by the installer Warranty and liability claims for personal injury and material dam...

Страница 38: ...ectrically skilled person The product is intended for indoor installation or indoor use The transportation work must generally be carried out with at least 2 persons Visual representation Meaning 1 2...

Страница 39: ...tion seal for individual entry External mounting brackets Door flush mounted in carcass opening angle 180 Ventilation in the rear panel of the enclosure C profile rails for direct installation of moun...

Страница 40: ...y a quarter turn and pull out twist lever Turn twist lever upwards through 180 anticlockwise Open the door Closing Close the door and ensure that the twist lever is open Press the door gently and turn...

Страница 41: ...technical rated dowels with steel screws which are suitable for the purpose of use according to the static requirements The special provisions of the respective general building supervisory or Europea...

Страница 42: ...the fire enclosure horizontally on the wall Mark on the predrilling marks through the hanging brackets at the top Make the holes for the enclosure fixing Knock in the frame plugs Attach the housing I...

Страница 43: ...anges reserved Step Action 1 Transport and positioning 2 Hold on the plinth and loosen the countersunk to remove it from the back 3 Use the plinth taken from the back and screw it on the doubling at t...

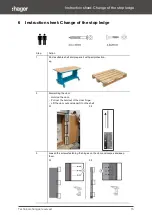
Страница 44: ...lf and prepare it with pad protection e g 2 Dismantling the door Hold on the door Pull out the bold out of the door hinge Lift the door out and depart it on the shelf 2 1 2 2 3 Loosen the screws faste...

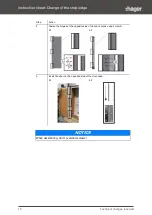
Страница 45: ...edge 16 Technical changes reserved Step Action 4 Fasten the hinges at the opposite side of door an corpus using screw A 4 1 4 2 5 Insert the door on the opposite side of the door case 5 1 5 2 NOTICE W...

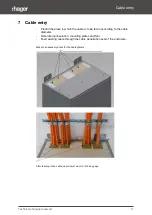
Страница 46: ...be fed in according to the cable diameter Note internal insulation mounting plates and fan Feed existing cable through the cable penetration seal of the enclosure Make the necessary holes for the cabl...

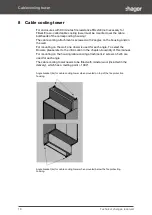
Страница 47: ...l one dowel is used for each angle To select the Dowels please refer to the information in the chapter Assembly of this manual For mounting on the housing cable cooling attachment 2 screws 4 5x35 are...

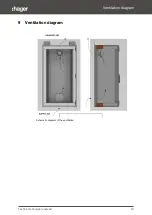
Страница 48: ...Ventilation diagram Technical changes reserved 19 Schematic diagram of the ventilation 9 Ventilation diagram...

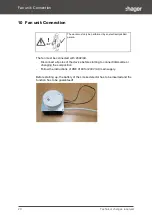
Страница 49: ...must be connected with 230V AC Disconnect all poles of the device before starting to connect dismantle or changing the composition Follow the instructions of VDE 0100 for 230 V AC main supply Before s...

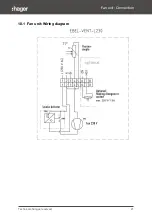
Страница 50: ...Fan unit Connection Technical changes reserved 21 10 1 Fan unit Wiring diagram...

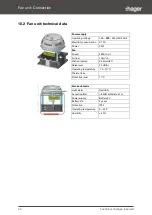
Страница 51: ...nsumption 0 15A Power 22W Fan Speed 2850 min 1 Air flow 164m h Static pressure 8 64mmH2O Noise level 45 dB A Operating temperature 10 70 C Thermal fuse Protection level 77 C Smoke detector Light alarm...

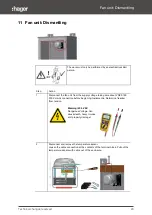
Страница 52: ...re about VDE 0100 230 V mains connection before beginning to dismantle Determine freedom from tension Warning 230 V AC Dangerous Voltage Can cause death heavy injuries and property damage 2 Disconnect...

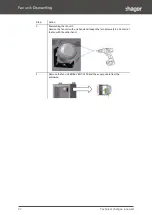
Страница 53: ...hanges reserved Step Action 3 Dismantling the fan unit Hold on the fan unit with one hand and loosen the two screws 4 5 x 55 mm at the fan with the other hand 4 Remove the fan unit EBEL VENT L230 and...

Страница 54: ...the size of enclosure for the fixation of univers N extension system kits The uprights have to be mounted on the fixation brackets inside the fire protection enclosure enclosure for on wall installat...

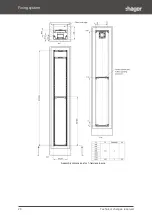
Страница 55: ...Fixing system 26 Technical changes reserved Assembly dimensions for 1 field enclosure...

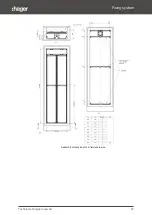
Страница 56: ...Fixing system Technical changes reserved 27 Assembly dimensions for 2 field enclosure...

Страница 57: ...the outside of the fire enclosure The locking mechanism of the doors must be oiled 2 x per year The fire enclosures must be protected against water penetrating moisture and spray water If safety relev...

Страница 58: ...able cooling tower 18 Cable entry 17 D Disposal information 28 F Fan unit Connection 20 Dismantling 23 technical data 22 Wiring diagram 21 Fixing system 25 For your safety 3 Functional test safety che...

Страница 59: ...94 00 Verkaufsniederlassungen Hager AG Glattalstrasse 521 8153 R mlang Tel 044 817 71 71 Fax 044 817 71 75 Hager AG Ey 25 3063 Ittigen Bern Tel 031 925 30 00 Fax 031 925 30 05 Hager AG Chemin du Peti...

Отзывы: