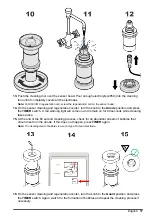
17.
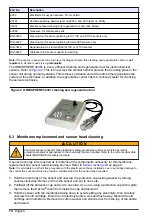
On the sensor cleaning and regeneration center, turn the knob to the
Cathode
position and press
the
TIMER
switch. Again, watch for the formation of bubbles and repeat the cleaning process if
necessary.
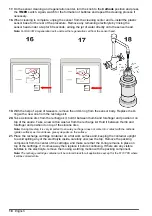
18.
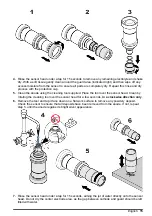
When cleaning is complete, unplug the sensor from the cleaning center and re-install the plastic
sensor base for the rest of the procedure. Remove any remaining electrolyte by rinsing the
sensor head under a tap for 60 seconds, aiming the jet of water directly onto the sensor head.
Note: For DG33619 regeneration cell, unscrew the regeneration cell from the sensor head.
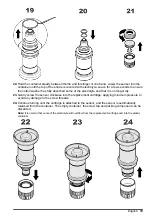
19.
With the help of a pair of tweezers, remove the old O-ring from the sensor body. Replace the O-
ring with a new one from the recharge kit.
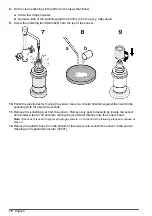
20.
Take a silicone disc from the recharge kit, hold it between thumb and forefinger and position it on
top of the anode. Take a new cotton washer from the recharge kit. Hold it between thumb and
forefinger and position it on top of the silicone disc.
Note: During this step, it is very important to ensure your finger does not come into contact with the cathode
(golden surface) as it could leave greasy deposits on the surface.
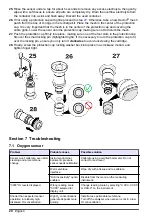
21.
Place the recharge cartridge container on a flat work surface and, keeping the container upright
to avoid spilling any of the electrolyte inside, carefully unscrew the top. Remove the packing
component from the center of the cartridge, and make sure that the O-ring remains in place on
top of the cartridge. If it comes away then replace it before continuing. If there are any visible
bubbles in the electrolyte, remove them using a stirring motion with the packing component.
Note: The recharge cartridge container will be colored black for all applications except for the 6110 TPA where
it will be colored white.
18
English

