


• Sensor measured values
• Measured sensor trends (for the last 10 minute to last hour)
• Measured sensor data alarm limits and other events
• Temperature
5.2 Touch screen
The user interface on the front panel is a touch screen providing easy selection through menus. All
the measurement, configuration, calibration and standard service routines can be called by pressing
buttons and menu bars on screen.
The display can be configured to only show a sensor measurement, or to show a parameterized
graphic representation of the last measurements.
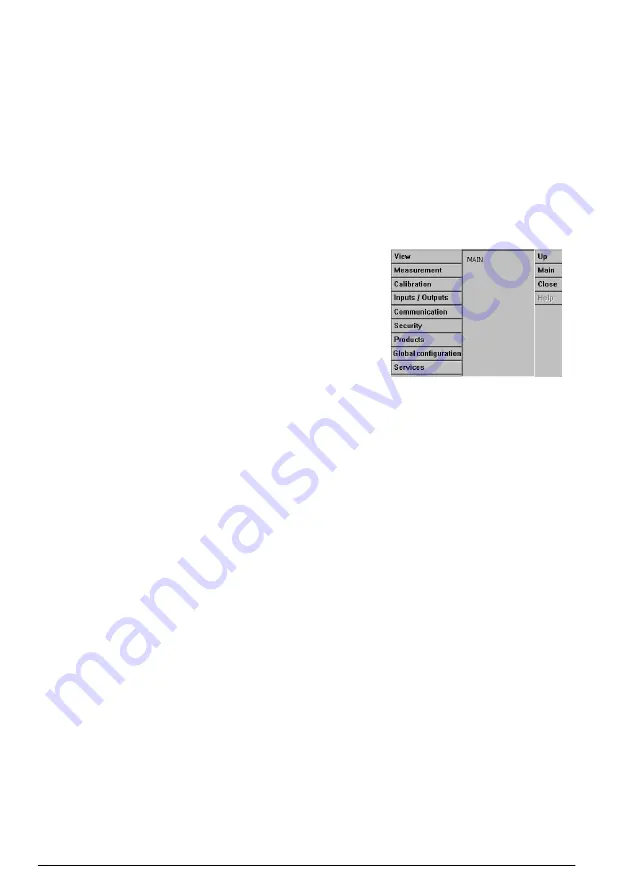
5.3 Menu navigation
Pressing the “menu” button in the header bar calls the main menu. The
display is made of three columns:
• The left shows the menu options
• The center shows a tree view of the position inside the menu
structure
• The right has the following generic controls:
• Up - Return to previous menu (one step back)
• Main - Jump directly to main menu
• Close - Close the menu and go back to the measurement display.
• Help - Help topics concerning current menu
5.4 Virtual keyboard
When a value or text is to be edited a virtual keyboard will appear on screen and can be used like a
standard keyboard. Press
CAP
to access special keys. When input is complete press the
Enter
key
to confirm and exit the virtual keyboard. During editing, the edited field name is displayed along with
units where applicable.
Section 6 Start up
When the instrument is started for the first time, security is enabled. The user must enter a factory
configured login credentials (user ID and password) to get access to the instrument. Make sure to
change the default login credentials at startup. Refer to
on page 15 for additional
information.
Do the steps that follow to change the default login credentials and add users and user access rights.
1.
Push OK when the message to change the default login credentials shows on the display. Push
OK.
2.
Push the padlock icon on the header bar of the top of the display for more than 2 seconds to
unlock the touch screen.
The login window shows on the display.
3.
Enter the default user login credentials: "
1007
" for the ID and "
1234
" for the password. Push OK.
4.
Push OK when the message to change the default login credentials shows on the display.
The users table, which is used to manage the registered users, shows on the display.
5.
Push on the row of the default user. The user modification window shows.
6.
Change the Name, ID, Password and security level values. Push OK to save the values.
7.
Complete the table with the necessary users or push OK to leave.
14
English
Содержание K1100
Страница 308: ...K1100 M1100 28 mm 143 50 x 49 mm 0 74 kg 5 65 x 1 93 1 63 T 0 7 kg 2 3 3 1 3 2 308...
Страница 309: ...3 3 ESD T 3 4 2000 m 6562 ft 2000 m 4 309...
Страница 310: ...PE 100 240 VAC 5 VDC PE PE 4 1 1 U 2 3 2 4 4 2 1 U 2 3 4 2 5 310...
Страница 311: ...4 3 1 3 4 5 6 7 1 2 3 6 4 4 5 4 1 4 6 7 311...
Страница 312: ...4 4 1 1 6 2 Ethernet 7 3 USB A 8 2 4 USB B 4 9 5 1 4 5 NEMA IP NEMA 4X IP66 4 5 1 1 Ethernet 2 25 mm 8 mm 3 4 312...
Страница 316: ...4 7 2 6 7 J7 J7 16 J7 7 1 2 1 3 2 4 3 5 6 1 7 2 8 3 9 J7 9 J7 12 10 11 12 13 16 4 7 3 NO NC NC NO J14 1 J18 2 J19 3 316...
Страница 317: ...4 8 4 8 1 3 5 10 15 20 15 2 Hach 4 8 2 1100 1100 150 mL min No 3 8 8 1 3 2 4 5 5 1 LED 317...
Страница 318: ...10 1 5 2 5 3 menu Up Main Close Help 5 4 Enter 6 ID 319 1 OK OK 2 2 3 1007 ID 1234 OK 318...
Страница 319: ...4 OK 5 6 ID OK 7 OK Hach 7 7 1 318 7 1 1 4 1 Configuration Security ID Clear 7 1 2 ID ID ID 0 1 2 319...
Страница 330: ...7 5 1 Enable 7 5 2 Enable Service done 7 5 3 7 5 4 7 6 RS485 PROFIBUS DP USB HTTP TCP IP 8 8 1 Hach 8 2 6 CIP ClO2 330...
Страница 331: ...8 2 1 Ksv Ksv 328 1 2 3 8 2 2 1 2 3 8 2 3 331...
Страница 332: ...1 2 3 4 332...
Страница 386: ...3 3 3 4 2000 2000 4 386...
Страница 387: ...PE 100 240 5 4 1 1 U 2 3 4 4 2 1 U 2 3 4 5 4 3 387...
Страница 388: ...1 3 4 5 6 7 1 2 3 6 4 4 5 4 1 4 6 7 388...
Страница 389: ...4 4 1 1 6 2 Ethernet 7 3 USB A 8 2 4 4 USB B 9 5 1 4 5 NEMA IP NEMA 4X IP66 4 5 1 1 Ethernet 2 25 8 3 4 389...
Страница 390: ...1 4 7 2 5 8 3 6 5 6 4 6 4 6 1 10 30 8 BINDER 2 BINDER 1 10 30 2 3 4 5 6 10 30 7 10 30 8 3 4 6 2 390...
Страница 393: ...4 7 2 6 7 J7 J7 16 J7 7 1 2 1 3 2 4 3 5 6 1 7 2 8 3 9 J7 9 J7 12 10 11 12 13 16 4 7 3 J14 1 J18 2 J19 3 393...
Страница 394: ...4 8 4 8 1 3 5 10 15 20 15 CO2 Hach 4 8 2 150 K1100 M1100 3 8 8 1 3 2 4 5 5 1 394...
Страница 395: ...10 5 2 5 3 Menu Up Main Close Help 5 4 CAP Enter 6 Security 396 1 OK OK 2 2 395...
Страница 409: ...8 2 6 CIP ClO2 8 2 1 Ksv Ksv 406 1 2 3 8 2 2 1 2 3 8 2 3 409...
Страница 410: ...1 2 3 4 410...
Страница 490: ...3 3 3 4 2000 m 6562 ft 2000 m 4 DC AC 490...
Страница 491: ...100 240 V AC 5 V DC PE 4 1 1 U 2 3 2 4 4 2 1 U 2 3 4 2 5 491...
Страница 492: ...4 3 1 3 4 5 6 7 1 2 3 4 4 2 5 4 1 4 6 7 492...
Страница 493: ...4 4 1 1 6 2 Ethernet 7 3 USB A 8 2 4 USB B 4 9 5 1 4 5 4X IP66 4 5 1 EMC 1 ethernet 2 25 mm 8 mm 3 4 493...
Страница 494: ...1 4 7 2 5 8 3 6 5 6 4 6 4 6 1 10 30 V DC 8 2 1 10 30 V DC 2 3 4 5 6 10 30 V DC 7 10 30 V DC 8 3 4 6 2 494...
Страница 498: ...4 8 4 8 1 3 5 10 15 20 15 CO2 Hach 4 8 2 K1100 M1100 150 mL min 3 8 8 1 3 2 4 5 5 1 LED 498...
Страница 499: ...10 5 2 service 5 3 menu Up Main Close Help 5 4 CAP Enter 6 500 1 OK OK 2 2 499...
Страница 513: ...ClO2 8 2 1 Ksv Ksv 510 1 2 3 8 2 2 1 2 3 8 2 3 513...
Страница 514: ...1 2 3 4 514...
Страница 540: ......
Страница 541: ......


