


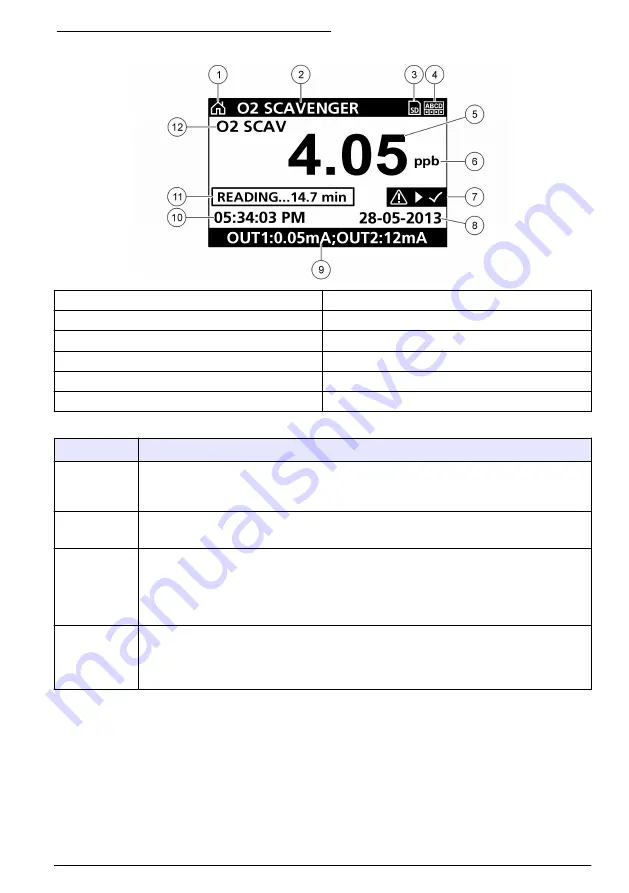
Figure 5 Example of Main Measurement screen
1
Home screen icon
7
Warning status bar
2
Sensor name
8
Date
3
SD Memory card icon
9
Analog output values
4
Relay status indicator
10
Time
5
Measurement value
11
Progress bar
6
Measurement unit
12
Measurement parameter
Table 4 Icon descriptions
Icon
Description
Home screen The icon may vary depending on the screen or menu being displayed. For
example, if an SD card is installed, an SD card icon appears here when the user is
in the SD Card Setup menu.
SD memory
card
This icon appears only if an SD card is in the reader slot. When a user is in the SD
Card Setup menu, this icon appears in the upper left corner.
Warning
A warning icon consists of an exclamation point within a triangle. Warning icons
appear on the right of the main display below the measurement value. Push the
ENTER
key then select the device to view any problems associated with that
device. The warning icon will no longer be displayed once all problems have been
corrected or acknowledged.
Error
An error icon consists of an exclamation point within a circle. When an error occurs,
the error icon and the measurement screen flash alternately in the main display. To
view errors, push the
MENU
key and select
Diagnostics
. Then select the device to
view any problems associated with that device.
7.2.1 Additional display formats
• From the Main Measurement screen push the
UP
and
DOWN
arrow keys to switch between
measurement parameters
• From the Main Measurement screen push the
RIGHT
arrow key to switch to a split display of up to
4 measurement parameters. Push the
RIGHT
arrow key to include additional measurements. Push
the
LEFT
arrow key as needed to return to the Main Measurement screen
• From the Main Measurement screen push the
LEFT
arrow key to switch to the graphical display
on page 20 to define the parameters). Push the
UP
and
DOWN
arrow
keys to switch measurement graphs
English
19
Содержание 9586sc
Страница 151: ...4 5 4 2 4 3 1 1 6 2 7 3 8 4 6 mm 4 9 6 8 mm 5 151...
Страница 152: ...5 5 1 4 152...
Страница 153: ...5 2 2 153...
Страница 154: ...2 1 5 2 9 2 2 4 20 mA 2 6 10 2 3 7 2 4 Modbus Profibus HART 4 20 mA 8 2 5 2 1 5 2 2 24V 2 154...
Страница 156: ...5 2 3 100 250 VAC 50 60 Hz 5A 250 VAC 5A 24 VDC 5A 156...
Страница 158: ...158...
Страница 159: ...5 2 5 NEMA IP NEMA 4X IP66 1 2 3 3 3 3 3 2 4 2 3 1 2 1 1 1 2 3 4 500 5 6 159...
Страница 161: ...6 147 1 2 3 4 5 7 7 1 4 4 1 5 Back 2 6 Menu Settings Menu 3 HOME Main Measurement 7 4 ENTER SD 7 2 5 161...
Страница 275: ...Suomi 275...
Страница 336: ...4 1 4 1 1 4 1 2 336...
Страница 337: ...EMC 4 1 3 IECS 003 A FCC 15 15 FCC 1 2 15 FCC 1 2 3 4 5 4 2 337...
Страница 338: ...4 3 1 1 6 2 7 3 8 4 6 4 9 6 8 5 DIPA 338...
Страница 339: ...5 5 1 4 339...
Страница 340: ...5 2 2 340...
Страница 341: ...2 1 5 2 9 2 2 4 20 2 6 10 2 3 7 2 4 Modbus Profibus HART 4 20 8 2 5 2 1 5 2 2 2 341...
Страница 342: ...24 PE 100 240 24 100 240 24 18 12 AWG 80 C 176 F NEMA 4X IP66 3 18 24 24 15 20 1 2 342...
Страница 343: ...1 1 L1 2 N PE 2 1 24 2 24 PE 343...
Страница 344: ...5 2 3 100 250 50 60 5 100 250 5 24 5 5 2 4 5 5 NEMA IP NEMA 4X IP66 100 250 344...
Страница 346: ...346...
Страница 347: ...5 2 5 NEMA IP NEMA 4X IP66 1 2 3 3 3 3 3 2 4 2 3 1 2 1 1 1 2 3 4 500 5 6 347...
Страница 349: ...3 4 6 Startup 333 1 2 3 4 5 7 7 1 4 349...
Страница 350: ...4 1 5 BACK 2 SD 6 MENU 3 HOME 7 4 ENTER SD 7 2 5 350...
Страница 351: ...5 1 7 2 8 3 SD 9 4 10 5 11 6 12 4 SD SD SD SD SD SD ENTER MENU Diagnostics 7 2 1 Main Measurement Main Measurement 4 351...
Страница 382: ......
Страница 383: ......


