50
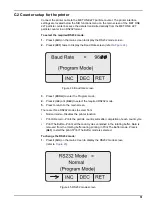
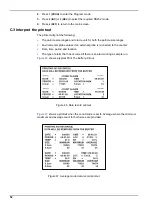
When all the SW-1 settings are complete, the printer prompts the user to select
CONTINUE
by pressing the
ONLINE
button or
WRITE
by pressing the
FEED
button. If SW-2
and SW-3 settings are correct, select
WRITE
to exit the programming routine and save
the settings. If SW-2 settings are correct, but SW-3 settings need to be changed, SW-2
settings must be programmed first in order to access SW-3 settings. If the SW-3 settings
are modified, the printer will automatically exit the DIP-SW programming mode after the
last position is set and print "DIP SW setting complete!!". Make sure that the printer is
online when the programming is complete.
Table 5 DIP switch settings
Dip switch 1
1
(OFF)
: Input = Serial
2
(ON)
: Printing Speed = High
3
(ON)
: Auto Loading = On
4
(ON)
: Auto LF = On
5
(ON)
: Setting Command = Enable
6
(ON)
: Printing
7
(ON)
: Density
8
(ON)
: = 72 %
Dip switch 2
1
(ON)
: Printing Columns = 40
2
(ON)
: User Font Back-up = ON
3
(ON)
: Character Select = Normal
4
(ON)
: Zero = Normal
5
(ON)
: International
6
(ON)
: Character
7
(ON)
: Set
8
(OFF)
: = U.S.A
Dip switch 3
1
(ON)
: Data Length = 8 bits
2
(ON)
: Parity Setting = No
3
(ON)
: Parity Condition = Odd
4
(ON)
: Busy Control = H/W Busy
5
(OFF)
: Baud
6
(ON)
: Rate
7
(ON)
: Select
8
(ON)
: = 9600
Содержание MET ONE 227
Страница 3: ......
Страница 7: ...6 Specifications ...
Страница 15: ...14 Installation ...
Страница 31: ...30 Maintenance ...
Страница 37: ...36 Troubleshooting ...
Страница 43: ...42 Certification ...
Страница 47: ...46 ...
Страница 55: ......


