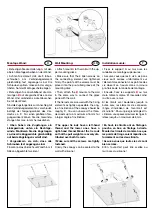
Montage Wand:
• Befestigen Sie die Halterung
A
mit den
oberen Montagescheiben an der Wand.
• Achten Sie darauf, daß die 3 Inbus-
schrauben am Verbindungselement
gleichmäßig fest angezogen sind. Die
Schrauben spitzen müssen in der vorge-
frästen Nut der Montagescheibe liegen.
• Befestigen Sie anschließend die Hal-
terungen
B
auf die gleiche Weise an der
Wand. Und verbinden so die Glasschei-
be mit der Wand.
Sind die Zugstangen bis zum Anschlag mit
den Verbindungselementen verschraubt,
beträgt der Neigungswinkel des Vor-
dachs ca. 5°. Für einen größeren Nei-
gungswinkel können Sie die Gewinde-
stangen bis max. 6 mm herausdrehen.
! Oben haben die Zugstangen ein
Linksgewinde, unten ein Rechtsge-
winde. Montieren Sie die Zugstangen
so, dass die Zuggewichte gleichmäßig
auf beide Zugstangen verteilt sind.
! Vergewissern sie sich, dass alle
Schrauben fest angezogen sind.
Final kann das Vordach zur Wand hin mit
Silikon abgedichtet werden!
GB
D
F
Wall Mounting:
• Attach mount
A
to the wall with the up-
per mounting disks.
• Make sure that the 3 Allen screws on
the connecting element are tightened
firmly. The points of the screws must be
placed into the pre-milled groove of the
mounting disk.
• Then, attach the
B
mounts to the wall
in the same way to connect the glass
pane with the wall.
If the tie rods are screwed with the fixing
elements as tightly as possible, the ang-
le of inclination of the canopy should be
roughly 5°. You can unscrew the threa-
ded rods up to a maximum of 6 mm for
a larger angle of inclination.
! The upper tie rods have a left-hand
thread and the lower ones have a
right-hand thread. Mount the tie rods
so that the pull weights are evenly dis-
tributed over both tie rods.
! Make sure all the screws are tightly
fastened.
Finally, the canopy can be sealed to the
wall with silicone!
Installation murale:
• Fixez le support
A
au mur avec les
rondelles de montage supérieures.
• Assurez-vous que les 3 vis à six pans
creux sont serrées uniformément sur
l’élément de connexion. Les pointes des
vis doivent se trouver dans la rainure
pré-fraisée de la rondelle de montage.
• Ensuite, fixez les supports
B
au mur
de la même manière. Et raccordez ainsi
la vitre avec le mur.
Si les tirants sont boulonnés jusqu’à la
butée avec les éléments de connexion,
l’angle d’inclinaison de l’avant-toit est
d’environ 5°. Pour un plus grand angle d’in-
clinaison, vous pouvez dévisser les tiges fi-
letées jusqu’à un maximum de 6 mm.
! En haut, les tirants ont un filetage à
gauche, en bas, un filetage à droite.
Monter les tirants de manière à ce que
les poids de tirage soient répartis uni-
formément sur les deux tirants.
! Assurez-vous que toutes les vis sont
bien serrées.
Enfin, l’avant-toit peut être scellée au
mur avec du silicone !


