SPACE FIDELITY
PA 6
1
ENGLISH
55403-941.1100
Страница 1: ...SPACE FIDELITY PA 6 1 ENGLISH 55403 941 1100...
Страница 2: ...ote control Connecting the loudspeaker module Installing the speaker caps Attaching the wing panels to the HiFi Connecting the antenna Connecting an external device Connecting headphones Connecting th...
Страница 3: ...asic CD mode functions Special CD mode features Playing back tracks in a selected order creating a track memory Entering or deleting CD names 40 Cassette mode General information about cassette mode P...
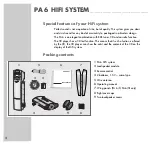
Страница 4: ...s that if such a fuction is offered by the CD the CD player can show the artist and the contents of the CD on the display of the HiFi system Packing contents 1 PA 6 HiFi system 2 Loudspeaker module 3...
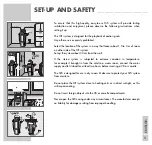
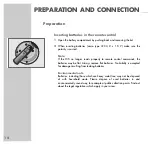
Страница 5: ...tand for at least two hours before inserting a CD or cassette The HiFi is designed for use in dry rooms Make sure to protect your HiFi system from moisture Do not place the HiFi system close to heatin...
Страница 6: ...m collecting on the laser optics This HiFi system sucessfully fuses technology and environmental friendliness into a coherent package Only ecologically compatible high quality materials have been used...
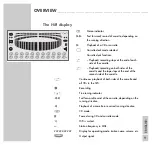
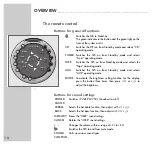
Страница 7: ...oudness on off SOUND Receiver for remote conrol signals Operating elements under the remote control SOURCE Switches the HiFi on from Stand by Selects the input source and muting in the following order...
Страница 8: ...LOSE TAPE Opens and closes the tape compartment OPEN CLOSE DISC SELECT Selects the CD in compartment 1 2 1 2 3 or 3 for playback 0 Headphone jack for connecting a stereo headphone set with a jack plug...
Страница 9: ...the cassette H Playback recording on both sides of the cassette and the tape stops at the end of the second side of the cassette J Continuous playback of both sides of the cassette and all CDs in the...
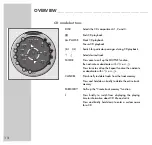
Страница 10: ...the HiFi on from Stand by mode and selects AUX operating mode MODE To activate the brightness setting function for the display press this button three times then press 1 or 2 to adjust the brightness...
Страница 11: ...AUTO TUNING 1 2 Call up the next or previous preset station i Changes the display of the HiFi Station name RDS time radio text RDS stations only and frequency CANCEL Press briefly to delete individua...
Страница 12: ...vate or deactivate with 1 or 2 Press twice to call up the Repeat function then activate or deactivate with 1 or 2 CANCEL Press briefly to delete tracks from the track memory Press and hold down briefl...
Страница 13: ...once to call up the Dolby NR function then activate or deactivate the function with 1 or 2 Press twice calls up the REVERSE function then select with 1 or 2 CD COPY Press and briefly hold down to star...
Страница 14: ...i no longer reacts properly to remote control commands the batteries may be flat Always remove flat batteries No liability is accepted for damage resulting from leaking batteries Environmental note Ba...
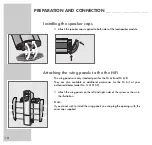
Страница 15: ...ables need to be placed behind the loudspeaker module Please note that the top side of the loudspeaker module is marked appropriately 2 Insert the loudspeaker module into the recess in the HiFi until...
Страница 16: ...are only standard parts for the PA 6 II and PA 6 III They are also available as additional accessories for the PA 6 I at your authorised dealer order No G 0I 01 52 1 Attach the wing panels on the lef...
Страница 17: ...devices Make sure the left and right stereo channels are correctly connected R right red L left white 1 Use cinch cables to connect the audio output sockets of the external device television DVD play...
Страница 18: ...a cable connection from a public or private provider select the CABLE setting If you are using your own rooftop antenna or the auxiliary antenna supplied select ANTENNA 1 Switch on the HiFi by pressi...
Страница 19: ...which can be received at your location The second method allows you to search for a station directly and then store it manually with the preset number of your choice Option 1 Page 20 Automatic Search...
Страница 20: ...ically If RDS information is transmitted by a station the HiFi will store the station name Note If all the preset station numbers are occupied the message MEM FULL briefly appears in the display Selec...
Страница 21: ...ays the name and frequency of the station If the radio station is not already stored in the memory store it now see Step 4 Note If the search did not locate the radio station you wanted press 8 or 9 t...
Страница 22: ...tation or the frequency 4 Delete station by briefly pressing CANCEL The preset station number disappears from the display or Delete all preset stations by pressing CANCEL for five seconds ERASE ALL ap...
Страница 23: ...ations repeat steps 3 to 5 Manually entering and deleting names for radio stations You can enter your own names for radio stations whose names are not automatically displayed Eight spaces are availabl...
Страница 24: ...delete the name press CANCEL after Step 4 The name is deleted and the cursor returns to the first space Adjusting the brightness of the display The brightness of the display can be either reduced or s...
Страница 25: ...ed Note If the HiFi system had been in Stand by mode before it was turned off using the POWER button it automatically returns to Stand by if you then press the POWER button again 2 Press POWER to swit...
Страница 26: ...etting the sound type This HiFi system offers various sound types Four of them are permanently stored FLAT JAZZ DISCO VOCAL and you can set three more according to your own preferences 1 To enter the...
Страница 27: ...O VOCAL USERI USER2 or USER3 Selecting the Power Sound 1 Press POWER SOUND The display reads POWER SOUND Muting the HiFi system 1 Mute the HiFi by pressing s on the remote control or Press SOURCE on t...
Страница 28: ...et station Selecting the preset station number 1 Select the station by pressing 1 or 2 Note You cannot select a preset number that has not been assigned to a radio station Stereo Mono reception Radio...
Страница 29: ...time display is updated every minute The accuracy depends on the information transmitted by the station itself You must be tuned to the RDS station for several minutes before the time information can...
Страница 30: ...in the display and you will hear the most recently selected station NONE 12 Nachrich NACHRICH News AKTUELL Politics and current affairs SERVICE Specialist speech programmes SPORT Sport BILDUNG Educat...
Страница 31: ...hoose between German and English as the language for the display of the programme types 1 Switch off the HiFi by pressing the POWER button 2 Press and hold PTY and press the POWER button on the HiFi T...
Страница 32: ...ents or scouring agents Selecting the CD player as the source 1 Select the input source by pressing CD on the remote control or press SOURCE on the top side of the HiFi until CD is shown in the displa...
Страница 33: ...low indicators in the DISC SELECT buttons on the HiFi indicate dimly lit a CD has been inserted brightly lit the compartment was selected CD playback 1 Select the desired CD compartment 1 to 3 by pres...
Страница 34: ...in the display Playback of the selected track starts automatically Repeating the current track 1 Press 1 during playback The track is played back from the beginning Searching for a passage 1 During pl...
Страница 35: ...or music programmes are played in random order 3 To terminate this function press 5 or open the CD compartment by pressing DISC OPEN CLOSE on the HiFi Repeating a CD or track memory 1 Select this fun...
Страница 36: ...itch on the system by pressing the POWER button on the HiFi 2 Place a CD in the CD compartment 3 Select the function by pressing MEMORY 4 Select the desired track using 1 or 2 and then select MEMORY t...
Страница 37: ...emory by pressing MEMORY and briefly holding it down 2 Select the title that is to be deleted with 1 or 2 and delete it with CANCEL Deleting the track memory 1 Select the track memory by pressing MEMO...
Страница 38: ...reads NO NAME briefly then a cursor _ appears 5 Select digits letters or characters with 1 or 2 6 Move on to the next space with and continue your entry With you can move the cursor back by one space...
Страница 39: ...f the CD 2 Press CANCEL until ERASE ALL appears in the menu By letting go of the CANCEL button the names will not be deleted Keep CANCEL pressed until ERASE ALL disappears from the menu The names of a...
Страница 40: ...sionally using special cleaning cassettes Selecting the Cassette input source 1 Select the input source by pressing TAPE on the remote control or press SOURCE on the top of the HiFi until TAPE is show...
Страница 41: ...he cassettes the way they were recorded meaning either with or without DOLBY B NR The advantage of recording with DOLBY NR is the improved noise voltage ratio Dolby Noise Reduction was manufactured un...
Страница 42: ...the end of the second side of the cassette The display shows the symbol H REVERSE OFF playback stops at the end of one side of the cassette The display shows the symbol G Playback 1 Press 4 PAUSE to...
Страница 43: ...acks Very quiet passages in songs or live recordings may be identified as pauses by the track search Switching the tape counter to real time 1 To switch between the two press i The display shows the f...
Страница 44: ...own cassettes against accidental erasure by breaking the safety tabs on the top of the cassette If you want to record on to a protected cassette cover the opening with adhesive tape Selecting the rec...
Страница 45: ...ect the running direction of the cassette with z t and search for the desired position on the cassette with either 9 or 8 2 Select the input source from which you want to record by pressing CD TUNER o...
Страница 46: ...button and briefly holding it down Recording starts The CD player will begin playback after about four seconds Note If you begin recording at the start of the cassette the HiFi will play the lead in...
Страница 47: ...S N 46 dB 31 V Distortion Mono 1 kHz 40 75 kHz dev 0 2 0 4 Stereo 1 kHz 40 75 kHz dev 0 4 0 7 Frequency range 3 dB 10 Hz 15 kHz Stereo Crosstalk 1 kHz 40 dB Dynamic tuning precision mono stereo 300 kH...
Страница 48: ...s weak Possible cause remedy The transformer could be overheated Switch of the HiFi and remove all objects that could possibly cover the air vents on the rear side of the HiFi and let it cool down for...
Страница 49: ...loyed it may lead to dangerous exposure to emissions CLASS 1 LASER PRODUCT CD MODE PROBLEM The CD compartment does not close Playback is not functioning NO DISC appears in the display Playback does no...
Страница 50: ...7 Mannheim 49 6 21 33 76 70 GRUNDIG PORTUGUESA Com rcio de Artigos Electr nicos Lda Rua Bento de Jesus Cara a 17 P 1495 Cruz Quebrada Lisboa 3 51 1 4 19 75 70 GRUNDIG ESPA A S A Solson s 2 planta baja...