ǵ
DVD-RECORDER
GDR 5500
ENGLISH
Страница 1: ...DVD RECORDER GDR 5500 ENGLISH...
Страница 2: ...em with analogue two channel stereo sound 19 Connecting a digital multi channel amplifier or digital two channel audio system 20 Connecting the mains cable 20 Inserting batteries in the remote control...
Страница 3: ...aring for recording 42 Manually recording television programmmes from the antenna or the cable feed 43 Manually recording television programmes from the satellite receiver 43 Finalising a disc DVD R R...
Страница 4: ...sonal settings 65 Language settings 66 Switching the screen saver on off 66 Setting the signal type for the video output socket 67 Recording settings 68 71 Special settings 68 Tuning television channe...
Страница 5: ...be played on both CD ROM and DVD ROM Disc formats DVD RWs RWs and DVD Rs Rs are suitable for recording and playback Due to the difference in quality of the recording media and the quality of the recor...
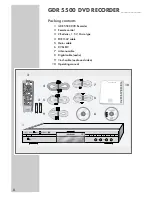
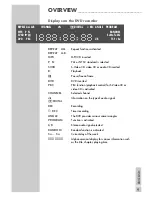
Страница 6: ...ns cable 6 DVD RW 7 Antenna cable 8 Digital cable audio 9 Cinch cable audio and video 10 Operating manual GDR 5500 DVD RECORDER ______________ Q SET SV 3 2 1 6 5 4 7 8 9 0 CL SOURCE Tele Pilot 88 D TO...
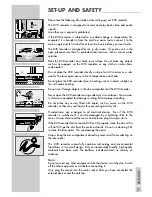
Страница 7: ...r casing under any circumstances No warran ty claims are accepted for damage resulting from improper handling Do not place any vessels filled with liquid such as vases on the DVD recorder as they may...
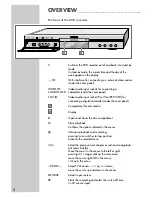
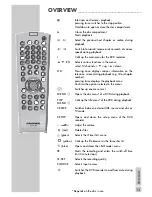
Страница 8: ...e disc compartment 8 Starts playback Confirms the options selected in the menus 7 Interrupts playback and recording pressing twice switches to stop position activates the selected menu 5 6 Select the...
Страница 9: ...hannel dts Information on the type of audio signal DIGITAL REC Recording REC Timer recording ANGLE The DVD provides various camera angles PROGRAM Function is activated L R Stereo audio signal selected...
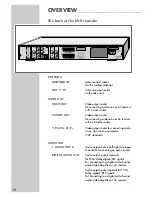
Страница 10: ...AUDIO OUT L AUDIO OUT R Audio output sockets left right analogue channel for connecting an audio system DIGITAL AUDIO OUT Audio output sockets coaxial for PCM Dolby digital DTS signals For connecting...
Страница 11: ...DVD player or an audio system EURO AV1 TV Euro AV socket input output for the television EURO AV2 DECODER Euro AV Scart socket input output for an external device AC 110 240V Power cord socket 50 60...
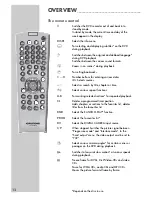
Страница 12: ...sections for repeated playback CL Deletes a programmed timer position Adds chapters or sections to the favorites list deletes titles from the favourites list RND Selects the RANDOM PLAY function PROG...
Страница 13: ...lays the playback menu Confirms the options selected in the menus x Switches up one menu level MENU Opens the disc menu of a DVD during playback TOP Calls up the title menu of the DVD during playback...
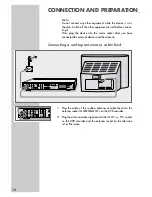
Страница 14: ...ket ANTENNA IN on the DVD recorder 2 Plug the antenna cable supplied into the OUT TV socket on the DVD recorder and the antenna socket on the television set or flat screen CONNECTION AND PREPARATION__...
Страница 15: ...g cinch cables Connect the DVD recorder directly to the television or flat screen If you connect a video recorder in between the DVD s copy protection may impair the picture quality Connect the televi...
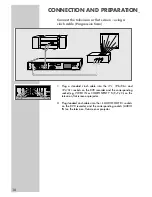
Страница 16: ...bles into the L AUDIO OUT R sockets on the DVD recorder and the corresponding sockets AUDIO IN on the television flat screen or projector ANTENNA IN ANTENNA OUT TV VIDEO OUT VIDEO OUT S VIDEO OUT Y Pb...
Страница 17: ...ockets AUDIO IN on the television or flat screen CONNECTION AND PREPARATION__ VIDEO IN AUDIO IN VIDEO IN S VIDEO IN L R AUDIO OUT DIGITAL AUDIO OUT AUDIO OUT L R EURO AV 1 TV EURO AV 2 DECODER ANTENNA...
Страница 18: ...m Caution Do not connect the L AUDIO OUT R sockets on the DVD recorder to the PHONO record player input socket on the audio system CONNECTION AND PREPARATION__ ANTENNA IN ANTENNA OUT TV VIDEO OUT VIDE...
Страница 19: ...see page 18 because depen ding on the disc type the DIGITAL AUDIO OUT socket may not be able to transfer the signal CONNECTION AND PREPARATION__ Manufactured under licence from Dolby Laboratories Lice...
Страница 20: ...ontrol 1 To open the battery compartment press the catch and remove the lid 2 When inserting the batteries Micro type e g R06 or AA 2 x1 5 V observe the polarity marked on the battery compart ment 3 C...
Страница 21: ...nfirm 2 Select NEXT by pressing OK Tuning television stations The DVD recorder has its own receiver unit It can receive and record from television stations independently of the television This means t...
Страница 22: ...with S or A and press OK to activate it 5 Enter the time as six digits using 1 0 and press OK to confirm the setting 6 Select NEXT by pressing OK Ending initial setup 1 Select FINISHED by pressing OK...
Страница 23: ...u have a 4 3 format television or flat screen the following set tings are available 4 3 P S for wide screen playback with the left and right edges of the picture cropped depending on the DVD used or 4...
Страница 24: ...led up directly by pressing blue To disc menu Calls up the disc edit menu of a home made DVD RW or DVD R so that you can change the name of a disc for example To set up menu In the set up menu you can...
Страница 25: ...sc you want to play in the disc compartment with the label facing upwards 3 Press on the DVD recorder or 8 on the remote con trol Display 01 LOAd the disc tray retracts again Display on the DVD record...
Страница 26: ...turer with subtitles in up to 32 languages You can select the subtitles you prefer Playback 1 After the disc compartment closes and the DVD is scanned playback starts automatically Does not start play...
Страница 27: ...partment is closed and the disc is scanned play back starts automatically if the disc is write protected or finalised Does not start playback automatically start playback with 8 Note If playback does...
Страница 28: ...nd elapsed playing time Note Depending on the type of S VCD VCD used you may have to press s 6 or 5 a or 1 0 to select the track from a list Press x to return to the previous menu in PBC ON mode 2 To...
Страница 29: ...ilm data The MP3 format enables audio files to be saved on a computer with a sound quality similar to that of a CD This only requires approx 10 of the original data quantity The standard encoding byte...
Страница 30: ...ntents of the DivX Video CD file brow ser Information about the MP3 track selected can be called up with DISPL The contents of the MP3 CD file browser can be called up with DISPL Selecting specific tr...
Страница 31: ...1 During playback press v Display for example zoom on the DVDrecorder enlarges a picture section 2 Move the picture section around the screen with a s A or S 3 Switch back to normal picture size with...
Страница 32: ...ile in the browser 1 Select the subtitles file in the browser the file name has an extension such as TXT then press OK Display EXTERNAL SUB TITLE SELECTED briefly appears In the file browser select th...
Страница 33: ...press 8 Displaying pictures on a JPEG CD 1 After the disc compartment has closed and the JPEG CD has been scanned the file browser contents menu of the JPEG CD is displayed 2 Press A or S to select th...
Страница 34: ...D is scanned the slide show starts automatically Does not start playback automatically start playback with 8 Adjusting the picture display The pictures can be rotated or reversed 1 During playback pre...
Страница 35: ...menu can be called up with DISPL Repeat functions can be selected in the Mode line 4 Press 7 to end playback Selecting titles directly with the number buttons 1 During playback press 1 0 to enter the...
Страница 36: ...ting a section to the minute 1 During playback press to open the time display 2 Enter the playing time in five digits hours minutes and seconds using 1 0 and press OK to confirm The DVD recorder locat...
Страница 37: ...ss 8 to resume normal playback Selecting camera angles for scenes Some DVDs contain scenes or passages which were filmed several times from different camera angles You can choose from among these diff...
Страница 38: ...2 10 ENG 2 Press y to select the subtitle language Notes To switch off the subtitles keep pressing y until Off appears in the display The structure of the DVD itself may stop you from activating and d...
Страница 39: ...peated or To repeat the entire disc press b during playback until D RPT appears in the display The disc is repeated 2 To quit the function keep pressing b until NORMAL appears in the display Repeating...
Страница 40: ...have been finalised they can no longer be recorded on If you want to play them on your DVD recorder you do not have to finalise them You can add more recordings and delete them as necessary Note that...
Страница 41: ...rding time is shorter in high quality mode than in standard quality mode Note The recording quality HQ SP SP LP EP SLP or SEP is selected automatically during playback Remaining recording time You can...
Страница 42: ...1 ARD the current TV station is shown 2 Press A or S or use the number buttons 1 0 to select the TV channel 3 Press Q SET until the recording quality you require appears in the display 4 Press to star...
Страница 43: ...f time 30 minutes 60 minutes 90 minutes off The switch off time depends on the playing time left on the disc The DVD recorder automatically switches off the recording after this time The info line can...
Страница 44: ...d satellite receiver press S or A to select the EURO AV 2 chan nel and select the TV station on the satellite receiver The satel lite receiver must be switched on at the selected recording time and fo...
Страница 45: ...If you do not want to save the timer data select Cancel with S or A and press OK to confirm 10 Repeat from step 3 if you want to make more recordings or press green to quit the timer recording menu 11...
Страница 46: ...rtment There is no disc in the compartment or the disc is unsuitable for recording Put in another disc Failed to start recording Disc is not ready The disc in the loader is write protected or there is...
Страница 47: ...menu appears displaying the current data 2 Press S or A to select the timer item and OK to confirm The Item editor menu appears 3 Press S or A to select the recording data press OK and then S or A or...
Страница 48: ...menu or the title menu select Edit title The rest of the process is described in the following sections starting from step 1 Adding chapter markers You can add chapter markers within a title to allow...
Страница 49: ...rm The chapter is skipped during playback Note If you want to see the chapter again select it with 1 0 select Show chapter with S or A and press OK to confirm 3 Press blue to quit the function Creatin...
Страница 50: ...menu appears 3 Select Rename title with S or A and press OK to confirm 4 Press a or s to select the input position and S to switch to the keyboard 5 Press S A a or s to select letters and numbers and...
Страница 51: ...his function allows you to use free recording space on the disc Note that only the playing time of the title to be overwritten is available for recording 1 Put a DVD R DVD RW or DVD RW in the disc com...
Страница 52: ...press 8 2 Select any title with S or A and press s to open the title menu The title menu appears 3 Select Overwrite disc with S or A and press OK to confirm 4 Press SOURCE to select the input source f...
Страница 53: ...t the input position and S to switch to the keyboard 5 Press S A a or s to select letters and num bers and OK to confirm Notes The keys at the bottom of the keyboard are function keys Press Caps to sw...
Страница 54: ...es A new title is added to the disc 1 Put a DVD R DVD RW DVD R or DVD RW in the disc com partment The index screen appears Note If the index screen does not appear press 8 2 Select the disc informatio...
Страница 55: ...rectly displayed on a DVD player Note Depending on the length of the title this can take some time Lock disc This protects the disc from being accidentally recorded over 1 Put a DVD R or DVD RW in the...
Страница 56: ...ting the content of the disc DVD RW RW If you cannot switch to the disc menu on a DVD RW RW to delete the disc the disc is not compatible to the DVD recorder you can delete the disc using the function...
Страница 57: ...sockets on the front of the DVD recorder to the corresponding sockets on the cam corder using a standard cinch cable or connect the DV IN socket on the front of the DVD recorder to the corresponding...
Страница 58: ...DVD player or set top box or VIDEO IN for a camcorder or DV DV for a digital camcorder 2 Press Q SET until the recording quality you require appears in the display 3 Press to start recording 4 Press...
Страница 59: ...uires the decoder using the numerical buttons 1 0 and confirm with OK 5 Select Decoder with S or A and press OK to confirm Press S or A to select ON and press OK to confirm The channel is marked in th...
Страница 60: ...e for example TV Display for example Monitor P001 ARD the current TV station is shown 2 Press S or A or the number buttons 1 0 to select the pay TV station 3 Press Q SET until the recording quality yo...
Страница 61: ...plug of the USB memory stick in the USB inter face IN on the DVD recorder Note It is possible to simultaneously connect several devices to the USB interface IN of the DVD recorder via a USB HUB Playb...
Страница 62: ...or DVD R RW Read the section on page 56 to find out how to delete the data on the DVD RW DVD RW Recording 1 Press SELECT to select the USB input source Display for the USB interface 2 Open the Edit m...
Страница 63: ...el and OK to confirm 8 Press SETUP to finish the setting Changing the access code password 1 Press SETUP to open the setup menu 2 Select with S or A and press OK to confirm 3 Select Rating level with...
Страница 64: ...very large dynamic volume range hence there is a great difference in volume between quiet and loud tones The dynamic range compression function optimises this dynamic range at low volume 1 Press SETU...
Страница 65: ...confirm 2 Select your language using S or A and press OK to confirm Selecting the dubbing language If several languages are available on the current DVD the sound is played back in the language you ha...
Страница 66: ...n the setup menu 2 Select with S or A and press OK to confirm 3 Select SCART output with S or A and press OK to confirm 4 Select the video output with S or A and press OK to confirm RGB for EURO AV1 T...
Страница 67: ...g TV programmes 1 Select Default source with S or A and press OK to confirm 2 Select the input source with S or A and press OK to confirm Selecting the recording quality The function allows you to sel...
Страница 68: ...the input position with a or s enter letters or numbers with S or A and press OK to confirm 6 If you want to search by channel special channel or frequency select Scan mode with S or A and press OK to...
Страница 69: ...g television stations You can sort the TV stations in any order you like 1 Press SETUP to open the setup menu 2 Select with S or A and press OK to confirm 3 Select Sort channel order with S or A and p...
Страница 70: ...press OK to confirm 3 Select Remote control type with S or A and press OK to activate 4 Select the remote control type with S or A and press OK to confirm The DVD recorder can now be operated with ano...
Страница 71: ...tus 1 Press SETUP to open the main menu 2 Select with S or A and press OK to confirm 3 Select Restore factory settings with S or A and press OK to confirm 4 Select OK with a or s and press OK to confi...
Страница 72: ...decoder must be connected to the digital output S PDIF of the DVD recorder Manufactured with permission from Dolby Laboratories The Dolby label and the double D logo are trademarks of Dolby Laboratori...
Страница 73: ...w the cleaning instructions on the next page The DVD CD cannot be played Check if the label on the DVD CD is facing upwards Clean the DVD CD Check if the DVD CD is damaged by testing out another DVD C...
Страница 74: ...such as benzene thinners conventional cle aner or anti static spray for vinyl records Do not use a cleaning CD as it might damage the laser of your DVD recorder Software information We wish to point...
Страница 75: ...must be protected by a 5A fuse either in the plug or at the distribution board If this type of plug becomes defective ensure that the fuse is removed before disposal to eliminate potential shock hazar...
Страница 76: ...Grundig Multimedia B V De Boelelaan 7 NL 1083 HJ Amsterdam http www grundig com 39 05...