


Model G1014Z/G1014ZX (Mfd. Since 08/22)
-39-
Changing Sanding
Belt
Some sanding belts are designed to sand in
only one direction and will have a direction indi-
cated on the back of the belt. The Model G1014Z/
G1014ZX is designed so that the sanding belt
travels clockwise as viewed from the side with the
quick release tension lever.
To change the sanding belt:
1. DISCONNECT MACHINE FROM POWER!
2. Move the quick release lever away from the
motor to release the belt tension.
3. Remove the idler roller guard and back stop.
4. Remove the belt from the rollers and sanding
belt frame.
5. Install a new sanding belt onto the idler and
drive rollers, making sure the arrows on the
bottom of the belt face the front of the sander,
as shown in
Figure 72.
Figure 72. Installing new sanding belt.
Arrow Direction on Belt
6. Position the belt in the center of the roller,
then move the quick release tension lever
toward the motor to tension the belt (see
Figure 73).
Figure 73. New belt installed.
7. Adjust the sanding belt tension for new belt
(refer to
Adjusting Sanding Belt Tension
on
Page 40).
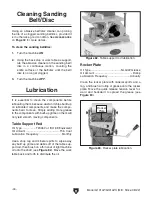
8. Install the back stop and adjust it so it is no
more than
1
⁄
16
" above the belt (see
Figure 74).
1
/
16
" Clearance
Platen
Belt
Frame
Back Stop
Figure 74. Correct clearance between back stop
and belt.
9. Perform the belt pre-tracking procedure (refer
to
Pre-Tracking Belt on Page 28).
10. Perform the belt tracking procedure outlined
in
Tracking Belt on Page 41.
Содержание G1014Z
Страница 18: ...16 Model G1014Z G1014ZX Mfd Since 08 22 5mm Hardware Recognition Chart...
Страница 64: ......