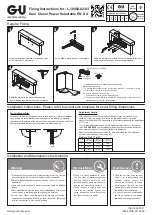
Arm is fitted in pinion with hex head screws.
1
2
3
4
5
Using the templates provided, mark and drill pilot
holes into the door and frame.
Attach the armset to the mechanism ensuring
the pre-loading requirement has been completed.
Using the templates provided, fix the mechanism to the door
as well as the armset and any necessary brackets.
Backcheck Adjustment
To increase the backcheck action, turn the valve clockwise. To decrease, or to turn
off backcheck , turn the valve counter clockwise.
Adjust the Closing & Latching speed.
1.The door closer can control two different speeds.
2.The No.1 speed-adjusting valve controls the Closing speed, and the No.2 speed
adjusting valve controls the Latching speed.
Operate door closer in order to check operation.
No.2
No.1
No.3
65
°
Fast Slow
No.3
Backcheck (OPTIONAL)
No.1 Closing
No.2 Latching
Regular Fixing
Installation and Maintenance Instructions:
Maintenance
1.Once the unit has been correctly
fitted it is recommended that
periodic checks (every six
months) are carried out to ensure
all fixings are tight and the door
closes freely and positively into
the frame, without slamming.
2.A light oil lubricant (non-graphite)
should be applied to the moving
joints and exposed pivot points.
After Installation
1.When the closer operates to close
the door from its maximum opening
position, it should ensure the lock
latchbolt and any seals are overcome
and the leaf returned into its frame.
2.When the door is slightly open and
the latch bolt resting against the
strike, release the door to ensure the
leaf fully closes into its frame.
Warning
1.Please note the minimum power size requirement for fire / smoke
door assemblies is 3 as required by Approved Document B.
2.Do not install mechanical hold open devices on fire / smoke door
assemblies.
3.Take care not to exceed the maximum opening angle as detailed
above.
4.Care and attention must be taken when adjusting any of the units
control valves to avoid damage through over adjustment.
5.All our Door Closer units are sealed for life and the internal
components assembled under high load, therefore, tampering
with the mechanism is to be strictly avoided.
Installation Instructions: Please refer to actual size template for exact fitting dimensions
Fixing in Fig.1 / Fig.61
Pre-Loading of Arm
For the unit to provide the optimum performance and overcome any resistance
upon closing it is recommended that the armset is “pre-loaded” To pre-load,
reposition the fixing angle of the arm onto the mechanism so that the end of the
closing cycle would be past the stop position, as indicated below.
Adjustment Details
After installation check the operation of the door closer. Adjustment to the
operation of the unit is made by altering the two valves at the front of the
mechanism. PLEASE NOTE each valve is at its fastest speed with the adjustment
of 1 full turn.
The following adjustment valves have a maximum adjustment of 1 full turn per
valve.
PLEASE NOTE
over adjustment will damage the mechanism and/or the
performance of the door closer and invalidate its guarantee.
Adjust the optional Backcheck (valve #3) before adjusting the Closing Speed
(valve #1) and Latching Action (valve #2).
90°
90°
Before
After
3
Max.
Door width
Max.
Door weight
950mm
60Kg
Power
size
180°
130°
Door opening
Max.
4
1100mm
80Kg
2
180°
850mm
40Kg
90°
ISSUE 02:08/17
10608 ZINS-D1126-9Z
www.gu-secury.com
Fixing Instructions for : L-10002-02/03
Door Closer Power Selectable EN 2-4
1121
17
BS EN1154:1997+ A1:2002
4 8 42 1 1 4
APPROVED
PRODUCT
CF 5514
CPR
AD5325
www.gu-secury.com


