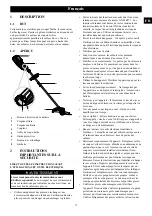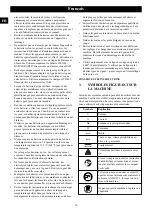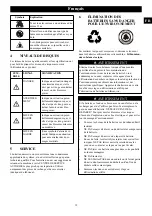
background image

4

2

3

1

5

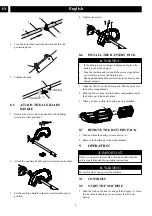
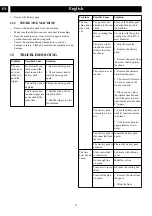
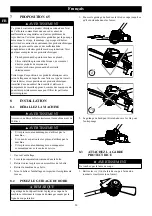
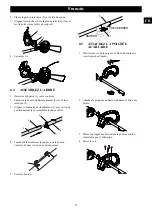
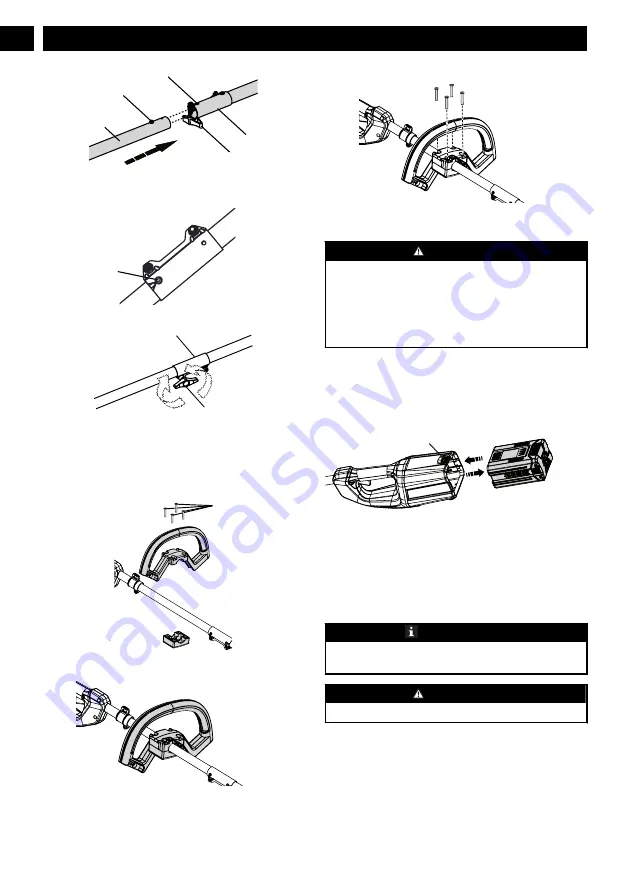
4. Turn the lower shaft until the button locks into the

positioning hole.

2

5. Tighten the knob.

LOOSEN

5

TIGHTEN

1

8.5

ATTACH THE AUXILIARY

HANDLE

1. Remove the screws from the handle with a Phillips

screwdriver (not provided).

1

2. Attach the auxiliary handle and lower clamp on the shaft.

3. Set the auxiliary handle in the most comfortable in use

position.

4. Tighten the screws.

8.6

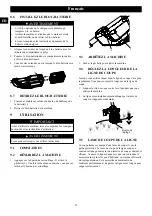
INSTALL THE BATTERY PACK


WARNING

If the battery pack or charger is damaged, replace the
battery pack or the charger.

Stop the machine and wait until the motor stops before
you install or remove the battery pack.

Read and understand the instructions in the battery and
charger manual.

1. Align the lift ribs on the battery pack with the grooves in

the battery compartment.

2. Push the battery pack into the battery compartment until

the battery pack locks into place.

3. When you hear a click, the battery pack is installed.

1

8.7

REMOVE THE BATTERY PACK

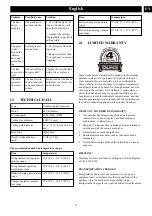
1. Push and hold the battery release button (1).
2. Remove the battery pack from the machine.

9

OPERATION


IMPORTANT

Before you operate the machine, read and understand the
safety regulations and the operation instructions.


WARNING

Be careful when you operate the machine.

9.1

CONTROLS

9.2

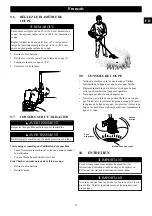
START THE MACHINE

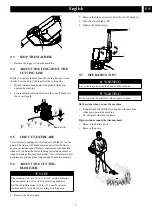
1. Push the lock-out button (2) and pull the trigger (1). Once

the machine is running you can release the lock-out
button.

8

English

EN

Содержание ST80L00

Страница 1: ...STB405 EN OPERATOR MANUAL FR MANUEL DE L UTILISATEUR STRING TRIMMER COUPE HERBE ES MANUAL DEL OPERADOR www greenworkstools com CORTABORDES ST80L00 ...

Страница 2: ......

Страница 3: ... pack 8 8 7 Remove the battery pack 8 9 Operation 8 9 1 Controls 8 9 2 Start the machine 8 9 3 Stop the machine 9 9 4 Adjust the length of the cutting line 9 9 5 Line cut off blade 9 9 6 Adjust the cutting diameter 9 9 7 Operation tips 9 9 8 Cutting tips 10 10 Maintenance 10 10 1 General information 10 10 2 Clean the machine 10 10 3 Replace the spool 10 10 4 Replace the cutting line 11 11 Transpor...

Страница 4: ...do the job better and with less likelihood of a risk of injury at the rate for which it was designed Don t overreach Keep proper footing and balance at all times Stay alert Watch what you are doing Use common sense Do not operate this unit when you are tired ill or under the influence of alcohol drugs or medication Always store idle power tools indoors When not in use power tools should be stored ...

Страница 5: ...ed repair person using only identical replacement parts This will ensure that the safety of the product is maintained Keep guards in place and in working order Keep hands and feet away from cutting area Disconnect the battery pack from the appliance before making any adjustments changing accessories or storing appliance Such preventive safety measures reduce the risk of starting the appliance acci...

Страница 6: ...he battery with heavy duty adhesive tape DO NOT try to remove or destroy any of the battery pack components DO NOT try to open the battery pack If a leak develops the released electrolytes are corrosive and toxic DO NOT get the solution in the eyes or on skin and do not swallow it DO NOT put these batteries in your regular household trash DO NOT incinerate DO NOT put them where they will become pa...

Страница 7: ...risk of the damage caused by the rotating cutting line 1 Push the edge guide onto the trimmer head until it engages in the slots 2 2 The edge guide can be flipped to the side for storage 8 3 ATTACH THE GUARD WARNING Do not touch the cut off blade 1 Remove the screws 1 from the trimmer head with a Phillips head screwdriver not included 1 2 Put the guard 2 onto the trimmer head 3 Align the screw hol...

Страница 8: ...the battery pack Read and understand the instructions in the battery and charger manual 1 Align the lift ribs on the battery pack with the grooves in the battery compartment 2 Push the battery pack into the battery compartment until the battery pack locks into place 3 When you hear a click the battery pack is installed 1 8 7 REMOVE THE BATTERY PACK 1 Push and hold the battery release button 1 2 Re...

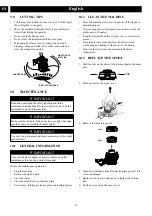
Страница 9: ...ncy diminishes This will maintain best performance and keep line long enough to advance properly 9 6 ADJUST THE CUTTING DIAMETER NOTE The machine is set at a 14 in 35 6 cm cutting diameter You can adjust to a 16 in 40 6 cm cutting diameter Set the cutting diameter to 14 in 35 6 cm for greater runtime and 16 in 40 6 cm for a larger cutting area 1 Remove the battery pack 2 Remove the blade screws 2 ...

Страница 10: ... Only your dealer or approved service center can do the maintenance that is not given in this manual Before the maintenance operations Stop the machine Remove the battery pack Cool the motor Store the machine in cool and dry place Use correct clothing protective gloves and safety glasses 10 2 CLEAN THE MACHINE Clean the machine after use with a moist cloth dipped in neutral detergent Do not use ag...

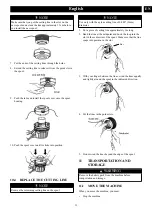
Страница 11: ... NOTE Use only with the nylon cutting line of 0 080 2 mm diameter 1 Cut a piece of cutting line approximately 3m long 2 Bend the line at the midpoint and hook the loop into the slot in the center rim of the spool Make sure that the line snaps into position in the slot Slot 3 With your finger between the lines wind the lines equally and tightly around the spool in the indicated direction 4 Put the ...

Страница 12: ...ove the battery pack and attach the guard to the machine Heavy cutting line is used Use only with the nylon cutting line of 0 080 2 mm diameter The grass winds around the motor shaft or the trim mer head 1 Stop the machine 2 Remove the battery pack 3 Remove the grass from the motor shaft and trim mer head The motor is over loaded 1 Remove the trimmer head from the grass 2 The motor will recover to...

Страница 13: ... 32 F 0 C 113 F 45 C Battery discharging tempera ture range 32 F 0 C 113 F 45 C 14 LIMITED WARRANTY Greenworks hereby warranties this product to the original purchaser with proof of purchase for a period of four 4 years against defects in materials parts or workmanship Greenworks at its own discretion will repair or replace any and all parts found to be defective through normal use free of charge ...

Страница 14: ...ess such return is requested in writing by Greenworks USA address Canadian address Greenworks Tools Greenworks Tools Canada Inc P O Box 1238 1110 Stellar Drive Unit 102 Mooresville NC 28115 Newmarket ON L3Y 7B7 14 English EN ...

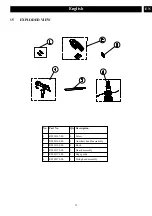
Страница 15: ...XPLODED VIEW No Part No Qty Description 1 2 3 R0201167 00 Screw 4 R0201168 00 R0201169 00 Auxiliary handle assembly 5 R0201170 00 Guard assembly 6 R0201171 00 Edge guide R0200179 00 String head assembly 4 1 Knob 1 1 1 1 ...

Страница 16: ... le bloc batterie 22 8 7 Retirez le bloc batterie 22 9 Utilisation 22 9 1 Commandes 22 9 2 Démarrez la machine 22 9 3 Arrêtez la machine 22 9 4 Réglez la longueur de la ligne de coupe 22 9 5 Lame de coupe de la ligne 22 9 6 Réglez le diamètre de coupe 23 9 7 Conseils sur l utilisation 23 9 8 Conseils de coupe 23 10 Entretien 23 10 1 Informations générales 24 10 2 Nettoyez la machine 24 10 3 Rempla...

Страница 17: ...t de gants en caoutchouc et de chaussures adaptées est recommandé pour travailler à l extérieur Portez un couvre chef protecteur pour contenir les cheveux longs Utilisez le bon appareil N utilisez l appareil que pour les travaux auxquels il est destiné Évitez tout démarrage accidentel Ne transportez pas l appareil avec un doigt sur l interrupteur Assurez vous que l interrupteur est éteint lorsque ...

Страница 18: ...s locaux pour connaître les instructions d élimination spéciales Ne tentez pas d ouvrir ni d abîmer la batterie Les électrolytes rejetés sont corrosifs et peuvent causer des dommages aux yeux ou à la peau L électrolyte peut être toxique lorsqu elle est avalée Manipulez les batteries avec précaution afin de ne pas court circuiter la batterie avec des matériaux conducteurs tels que les bagues les br...

Страница 19: ...T Les matières toxiques et corrosives ci dessous se trouvent dans les batteries utilisées dans cette machine Lithium ion une substance toxique AVERTISSEMENT Éliminez toutes les substances toxiques d une manière spécifiée afin de prévenir la contamination de l environnement Avant de jeter une batterie Li ion endommagée ou usée contactez votre agence locale d élimination des déchets ou l agence loca...

Страница 20: ...sques anti poussière spécialement conçus pour filtrer les particules microscopiques 8 INSTALLATION 8 1 DÉBALLEZ LA MACHINE AVERTISSEMENT Assurez vous d assembler correctement la machine avant de l utiliser AVERTISSEMENT Si les pièces sont endommagées n utilisez pas la machine Si vous n avez pas toutes les pièces n utilisez pas la machine Si les pièces sont endommagées ou manquantes communiquez ave...

Страница 21: ...déclenchement 2 avec le trou de positionnement 4 et assemblez les deux arbres 4 2 3 1 5 4 Tournez l arbre inférieur jusqu à ce que le bouton s enclenche dans le trou de positionnement 2 5 Serrez le bouton DESSERRER 5 SERRER 1 8 5 ATTACHEZ LA POIGNÉE AUXILIAIRE 1 Dévissez les vis de la poignée à l aide d un tournevis cruciforme non fourni 1 2 Attachez la poignée auxiliaire et abaissez la bride sur ...

Страница 22: ...machine 9 1 COMMANDES 9 2 DÉMARREZ LA MACHINE 1 Appuyez sur le bouton de verrouillage 2 et tirez la gâchette 1 Une fois la machine en marche vous pouvez relâcher le bouton de verrouillage 1 2 9 3 ARRÊTEZ LA MACHINE 1 Lâchez la gâchette pour arrêter la machine 9 4 RÉGLEZ LA LONGUEUR DE LA LIGNE DE COUPE Lorsque vous utilisez la machine la ligne de coupe s use plus rapidement Vous pouvez régler la l...

Страница 23: ... l herbe s enroule autour de la tête de coupe Retirez le bloc batterie Retirez l herbe 9 8 CONSEILS DE COUPE Inclinez la machine vers la zone à couper Utilisez l extrémité de la ligne de coupe pour couper l herbe Déplacez la machine de la droite vers la gauche pour éviter que des débris ne frappent l opérateur Ne coupez pas dans la zone dangereuse Ne forcez pas la tête de coupe dans l herbe non co...

Страница 24: ...e débris pour éviter la surchauffe et les dommages au moteur ou à la batterie Ne pulvérisez pas de l eau sur le moteur et les composants électriques 10 3 REMPLACEZ LA BOBINE 1 Poussez les languettes sur les côtés de la tête de coupe en même temps Languette 2 Tirez et démontez le couvercle de la bobine 3 Retirez la bobine restante Couvercle Bobine 4 Enlevez la saleté et les débris sur toutes les pi...

Страница 25: ...4 Placez les lignes dans les fentes de guidage Fente de guidage Fente de guidage 5 N enroulez pas les lignes au delà du bord de la bobine 11 TRANSPORT ET ENTREPOSAGE AVERTISSEMENT Retirez la batterie de la machine avant de la transporter et de l entreposer 11 1 DÉPLACEZ LA MACHINE Lorsque vous déplacez la machine il faut toujours faire ce qui suit Arrêtez la machine Retirez le bloc batterie 11 2 E...

Страница 26: ...rbre du moteur ou de la tête de coupe 1 Arrêtez la machine 2 Retirez le bloc batterie 3 Enlevez l herbe de l ar bre du moteur et de la tête de coupe Le moteur est sur chargé 1 Retirez la tête de coupe de l herbe 2 Le moteur se remet en marche dès que la charge est retirée 3 Lorsque vous coupez déplacez la tête de coupe dans le gazon à couper et hors de celui ci et n enle vez pas plus de 8 en un pa...

Страница 27: ...e Plage de température d en treposage de la batterie 32 F 0 C 113 F 45 C Plage de température de dé chargement de la batterie 32 F 0 C 113 F 45 C 14 GARANTIE LIMITÉE Greenworks garantit par la présente ce produit à l acheteur original avec preuve d achat pour une période de quatre 4 ans contre tout défaut de matériaux de pièces ou de main d œuvre Greenworks à sa propre discrétion réparera ou rempl...

Страница 28: ...placement en vertu de la présente garantie à moins qu un tel retour soit demandé par écrit par Greenworks Adresse aux Etats Unis Adresse au Canada Greenworks Tools Greenworks Tools Canada Inc P O Box 1238 1110 Stellar Drive Unit 102 Mooresville NC 28115 Newmarket ON L3Y 7B7 28 Français FR ...

Страница 29: ... pièce Qté Description 1 2 3 R0201167 00 Vis 4 R0201168 00 R0201169 00 Ensemble de la poignée auxiliaire 5 R0201170 00 Ensemble de la garde protectrice 6 R0201171 00 Guidage du bord R0200179 00 Ensemble de la tête de coupe 4 1 Bouton 1 1 1 1 ...

Страница 30: ...rada de la batería 36 9 Funcionamiento 36 9 1 Controles 36 9 2 Puesta en marcha de la máquina 36 9 3 Detención de la máquina 36 9 4 Ajuste de la longitud del hilo de corte 36 9 5 Cuchilla de corte de hilo 36 9 6 Ajuste del diámetro de corte 36 9 7 Consejos de funcionamiento 37 9 8 Consejos de corte 37 10 Mantenimiento 37 10 1 Información general 37 10 2 Limpieza de la máquina 37 10 3 Sustitución d...

Страница 31: ... Utilice el aparato adecuado No utilice el aparato para trabajos distintos del previsto Evite la puesta en marcha accidental No transporte el aparato con el dedo sobre el interruptor Asegúrese de que el interruptor esté desactivado al conectar la batería No fuerce el aparato Hará el trabajo mejor y con menos probabilidades de sufrir lesiones a la velocidad para la que se diseñó No se estire Manten...

Страница 32: ...Tenga cuidado al manipular las baterías para no cortocircuitarlas con materiales conductores como anillos pulseras y llaves La batería o el conductor puede sobrecalentarse y producir quemaduras Siga todas las instrucciones de carga y no cargue la batería o el aparato fuera del intervalo de temperatura especificado en las instrucciones La carga incorrecta o a temperaturas fuera del intervalo especi...

Страница 33: ...tilizadas en esta máquina Ion de litio un material tóxico AVISO Deseche todos los materiales tóxicos de una manera especificada para evitar la contaminación del medio ambiente Antes de desechar una batería de ion de litio dañada o agotada contacte con la agencia local de eliminación de residuos o con la agencia de protección ambiental local para obtener información e instrucciones específicas Llev...

Страница 34: ...picas 8 INSTALACIÓN 8 1 DESEMBALAJE DE LA MÁQUINA AVISO Asegúrese de montar correctamente la máquina antes del uso AVISO Si las piezas presentan daños no utilice la máquina Si no tiene todas las piezas no utilice la máquina Si faltan piezas o hay piezas dañadas hable con el centro de servicio 1 Abra el embalaje 2 Lea la documentación que se encuentra en la caja 3 Retire todas las piezas sin montar...

Страница 35: ... 2 Fije el asa auxiliar y la abrazadera inferior en el eje 3 Sitúe el asa auxiliar en la posición de uso más cómoda 4 Apriete los tornillos 8 6 INSTALACIÓN DE LA BATERÍA AVISO Si la batería o el cargador ha sufrido daños sustituya la batería o el cargador Detenga la máquina y espere hasta que el motor se pare antes de instalar o retirar la batería Debe leer y entender las instrucciones del manual ...

Страница 36: ... libera automáticamente y la cuchilla de corte corta la longitud sobrante Mando de avance 9 5 CUCHILLA DE CORTE DE HILO Este cortabordes está equipado con una cuchilla de corte de hilo 1 en la protección La cuchilla de corte de hilo recorta continuamente el hilo para garantizar un diámetro de corte uniforme y eficaz Avance el hilo cada vez que escuche que el motor funciona más rápido de lo normal ...

Страница 37: ...be leer y entender los reglamentos de seguridad y las instrucciones de mantenimiento antes de limpiar reparar o realizar tareas de mantenimiento en la máquina IMPORTANTE Asegúrese de que todas las tuercas los pernos y los tornillos estén apretados Examine periódicamente que las asas estén bien instaladas IMPORTANTE Utilice únicamente las piezas de repuesto y los accesorios del fabricante original ...

Страница 38: ...a del carrete NOTA Asegúrese de poner el hilo de corte en la ranura sobre el carrete nuevo y de extender el hilo aproximadamente 15 cm antes de instalar el carrete nuevo 7 Introduzca los extremos de los hilos de corte por los orificios 8 Extienda el hilo de corte para soltarlo de la ranura de guía en el carrete Cubierta Orificio de salida de hilo 9 Presione las pestañas e instale la cubierta del c...

Страница 39: ...quina Retirar la batería 11 2 ALMACENAMIENTO DE LA MÁQUINA Retire la batería de la máquina Asegúrese de que los niños no puedan acercarse a la máquina Mantenga la máquina alejada de agentes corrosivos como sustancias químicas para jardín y sales para descongelación Fije la máquina durante el transporte para evitar daños o lesiones Limpie y examine si hay daños en la máquina 12 SOLUCIÓN DE PROBLEMA...

Страница 40: ...hilos del car rete 2 Enrolle los hilos Problema Posible causa Solución El hilo se rompe con tinuamente La máquina se está utilizando incor rectamente 1 Corte con la punta del hilo evite piedras par edes y otros objetos duros 2 Avance el hilo de corte periódicamente para mantener el ancho de corte completo La hierba se enrolla alre dedor del cabezal de corte y de la carcasa del motor Corte la hierb...

Страница 41: ...e no funcione debido a mal uso uso comercial abuso negligencia accidente mantenimiento inadecuado o alteración o 2 La unidad si no ha sido utilizada o mantenida de acuerdo con el manual del propietario o 3 Desgaste normal excepto en lo indicado a continuación 4 Artículos de mantenimiento de rutina tales como lubricantes afilado de cuchillas 5 Deterioro normal del acabado exterior debido al uso o l...

Страница 42: ... Nº No de pièce Ca nt Descripción 1 2 3 R0201167 00 Tornillo 4 R0201168 00 R0201169 00 Conjunto de asa auxiliar 5 R0201170 00 Conjunto de protección 6 R0201171 00 Guía de borde R0200179 00 Conjunto de cabezal de corte 4 1 Mando 1 1 1 1 ...

Страница 43: ......

Страница 44: ......

Отзывы: