Model IGX Make-Up Air
7
®
Hanging
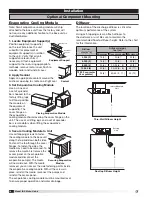
When suspending a unit indoors, adequate structural
support is required. Design of the support structure
is the responsibility of the installing contractor and/
or the structural engineer. Support structure will
vary based on application, building design, code
requirements, unit size, and unit weight. The following
information is provided as a guideline; it is not intended
to replace job specific structural design provided by a
structural engineer.
1. Install Field-Supplied Hangers
Install hangers from ceiling supports. Ensure hangers
are located to avoid interference with access doors and
allows for component removal.
2. Install Unit
Using sheet metal screws, assemble optional shipped
loose modules. Ensure that all cover seams and vertical
panels on each module are fastened securely. Raise the
assembled unit into place.
Appropriate field-supplied unit supports, such as
C-channel or angle iron, are to be placed under the unit.
Fasten the unit supports to the hangers and to the unit
using appropriate methods.
To prevent the unit from swinging and to provide a safe
environment
for service and
maintenance,
additional
measures must
be taken to
secure the unit in
all directions.
The installer is responsible for determining appropriate
support and fastening methods to ensure compliance
with all applicable codes.
3. Install Vent Piping
Refer to your unit submittal to determine the correct
indoor venting option. Vent piping is supplied by others.
Reference the supplemental IOM:
Indirect Gas-Fired
Furnace, Model PVF and PVG.
4. Attach Ductwork
Using appropriate methods, attach ductwork to unit.
Follow good duct practices for all ductwork. Install
ductwork in accordance with SMACNA and AMCA
guidelines, NFPA 96 and any further local codes.
Reference
I
nstallation, Duct Sizes
section in this
Installation, Operation, and Maintenance Manual for
proper duct sizes.
5. Seal Wall Opening
Sealant must be applied around the perimeter of the
weatherhood to prevent water penetration and drafts
into the building.
Indoor Unit Mounting
Floor Mounted
1. Install Unit
Use a crane and a set of
spreader bars hooked to
the factory lifting lugs to lift
and locate the unit in place.
The use of all lifting lugs
and a set of spreader bars
is mandatory when lifting
the unit.
It is recommended that any shipped loose modules be
installed after the base unit. The shipped loose modules
must be fastened together. Fasten the cover seams
and vertical panels on each module using sheet metal
screws. Some shipped loose modules will require field-
provided shims for proper alignment with the base unit.
Fasten the unit using appropriate methods. The installer
is responsible for determining appropriate support
and fastening methods to ensure compliance with all
applicable codes.
2. Install Vent Piping
Refer to your unit submittal to determine the correct
indoor venting option. Vent piping is supplied by others.
Reference the supplemental IOM:
Indirect Gas-Fired
Furnace, Model PVF and PVG.
3. Attach Ductwork
Refer to the unit submittal for the duct size and location.
An appropriate sealant should be used around the
discharge opening
of the unit to create
a weathertight seal.
Follow good duct
practices for all
ductwork. Install
ductwork in
accordance with SMACNA and AMCA guidelines, NFPA
96 and local codes. Reference
Installation, Duct Sizes
section in this Installation, Operation, and Maintenance
Manual for proper duct sizes.
Note for both Hanging and Floor Mounted
Installations:
The manufacturer recommends units
equipped with evaporative cooling be installed
outdoors. If an evaporative cooling module must be
installed indoors, it is recommended a field-supplied
secondary drain pan be installed under the evaporative
cooling section. This will help mitigate damage to
building materials in the event the evaporative cooling
module sump tank overflows.
Installation
Ceiling
Supports
Hangers
Unit Supports
Ductwork


