background image

DEUTSCH 


WICHTIG: Die Ihnen vorliegende Betriebsanleitung enthält wichtige 
Informationen zu den Sicherheitsmaßnahmen, die bei der Installation und 
der Inbetriebnahme zu treffen sind. Daher müssen sowohl der Monteur als 
auch der Benutzer die Anweisungen lesen, bevor sie sich mit dem Einbau 
und der Inbetriebnahme befassen. 
Bitte bewahren Sie dieses Handbuch zum späteren Nachlesen auf. 

 
Wenn Sie die nachstehenden Anweisungen befolgen, erzielen Sie optimale 
Leistung des Standard-Scheinwerfers: 
 

1.   INHALT DER VERPACKUNG ÜBERPRÜFEN: 

Der Kasten enthält folgendes Zubehör: 
 
Scheinwerfer 


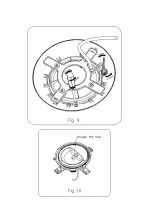
Kreuzkopf-Montage 


Schraubentütchen 


2. ALLGEMEINE MERKMALE: 

Dieser Scheinwerfer ist für den Unterwassereinsatz in Frischwasser-
Swimmingpools ausgelegt worden. Es ist ein Elektrogerät der Klasse III mit sehr 
niedriger Sicherheitsspannung (12 V Wechselstrom). 
Der Scheinwerfer entspricht der Schutzklasse IP X8 (Festigkeit gegen das 
Eindringen von Staub, Festkörpern und Feuchtigkeit) bei 2 m Nenntauchtiefe. 
Dieser Scheinwerfer erfüllt die internationalen Sicherheitsstandards für Lichter 
und insbesondere den EN 60598-2-18 Standard. LICHTER TEIL 2: 


SPEZIFISCHE ERFORDERNISSE ABSCHNITT 18  LAMPEN FÜR 
SWIMMINGPOOLS UND ÄHNLICHE ANWENDUNGEN. 
Der Hersteller ist unter keinen Umständen verantwortlich für Montage, Einbau 
oder Inbetriebnahme von elektrischen Komponenten, die außerhalb seiner 
eigenen Räumlichkeiten bearbeitet oder eingesetzt worden sind. 
 

3. EINBAU: 

  Niemals in senkrechter Position mit nach unten weisender Lampe einbauen. 

  Für die deutliche Ausleuchtung eines Pools wird empfohlen, pro 10 bis 15 

m² Wasserfläche einen 75 W Scheinwerfer einzubauen. 
In besonders tiefen Swimmingpools ist ein 75 W Scheinwerfer pro 12 bis 16 
m

3

 Wasservolumen erforderlich. 

  Zur Vermeidung einer Blendung sollten die Scheinwerfer so eingebaut 

werden, dass sie vom Wohnhaus oder der gewöhnlichen Betrachtungsstelle 
des Swimmingpools weggerichtet sind. 

  Bei Einsatz einer Beleuchtung in Trainings- oder Wettbewerbspools sollten 

die Scheinwerfer an den Seiten eingebaut werden, damit die Schwimmer 
nicht geblendet werden. 

  Wir empfehlen den Einbau der Scheinwerfer in von der Oberkante des Pools 

aus erreichbaren Bereichen, damit beim Austausch der Lampe der Pool 
nicht entleert werden muss. 

Vor dem Einbau prüfen, dass die Dichtung am Schlauchanschluss ganz 
festgezogen wurde. 

Содержание POOL EXPERT PLBL144

Страница 1: ...A PLBH144 PLBL144 PLCH144 PLCL144 Projector with 144 white LEDs for CONCRETE pools Proyector con 144 LED blancos para piscinas de HORMIGÓN Projecteur avec 144 LED blanches pour piscines en BÉTON Scheinwerfer mit 144 weißen LEDs für BETON Swimmingpools Proiettore con 144 LED di colore bianco per piscine in CEMENTO Projector met 144 witte leds voor BETONNEN zwembaden Projetor com 144 LED brancos par...

Страница 2: ......

Страница 3: ...GHTS PART 2 SPECIFIC REQUIREMENTS SECTION 18 LIGHTS FOR SWIMMING POOLS AND SIMILAR APPLICATIONS The manufacturer is not responsible in any circumstances for assembly installation or start up of any electric components which have been inserted or handied at locations other than its own premises 3 INSTALLATION Never install in vertical positlon with the lamp facing downwards In order to clearly ligh...

Страница 4: ... the butt point and the conduit nut to secure on the outer side of the swimming pool 4 ASSEMBLY The floodlamp is supplied with 2 5m of cable It should be inserted through the conduit body Fig 4 leaving approximately 1 5m of cable in order to be able to remove the floodlamp to the border of the swimming pool if handing or lamp change is required Fig 1 Wind the cable in counter clockwise direction u...

Страница 5: ...e floodlamp should only operate underwater while secured to the vertical walls of the pool Never switch on the floodlamp if it is not underwater 8 SAFETY WARNINGS The people who are in charge of assembly should have the required qualificatlons for this type of work If the end cable of this light fitting is damaged it should only be replaced by the manufacturer its technical service or by a similar...

Страница 6: ... de seguridad para luminarias en especial con la norma EN 60598 2 18 LUMINARIAS PARTE 2 REGLAS PARTICULARES SECCIÓN 18 LUMINARIAS PARA PISCINAS Y USOS ANÁLOGOS El fabricante no se hace responsable en ningún caso y bajo ninguna circunstancia del montaje la instalación o la puesta en marcha de los componentes electrónicos que hayan sido introducidos o manipulados en lugares distintos a sus propias i...

Страница 7: ... de tope entre la cruceta y el liner Inserte 4 arandelas y 4 tuercas en la cara exterior de la piscina Fig 2 Coloque el pasamuros en el cuadrante superior izquierdo de la cruceta soporte según las medidas mostradas en la Fig 3 Mediante las uniones de tope y la tuerca del pasamuros asegúrela por la cara externa de la piscina 4 MONTAJE La lámpara sumergible incluye un cable de 2 5 m Debe introducirs...

Страница 8: ...le o sustitúyalas si se perciben deformaciones o muescas 6 PUESTA EN MARCHA Asegúrese de que la tensión que recibe la lámpara nunca es superior a 12 V La lámpara sumergible solo debe funcionar bajo el agua y fijada a las paredes de la piscina Nunca encienda la lámpara sumergible si no está bajo el agua 8 ADVERTENCIAS DE SEGURIDAD Los responsables del montaje deben contar con las cualificaciones ne...

Страница 9: ...é pour éclairages notamment la norme EN 60598 2 18 ÉCLAIRAGES PARTIE 2 EXIGENCES PARTICULIÈRES SECTION 18 ÉCLAIRAGES POUR PISCINES ET APPLICATIONS SIMILAIRES Le fabricant ne pourra être tenu pour responsable en aucun cas pour l assemblage l installation ou la mise en service de tout composant électrique inséré ou manipulé à des endroits autres que ses propres locaux 3 INSTALLATION Ne jamais l inst...

Страница 10: ... le corps passe murs dans le quadrant supérieur gauche du croisillon de support conformément aux mesures indiquées dans la Fig 3 Fixez le sur la partie extérieure de la piscine à l aide du joint plat et de l écrou passe murs 4 MONTAGE La lampe à faisceau large est fournie avec 2 5 m de câble Elle doit être insérée à travers le corps passe murs Fig 4 en laissant environ 1 5 m de câble afin de pouvo...

Страница 11: ...SERVICE Assurez vous que la tension reçue par l ampoule n est en aucun cas supérieure à 12 V La lampe à faisceau large devra uniquement être allumée sous l eau lorsque fixée aux parois verticales de la piscine Ne jamais allumer la lampe à faisceau large si elle ne se trouve pas sous l eau 8 AVERTISSEMENTS CONCERNANT LA SÉCURITÉ Les personnes chargées du montage doivent disposer des qualifications ...

Страница 12: ...nd insbesondere den EN 60598 2 18 Standard LICHTER TEIL 2 SPEZIFISCHE ERFORDERNISSE ABSCHNITT 18 LAMPEN FÜR SWIMMINGPOOLS UND ÄHNLICHE ANWENDUNGEN Der Hersteller ist unter keinen Umständen verantwortlich für Montage Einbau oder Inbetriebnahme von elektrischen Komponenten die außerhalb seiner eigenen Räumlichkeiten bearbeitet oder eingesetzt worden sind 3 EINBAU Niemals in senkrechter Position mit ...

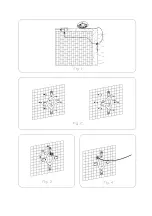
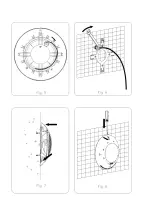
Страница 13: ...etzen An der Außenseite des Swimmingpools 4 Unterlegscheiben 4 Gegenmuttern einsetzen Abb 2 Den Leitungskörper in den oberen linken Quadranten der Kreuzkopf Montage gemäß den in Abb 3 gezeigten Abmessungen platzieren Mit der Stoßspitze und der Leitungsmutter an der Außenseite des Swimmingpools sichern 4 MONTAGE Der Scheinwerfer wird mit 2 5 m Kabel geliefert Er sollte durch den Leitungskörper eing...

Страница 14: ... permanente Verformungen oder Einkerbungen sichtbar sind 6 EINSCHALTEN Sichergehen dass die an der Lampe ankommende Spannung niemals 12 V übersteigt Der Scheinwerfer sollte nur unter Wasser funktionieren wenn er an den senkrechten Wänden des Pools gesichert ist Den Scheinwerfer niemals einschalten wenn er nicht unter Wasser ist 8 SICHERHEITSHINWEISE Die mit der Montage beauftragten Personen sollte...

Страница 15: ...proiettore rispetta gli standard internazionali di sicurezza in materia di illuminazione in particolare la norma EN 60598 2 18 ILLUMINAZIONE PARTE 2 SEZIONE 18 REQUISITI SPECIFICI ILLUMINAZIONE PER PISCINE E APPLICAZIONI SIMILARI Il produttore non si assume alcuna responsabilità per il montaggio l installazione o la messa in funzione di qualsiasi componente elettrico il cui montaggio o inserimento...

Страница 16: ... Fig 2 sul lato esterno della piscina Posizionare il corpo passamuro nel quadrante superiore sinistro della crociera di supporto rispettando le misure indicate nella Fig 3 Fissare sul lato esterno della piscina mediante la guarnizione piana e il dado passamuro 4 MONTAGGIO Il proiettore viene fornito con 2 5 m di cavo che deve essere inserito nel corpo passamuro Fig 4 lasciando all incirca 1 50 m d...

Страница 17: ...i che la tensione ricevuta dalla lampada non sia mai superiore a 12 V Il proiettore deve essere messo in funzione esclusivamente sott acqua fissato alle pareti verticali della piscina Non accendere mai il proiettore fuori dall acqua 8 AVVERTENZE DI SICUREZZA Le persone che effettuano il montaggio devono possedere la qualifica necessaria per questo tipo di lavoro Se il cavo del proiettore risulta d...

Страница 18: ...reenstemming met de internationale veiligheids standaarden voor verlichting met name de EN 60598 2 18 standaard LIGHTS PART 2 SPECIFIEKE VEREISTEN SECTIE 18 LICHTEN VOOR ZWEMBADEN EN VERGELIJKBARE TOEPASSINGEN De fabrikant is onder geen enkele omstandigheid verantwoordelijk voor de montage installatie of ingebruikname van elk van de elektrische onderdelen die worden geplaatst of toegepast op plaat...

Страница 19: ...nt is geplaatst Gebruik vier M 6x35 schroeven met vier sluitringen om de kruisbevestiging aan de binnenwand van het zwembad te bevestigen Plaats 4 stootvoegen tussen de ophanging en de wand Aan de buitenkant van het zwembad plaatst u 4 sluitringen en moeren Fig 2 Plaats de kabelhuls in de linkerbovenhoek van de kruisbevestiging in overeenstemming met de maten die u kunt zien in Fig 3 Gebruik het c...

Страница 20: ...mmen voor de schermbevestiging Fig 5 Let op Alvorens u de lamp moet aanraken verzeker u ervan dat er GEEN stroom op de onderwaterlamp staat De nieuwe lamp moet dezelfde kenmerken hebben als de lamp die bij de onderwaterlamp is meegeleverd 75W 12V halogeenlamp Om volledige waterdichtheid te garanderen maak de zetting van de lensbevestiging van de onderwaterlamp schoon of vervang deze wanneer er per...

Страница 21: ...s e à humidade com uma profundidade de imersão nominal de 2 m Este projetor cumpre as normas internacionais de segurança para aparelhos de iluminação em especial a norma EN 60598 2 18 APARELHOS DE ILUMINAÇÃO PARTE 2 REQUISITOS ESPECÍFICOS SECÇÃO 18 APARELHOS DE ILUMINAÇÃO PARA PISCINAS E APLICAÇÕES SIMILARES O fabricante não se responsabiliza em nenhum caso pela montagem instalação ou colocação em...

Страница 22: ...perior Fixe a cruzeta suporte à parede interior da piscina utilizando os quatro parafusos M 6x35 com quatro anilhas Coloque quatro juntas planas entre a cruzeta e o liner No lado externo da piscina coloque quatro anilhas e quatro porcas Fig 2 Coloque o corpo isolador de passagem no quadrante superior esquerdo da cruzeta suporte respeitando as medidas da Fig 3 Fixe o no lado externo da piscina com ...

Страница 23: ...mação permanente 6 COLOCAÇÃO EM FUNCIONAMENTO Assegure se de que a tensão que a lâmpada receba não seja nunca superior a 12 V O projetor somente deve funcionar submergido e fixado às paredes verticais da piscina Não acender nunca o projetor se não estiver submerso na água 8 ADVERTÊNCIAS DE SEGURANÇA As pessoas que se encarreguem da montagem devem ter a qualificação exigida para este tipo de trabal...

Страница 24: ......

Страница 25: ......

Страница 26: ......

Страница 27: ...hutzklasse Proteção CLASE III IPX8 TO BE USED ONLY WITH A SECURIY TRANSFORMER USO EXCLUSIVO CON UN TRANSFORMADOR DE SEGURIDAD À UTILISER AVEC UN TRANSFORMATEUR DE SÉCURITÉ MAG ALLEEN MET EEN VEILIGHEIDSTRANSFORMATOR WORDEN GEBRUIKT UTILIZZARE ESCLUSIVAMENTE CON TRASFORMATORE DI SICUREZZA EINSATZ NUR MIT EINEM SICHERHEITSTRANSFORMATOR PARA SER UTILIZADO APENAS COM UM TRANSFORMADOR DE SEGURANÇA THE ...

Страница 28: ...andled by non authorised people or III has been repaired or serviced not using original parts In cases where the defect of the Product is a result of incorrect installation or start up this guarantee will only apply when said installation or start up is included in the sales contract of the Product and has been conducted by the seller or under his responsibility ES CERTIFICADO DE GARANTÍA 1 ASPECT...

Страница 29: ...plicable selon la gamme et le modèle du Produit 2 4 Quand un calendrier sera spécifié pour le remplacement la maintenance ou le nettoyage de certaines pièces ou de certains composants du Produit la garantie sera valable uniquement lorsque ledit calendrier aura été suivi correctement 3 LIMITATIONS 3 1 La présente garantie ne sera applicable que dans les ventes réalisées aux consommateurs considéran...

Страница 30: ...dalla consegna del Prodotto all acquirente qualora quest ultimo dichiari un difetto di conformità del medesimo l acquirente dovrà attestare l origine e l esistenza del difetto dichiarato 1 8 Il presente Certificato di Garanzia non limita o preclude i diritti che corrispondano ai consumatori in virtù delle norme nazionale di carattere imperativo 2 CONDIZIONI PARTICOLARI 2 1 La presente garanzia cop...

Страница 31: ...ia o Produto não apresenta nenhum tipo de falta de conformidade 1 2 O Período de Garantia para o Produto é de dois 2 anos contados a partir da data de entrega ao comprador 1 3 Se durante o período de garantia o comprador notificar ao vendedor alguma falta de conformidade do Produto o vendedor deverá reparar ou substituir o Produto por sua conta no lugar onde considerar conveniente salvo que isso s...

Страница 32: ...á llevarlo al sitio que destinen las diferentes entidades locales 1 6 Nosotros nos haremos cargo de los costes de gestión 1 7 Los aparatos van etiquetados con el símbolo de un contenedor de basura con ruedas tachado este símbolo es indicativo de la necesaria recogida selectiva y diferenciada del resto de las basuras urbanas 1 8 Nuestros productos están diseñados y fabricados con materiales y compo...

Страница 33: ...remo carico dei costi di gestione 1 7 Gli apparecchi sono etichettati con il simbolo di un contenitore della spazzatura sbarrato questo simbolo indica la necessaria raccolta selettiva e differenziata dal resto della spazzatura urbana 1 8 I nostri prodotti sono progettati e fabbricati con materiali e componenti di elevata qualità che rispettano l ambiente che possono essere riutilizzati e riciclati...

Страница 34: ...á entregá lo ao distribuidor sem custo no acto da compra 1 5 Poderá levá lo ao local destinado pelas diferentes entidades locais 1 6 Nós assumiremos os custos de gestão 1 7 Os equipamentos são rotulados com o símbolo de um contentor de lixo com rodas barrado com uma cruz que indica a necessidade de recolha selectiva e diferenciada do resto dos lixos urbanos 1 8 Os nossos produtos são concebidos e ...

Страница 35: ...onfor ulla compatibil Europea 73 23 EuropeaEN 6059 uropea EN 550 009 3 2 2006 A1 2 3 3 2008 odukten zijn ove nbetreffendeele C RichtlijnEN 6059 RichtlijnEN 5501 009 3 2 2006 A1 2 3 3 2008 indicados cum de compatibilid Europeia73 23 EuropeiaEN 605 EuropeiaEN 550 009 3 2 2006 A1 2 3 3 2008 OOL WATE gang Ind City DECLARACIO HIARAZIONE DI mpliance with t ibility Directive 23 EEC 0598 1 EN 6059 A2 2009...

Страница 36: ...terísticas de nuestros artículos o el contenido de este documento sin previo aviso Nous nous réservons le droit de modier totalement ou en partie les caractéristiques de nos articles ou le contenu de ce document sans préavis Wir behalten uns das Recht vor die technischen Daten unserer Artikel oder den Inhalt dieses Dokumentes ohne vorherigen Hinweis ganz oder teilweise zu ändern Ci riserviamo il d...

Отзывы: