5-12
Chapter 5 Detailed Settings
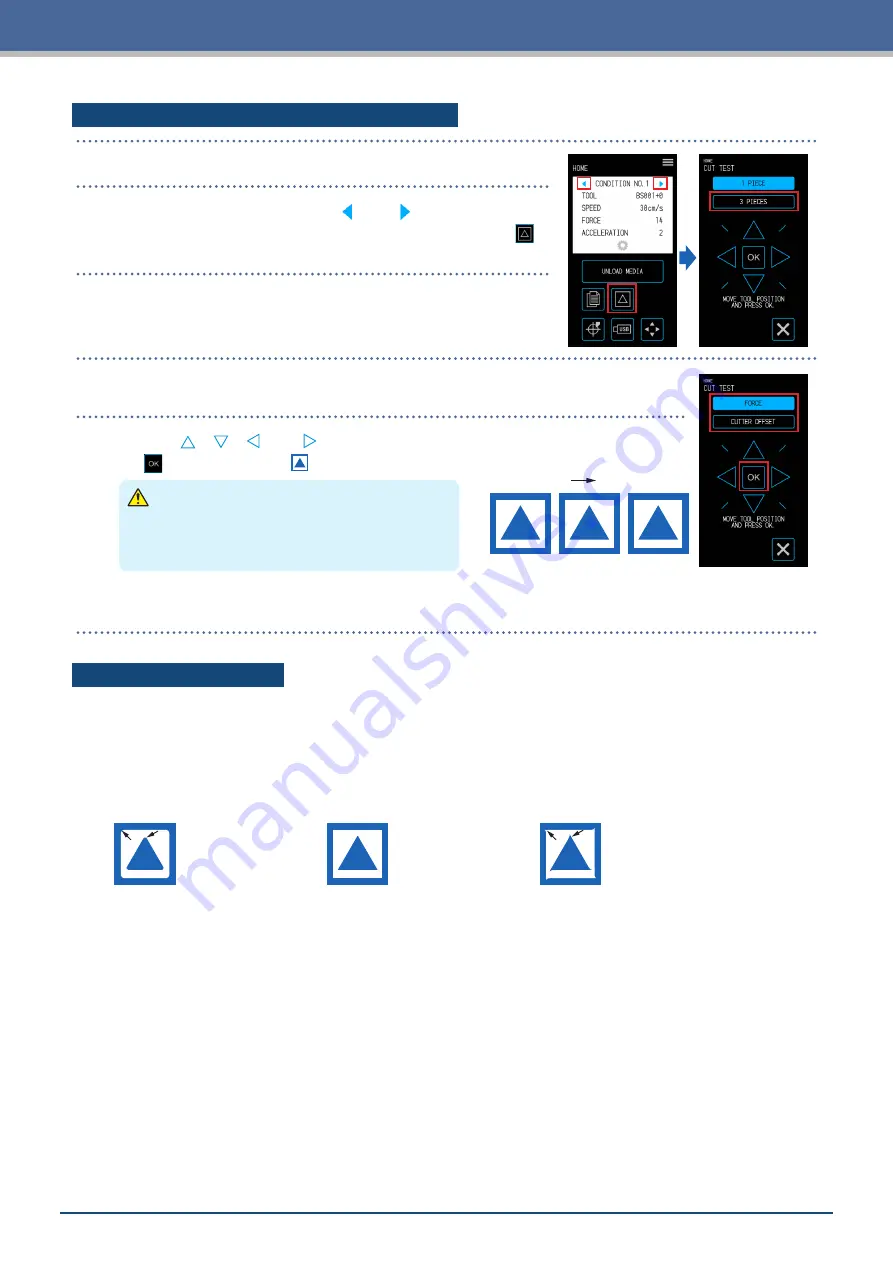
Cutting 3 Tests to include Setting Values ± 1
1.
Set the same media and tool as the actual cut.
2.
On the "HOME" screen, use the "
" and " " to select the
CONDITION NO. to perform the cut test with and touch the
(CUT TEST) to open the setting screen.
3.
Select the "3 PIECES" for the cut test.
4.
Select the item ("FORCE" or "CUTTER OFFSET") you wish to confirm.
5.
Use the " ", " ", "
" and " " to move the tool to the cut starting position and touch
the
(OK) to cut three "
" marks.
–1
0
+1
Cutting Order
CAUTION
When the "OK" is touched, the media and tool
carriage will start moving. Be careful to avoid
contact with your body or any object.
The cut test patterns will be created using setting values increased/decreased in the cutting order shown
on the right.
Confirming the Cut Test
Confirm the results of the cut test and adjust various settings so that the settings are optimal. Repeat the
process of performing cut tests and adjusting settings until settings for an excellent cut are established.
Adjusting the Offset Value
Confirm the corners of the triangle and square. If the corners are being cut excessively or not being cut
properly, adjust the offset value.
The correction amount
is insufficient.
Increase the offset value.
The offset value is
appropriate.
The correction is excessive.
Lower the offset value.
Adjusting for Kiss Cuts
Peel off the triangle and make adjustments so that a light trace of the cut is left on the backing.
If the backing has been cut all the way through, either the cutting force is too high or the blade depth is
excessive. If there are parts where a trace of the cut is not left on the backing, either the cutting force is too low
or the blade depth is insufficient.
Adjusting for Full Cuts
Make adjustments so that the media is cut all the way through.
If the media is not cut all the way through, either the cutting force is too low or the blade depth is insufficient.
Be sure to use the carrier sheet when creating full cuts.
Adjusting for Use of the Drawing Pen
Adjust the pen force so that the plot is not blurred. However, as increasing the pen force will shorten the life of
the pen, lower the pen force yet only to a degree where the plot does not become blurred.
Содержание CELITE-50
Страница 1: ...USER S MANUAL CE LITE 50 UM 151...
Страница 2: ......
Страница 10: ......
Страница 22: ......
Страница 78: ......
Страница 101: ...5 23 Chapter 5 Detailed Settings 3 Select ON or OFF for WIDTH DETECTION...
Страница 112: ......
Страница 116: ...A 4 Appendix A 3 Appearance Drawing 164 784 227 173 400 Units mm Dimension error 5 mm...
Страница 118: ...A 6 Appendix 3 PIECES Previous Page HOME SELECT FILE...
Страница 119: ...A 7 Appendix TOOL ARMS MODE 1 MODE 2 MODE 3 CHECK MARK SCAN SENSOR OFFSET ADJ Next Page MENU...
Страница 120: ...A 8 Appendix INTERFACE ADVANCE TEST Previous Page AREA MEDIA MENU...
Страница 127: ......
Страница 128: ......


