4-4
Setting Cutting Width (EXPAND)
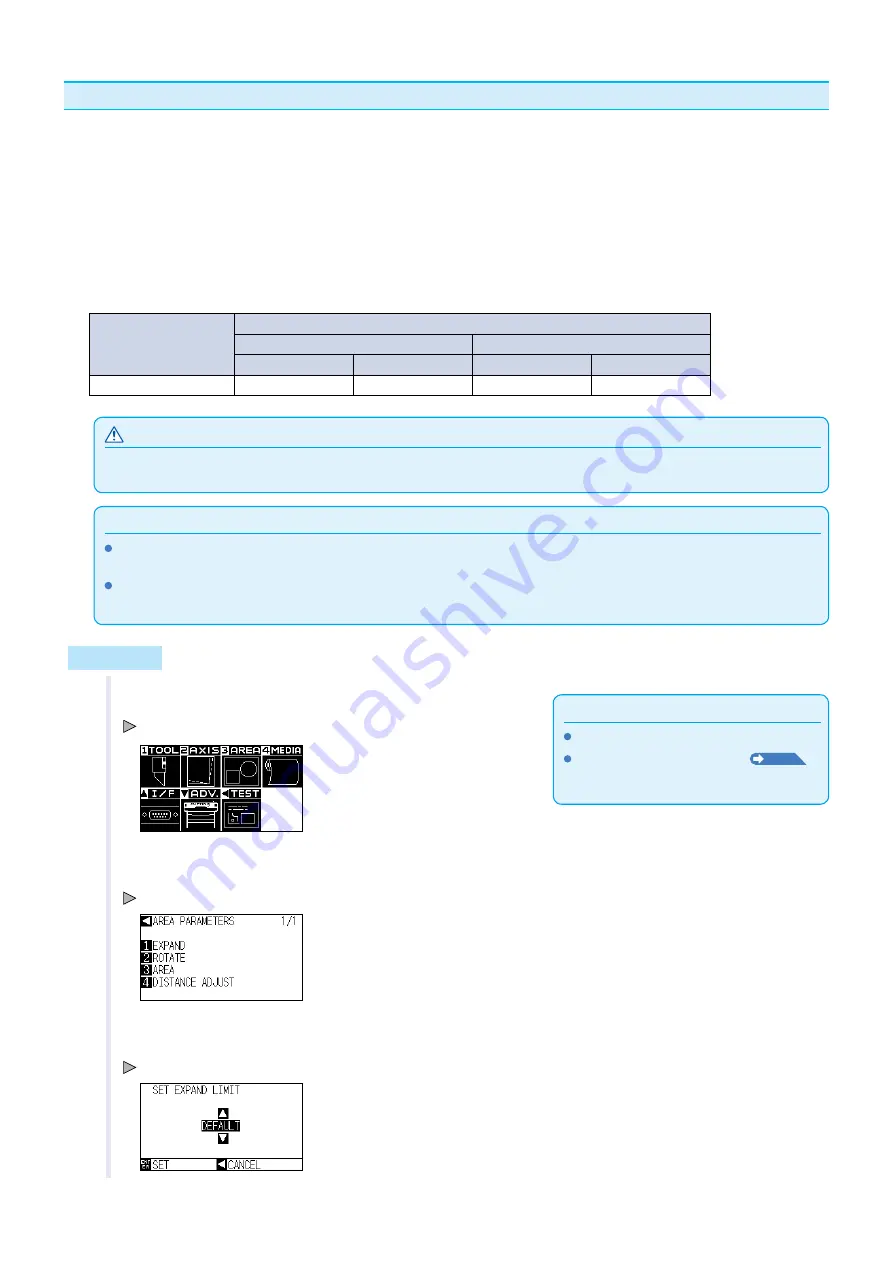
Set the cuttng wdth. It s possble to set that t wll cut to the area outsde of the push rollers, or not to cut at the
ends of the meda.
Default settng s to the nternal edge of the push rollers. It can be set up to 10 mm* outsde (postve value) or 10
mm nsde (negatve value) from the default poston. The wdth wll enlarge f the value s set to postve, and the
wdth wll decrease f the value s set to negatve. Settng wll affect both ends, resultng the total wdth change
wll be double the set value.
* The value of the left-hand margn when usng the left grt roller are as follows;
When the left grd roller s used, t does not spread to postve towards the left-hand.
Even f the value b1 and +10 s set, the left-hand margn wll be 0.
Media size
Making an expand setting
0 (Default)
+10 mm
Left-hand
Right-hand
Left-hand
Right-hand
1201 mm to 1220 mm
0
0
0
10 mm
CAUTION
Do not set the "INITIAL BLADE CONTROL POSITION" of the tool settng to "OUTSIDE" when the settng value s set to more than 8
mm. The blade mght be damaged by movng the carrage outsde the meda under ths condton.
Supplement
If the value s set to postve, t s able to cut over where the push rollers are, but the push rollers passes where t s cut, creatng a
chance of bad feedng dependng on the meda.
Set the wdth of cuttng area, and then send the cuttng data to the plotter. Cuttng data n the buffer memory wll be cleared when
cuttng area wdth s changed.
Operation
Supplement
Perform the settngs n Normal menu.
See "How to Use Control Panel"
P.2-21
for READY status.
1
Press the [PAUSE/MENU] key n READY status.
MENU screen s dsplayed.
2
Press the [3] key (AREA).
AREA PARAMETERS settng screen (1/1) s dsplayed.
3
Press the [1] key (EXPAND).
SET EXPAND LIMIT settng screen s dsplayed.
Содержание CE6000-120AP
Страница 1: ...USER S MANUAL MANUAL NO CE60AP UM 153 CUTTING PLOTTER CE6000 120AP...
Страница 200: ...12 12 Caution Message Symptom LCD Display Description W06002 When panel cutting is on copy cannot be changed...
Страница 214: ...A 4 CE6000 120AP 1575 1250 1200 Unit mm Dimensional accuracy 5mm A 3 External Dimensions...
Страница 218: ...A 8 Default screen Continued MENU screen 4 PAUSE MENU MEDIA SETTING 1 3 MEDIA SETTING 2 3 MEDIA SETTING 3 3 Continued...
Страница 219: ...A 9 INTERFACE 1 3 INTERFACE 2 3 MENU screen PAUSE MENU Continued Default screen Continued INTERFACE 3 3...
Страница 227: ......


