background image

Operation 

16

3A6393D

Spray Adjustments (Pole Spray Applicator)

NOTE:

 See the Pole Spray Applicator manual for model 

information.

General Adjustments

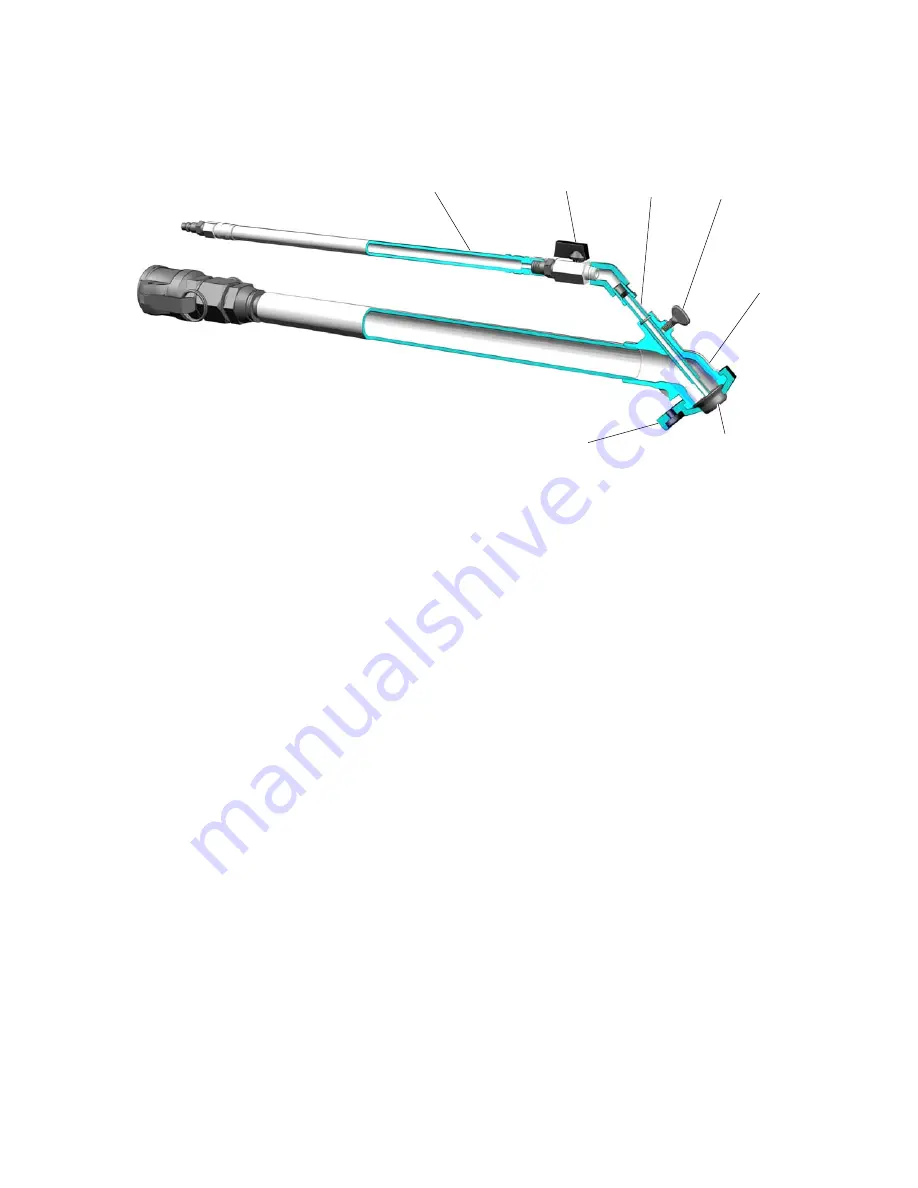
The spray pattern can be adjusted by changing:

Tip (CG) size

Air flow, use air ball valve (CB)

Air Needle (CD) position

Adjust Air Flow: 

Adjust the air assist shutoff ball valve 

(CB) for the minimum air flow necessary for a good 
pattern. Air bleeds from the applicator nozzle (CG) 
whenever the applicator air assist shutoff ball valve (CB) 
is open. Close the valve to stop the air flow, if desired. 
Otherwise, the air valve can stay open during priming. 
Air must be on prior to fluid flow.

Adjust Air Needle (CD) Position:

 Make sure the air 

needle (CD) is slightly behind the tip (CG). The general 
rule for setting the air needle position is that the air 
needle should be the same distance back from the tip as 
the size of the orifice. For example, if you have a 1/2 in. 

tip installed, the air needle should be approximately 1/2 
in. behind the tip.

NOTE:

 Installing the needle too far forward can restrict 

or completely block material flow. This can result in the 
retainer (CC) blowing off. Installing the needle too far 
back can raise the pressure behind the fluid enough to 
blow the retainer (CC) off and can cause dripping.

Air Flow Valve Adjustment

To decrease air flow, turn valve knob clockwise. To 
increase air flow, turn valve knob counterclockwise.

Check material and thin as needed to maintain the 
proper consistency. The material may thicken as it sits 
and could slow down application or affect the spray 
pattern. 

Flush and dry applicator thoroughly at the end of each 
use. Tips and retainers must be cleaned by hand.

Material Flow Adjustment

For a lighter spray pattern, adjust the air needle closer 
to the fluid nozzle and/or reduce the fluid flow.

For a heavier spray pattern, adjust the air needle farther 
back from the fluid tip and/or increase the fluid flow.

NOTE:

 Withdrawing the needle too far can force air 

pressure back into the fluid hose, which can slow 
material flow.

&$

&%

&'

&(

&)

&*

&&

WLE

Ref. Description

CA

Air Assist Air Line

CB

Air Assist Shutoff Ball Valve

CC

Rubber Tip Retainer

CD

Air Needle (adjustable position)

CE

Air Needle Retaining Screw

CF

Fluid Housing

CG

Tip (Nozzle)

Содержание ToughTek F340e

Страница 1: ...terial For professional use only Not approved for use in explosive atmospheres or hazardous locations 600 psi 4 13 MPa 41 3 bar Maximum Fluid Working Pressure See page 3 for model information and appr...

Страница 2: ...6 Spray Techniques 17 Installing Nozzle Retaining Cap 17 Pressure Relief Procedure 18 Clearing a Clogged Hose 18 Hopper Removal 19 Shutdown 19 Lifting Instructions 19 Maintenance 20 Water Exposure 20...

Страница 3: ...V 10 A 50 60 Hz 1 Phase Europe Asia Australia 25B556 Models with an air compressor require an additional dedicated 15 A circuit 120 V systems or 8 5 A circuit 230 V systems All 230 V pumps include a...

Страница 4: ...vent fire and explosion Use equipment only in well ventilated area Eliminate all ignition sources such as pilot lights cigarettes portable electric lamps and plastic drop cloths potential static spark...

Страница 5: ...in all equipment manuals Use fluids and solvents that are compatible with equipment wetted parts See Technical Specifications in all equipment manuals Read fluid and solvent manufacturer s warnings Fo...

Страница 6: ...compatibility TOXIC FLUID OR FUMES HAZARD Toxic fluids or fumes can cause serious injury or death if splashed in the eyes or on skin inhaled or swallowed Read Safety Data Sheets SDSs to know the spec...

Страница 7: ...D 3 8 0 Ref Description A Electric Motor B Pump Lower C Fluid Drain Purge Valve E Remote Control Switch F Fluid Outlet H Flow Adjustment Knob J Hopper K Over Center Latch L Control Board Status Light...

Страница 8: ...ole spray applicator pipe handle and adapter fitting The applicator ball valve 1 2 can be used to stop material flow but only after the pump has been stopped first Do NOT use the valve to stall the pu...

Страница 9: ...tting Description ON The motor will run continuously at the speed determined by the flow adjustment knob H OFF The motor will not run There is still power to the unit Remote Control The Remote Control...

Страница 10: ...e using this product GFCI outlets have a range of sensitivities Motor controllers can cause false trips of GFCI outlets If you experience issues while using this product switch to a different GFCI mod...

Страница 11: ...Seal Liquid TSL level in packing nut D Fill 1 2 full with TSL 4 Connect air supply to applicator 5 Attach hose to applicator fluid inlet and pump fluid outlet F then secure Velcro straps V around the...

Страница 12: ...b Fill the hopper with water as the material runs out and continue dispensing 7 Keep the hopper filled with water while dispensing NOTE Be prepared to decrease the flow adjustment knob H when the mate...

Страница 13: ...k flowed into the air lines while flushing this will prevent air line pack out 13 After performing the previous step at least twice drain remaining water from system a Place a drain pan beneath pump l...

Страница 14: ...material flows from applicator 8 To stop dispensing turn adjustment knob counterclockwise until it stops 9 Place the hose outlet into the hopper 10 Recirculate a few gallons of material to be sure the...

Страница 15: ...d with 1 1 2 NPT Nipple Fitting 121441 to reduce pressure drop and improve performance Spraying 1 Follow the Mix the Material procedure on page 13 2 Follow the Prime with Material procedure on page 14...

Страница 16: ...o far forward can restrict or completely block material flow This can result in the retainer CC blowing off Installing the needle too far back can raise the pressure behind the fluid enough to blow th...

Страница 17: ...and air needle position to make fine adjustments without adjusting the pump Higher pressures may cause excessive wear on the fluid pump Select a fluid tip large enough to spray at low pressure Some m...

Страница 18: ...from the pump Continue to disconnect the hose back toward the pump upstream until the hose with the clog is reached 3 To clear a clogged hose a Disconnect the clogged hose from the pump if not done al...

Страница 19: ...TE If the hopper elbow needs to be thoroughly cleaned rotate the second knob K to loosen the clamp between the elbow and the hopper Remove and clean the elbow NOTE To re install the hopper follow the...

Страница 20: ...luid drain purge valve for proper operation DAILY Check level of Throat Seal Liquid TSL in displacement pump packing nut wet cup Fill nut 1 2 full with TSL Maintain TSL level to help prevent material...

Страница 21: ...ial leaks and runs over the side of the wet cup Loose wet cup Tighten wet cup enough to stop leakage Throat packings worn or damaged Replace packings Fluid delivery is low Applicator tip is dirty or c...

Страница 22: ...Hose is packed out with dry or Reverse hose and try to push out bad material cured material Reverse hose and try to push out bad material Some materials may need only 1 in inner diameter fluid line a...

Страница 23: ...orrect the cause of overheating Keep the sprayer in a cooler location with good ventilation Make sure the motor air intake is not blocked If the sprayer still does not run contact your local distribut...

Страница 24: ...and inspect for damage at the connectors 4 Inspect the sensor for water If the sensor is wet let it dry for 24 hours 5 Re install the sensor motor control connections and shroud 6 Turn power ON If the...

Страница 25: ...electrical power 2 Open the motor electrical cover to access the terminals 3 Remove one wire from the capacitor to isolate the capacitor from the other circuitry 4 Measure the capacitance between the...

Страница 26: ...pump lower 4 Remove the bottom tool less clamp and inlet check valve assembly from the pump lower 5 Push up the retaining spring 5a and push out the pump pin 5b The pump pin can be pushed out towards...

Страница 27: ...r on page 26 For a list of available pump lower kits see the list on the following page WL D Apply thread locker sealant to threads Torque to 100 10 ft lb 135 5 1 55 N m Do not torque 305 307 and 310...

Страница 28: ...STON retainer 1 311 289189 O RING buna 3 48 in dia 1 312 17V181 O RING buna 2 11 in dia 1 313 17W620 SEAT inlet lapped 1 314 16W494 BALL sst 1 75 in dia 3 pack 1 315 17W621 STOP cage inlet 1 316 17W62...

Страница 29: ...Parts 3A6393D 29 Parts F340e Systems WL D...

Страница 30: ...table 340e 1 1 1 1 1 57 17J707 HOPPER F340e with cover 1 1 1 1 1 58 BRACKET 340e painted hopper 1 1 1 1 1 59 SCREW button head 4 4 4 4 4 60 100731 WASHER 8 8 8 8 8 61 101566 NUT lock 4 4 4 4 4 62 17G3...

Страница 31: ...from switch box 10 into connector J6 before securing the cover Install table tie 72 on the harness inside module 6 neat grommet 6 Cut grommet 9 through on one side before installing the harness from s...

Страница 32: ...6 19 SHIELD motor painted 1 1 1 1 1 21 119250 SCREW shoulder 2 2 2 2 2 22 276980 GROMMET cover 2 2 2 2 2 23 119975 GRIP vinyl gray 1 25 in 2 2 2 2 2 24 287395 ROD connecting 5900 1 1 1 1 1 25 119778...

Страница 33: ...nylock 5 16 7 4 4 7 7 48 107251 SCREW mach pnh 4 4 4 49 113505 NUT keps hex hd 4 4 4 67 17W633 CLAMP over center 3 in 2 2 2 2 2 68 17Y655 BOOT elbow rubber long 1 1 1 1 1 75 195551 RETAINER plug adapt...

Страница 34: ...Parts 34 3A6393D Driver and Motor WL E H J H N P E K P F I 25B558 Torque to 25 5 ft lb 33 9 6 7 N m Torque to 190 210 in lb 21 24 N m Apply lubricant to all teeth 6 21 23...

Страница 35: ...7m 116192 WASHER thrust 1 17k 114672 WASHER thrust 1 18 111800 SCREW cap hex hd 6 19 SHIELD motor painted 1 21 119250 SCREW shoulder 2 22 276980 GROMMET cover 2 24 287395 ROD connecting 5900 1 25 1197...

Страница 36: ...mp 1 202 COVER control ultra std 1 203 116167 KNOB potentiometer 1 204 256219 POTENTIOMETER assembly 1 205 15H064 CORD power 1 206 15D527 SWITCH rocker 240V 1 207 16T547 ADAPTER cord 1 208 COIL filter...

Страница 37: ...Parts 3A6393D 37 Compressor Kit 25A930 120 VAC Compressor Kit Kit 25A931 240 VAC Compressor Kit WL E 9 Tighten fittings one full turn past hand tight 1...

Страница 38: ...mach x rec panhd 8 14 127278 NUT keps hex 8 15 151395 WASHER flat 8 16 SCREW flge serrated 10 24 x 0 5 8 17 115942 NUT hex flange head 2 18 110996 NUT hex flange head 3 19 HARNESS F340E compressor 1 2...

Страница 39: ...fitting attach on applicator before fluid housing for added spray angles 17G554 Kit remote switch 340e 17W829 Kit remote switch extension cord 100 ft 114271 Strap retaining 240296 Kit retaining strap...

Страница 40: ...707 Kit 340e hopper with cover hopper and cover 17J709 Kit 340e hopper bracket hopper bracket 17J812 Kit 340e stop bracket adjustable stop bracket 17J710 Kit 340e adjustable latch adjustable latch 17J...

Страница 41: ...Dimensions 3A6393D 41 Dimensions WL D 39 4 in 100 cm 46 3 in 118 cm 24 0 in 61 cm 26 0 in 66 cm...

Страница 42: ...uminum solvent resistant o rings Inlet Outlet Sizes Fluid Inlet Size 3 in Fluid Outlet Size 1 5 in npt f with 1 5 in male camlock Hose Requirements Minimum Pressure 600 psi 4 1 MPa 41 Bar Minimum Hose...

Страница 43: ...Technical Specifications 3A6393D 43...

Страница 44: ...material or workmanship repairs will be made at a reasonable charge which charges may include the costs of parts labor and transportation THIS WARRANTY IS EXCLUSIVE AND IS IN LIEU OF ANY OTHER WARRANT...

Отзывы: