background image

Parts 

40

309832D

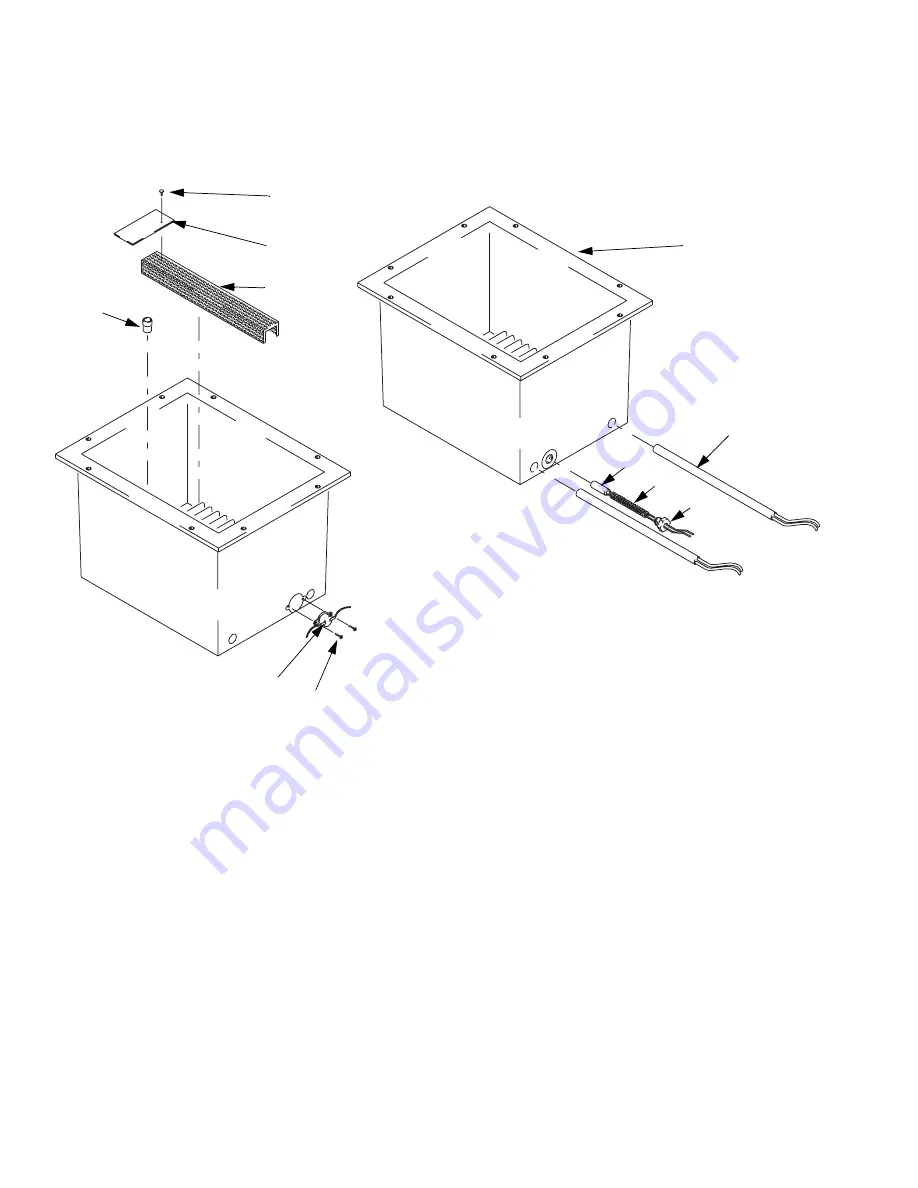
Tank assembly

Ref. 
No.

Part No. Description

Qty.

42

CASTING

1

43

118173 HEATER, tank; 115V

2

118174 HEATER, tank; 230V

2

44

118209 THERMISTOR ASSY. (includes 45 

and 46)

1

45

SPRING

1

46

NUT, retainer

1

47

SWTICH ASSY., over temp.

1

48

SCREW, cap #6-32 x 1/2 in.

2

49

FITTING, #14 tank insert

1

50

118211 SCREEN, tank filter; includes items 

51 and 52.

1

51

PLATE, deflector

1

52

RIVET, pop; 1/8 x 1/8 in.

1

7$1.%$&.

7$1.)5217

49

42

43

44

46

45

48

51

52

ti5396a

47

50

Содержание THERM-O-FLOW T7 Series

Страница 1: ... melting and pumping non explosive hot melt thermoplastic adhesives Not recommended for water based curable or solvent based adhesive Model 234251 115 VAC Model 234252 230 VAC 300 psi 2 0 MPa 20 6 bar Maximum Working Pressure Important Safety Instructions Read all warnings and instructions in this manual Save these instructions See page 2 for table of contents ...

Страница 2: ...ng pump 29 Replacing pressure adjuster 31 Replacing fluid outlet fittings 33 Replacing motor control board fuse 118321 33 Replacing over temperature switch assembly 34 Replacing tank heaters and thermistor assembly 35 Parts 36 Housing assembly 36 Motor pump to frame and tank assembly 38 Tank assembly 40 Pump and pressure adjuster assembly 42 Schematics 44 Front panel harness 44 Base harness 45 Bas...

Страница 3: ...uipment manuals Read fluid and solvent manufacturer s warnings Check equipment daily Repair or replace worn or damaged parts immediately Do not alter or modify equipment For professional use only Use equipment only for its intended purpose Call your Graco distributor for information Route hoses and cables away from traffic areas sharp edges moving parts and hot surfaces Do not use hoses to pull eq...

Страница 4: ...damage to the pump and or motor with mate rial that is too viscous or solid operation of the pump motor is inhibited until the tank reaches approximately 90 of the selected temperature The pump and motor are protected by a fuse that blows if a stall or overload condition occurs See Repair starting on page 23 for replacement instructions Auxiliary Input Connection One auxiliary connection is availa...

Страница 5: ...ion EC 40 B 4 event pattern timer for automatic appli cation Air Saver Control Unit C for spray or swirl pat tern applications Adjusts and regulates air to the applicator Hose Part No Extrusion Spray Swirl Application Length VAC 117852 Extrusion 4 ft 1 2 m 115 117853 Extrusion 6 ft 1 8 m 115 117854 Extrusion 8 ft 2 4 m 115 117855 Extrusion 10 ft 3 m 115 117856 Extrusion 12 ft 3 6 m 115 117857 Extr...

Страница 6: ...pplication C Air Controller required for airspray and swirl application D EG Applicator E VEA Applicator F AG Applicator G Handgun Applicator H COM PAK Applicator J Fluid Hose K Hose Electrical Connector L Timer to Tank Power Cord FIG 2 Typical Installation D F H E G B A L J K C ...

Страница 7: ...t Down Pump Function Toggle Loop Select On Off Pump Functions Actual Temperature Over Temperature Error Open Sensor Error Range Indicator Pump Status Pump Speed Increment Decrement Pump Speed Pump Indicator Standby On Off Status Standby Toggle Set Temperature Set Temperature Increment Decrement ...

Страница 8: ...ated For automatic application the pump will run when timer is activated CRAWL Pump is at a constant slow turning velocity keeping constant pressure from the pump to the hose and applicator When applicator is actuated the pump switches to cycle setting When applicator is off the pump switches back to crawl setting RUN Pump is always on Pump Functions Shows GREEN when ready Shows RED when the tank ...

Страница 9: ...pump speed Pump Speed Indicator Shows the current level of pump speed Lights are GREEN to show speed level The more lights are shown the faster the pump is running Pump Control On Off Turns pump on or off Standby Status Shows GREEN when Standby Toggle is actuated Standby Toggle Starts cooling the tank hoses and applicators to approxi mately 75 of the set point Set Temperature Standby Timer Shows t...

Страница 10: ...nk Mount tank where hose fittings are accessible from the bottom of the tank with wrenches Floor mounting stand 118089 is available FIG 4 T7 connections and power supply Key M Auxiliary Bypass Connection N Power Cord not shown P Fluid Outlet Q Pressure Adjuster R On Off Power Switch S Hose Electrical Receptacle shown underneath cover Q R S P M N ...

Страница 11: ... Warn ings page 3 WARNING Wait until equipment fluid has cooled completely See Warnings page 3 1 Raise or tilt the melt unit backward to access the fluid outlet fittings 2 Connect hose J to fluid outlet fitting P Tighten with 11 16 in mm opened end wrench To prevent leakage make sure hose is seated securely on inlet fitting To insure proper seating of threads make sure inlet threads are clean See ...

Страница 12: ...and controllers See EC 20 40 timer manual 310814 for instruction See appropriate applicator manual for air saver control instructions 310801 Manual Applicator manual 310803 Automatic Applicator manual Pattern controllers supplied by Graco come with termi nated cables to simplify connection to the melt system A cable with one end unterminated 118243 is available to allow connection of a customer su...

Страница 13: ...butyls and polyolefins with flash points above 450 F 232 C Not recommended for water curable or solvent based adhesive Do not use flammable material or material not compatible with the spec ifications of this equipment Failure to follow this instruction can cause burn injury to operators and damage to equipment 1 Make sure melt tank has been flushed and cleaned See Flushing page 14 If material to ...

Страница 14: ...ilure to follow this instruction can cause injury to operators and damage to equipment Flush before changing materials Flush at the lowest pressure possible Check connectors for leaks and tighten as necessary Flush with purging compound 118090 1 Make sure material in tank is completely dispensed 2 Follow Pressure Relief Procedure page 14 3 Remove nozzle and clean with compound 4 From inside tank p...

Страница 15: ...40 to 315 F 116 to 157 C 270 to 345 F 132 to 174 C 5 280 to 355 F 138 to 179 C 310 to 385 F 154 to 196 C 6 320 to 395 F 160 to 202 C 350 to 425 F 177 to 218 C 1 Use the loop select up down to select tank The LED to the left of the device should show GREEN 2 Once the tank device is selected and LED is GREEN press the loop select up four times The range indicator digit will begin flashing 3 Press th...

Страница 16: ...selected range See Temperature Range Chart page 15 The pump will not operate until the tank is within 90 of set temperature The tank is at temperature when all device LEDs are flashing GREEN 1 Press the pump on off ON 2 To set the pump to cycle crawl or run press the pump function toggle For pump function description see Front panel display chart on page 8 The LEDs will show RED when tank is not r...

Страница 17: ...tically resume to previous set temperatures and heating con tinues 1 Press the standby toggle 2 Press the loop select up down to select appro priate auxiliary channel 3 To activate or deactivate selected auxiliary press the loop select on off LEDs to the left of the selection will show GREEN if on 4 To resume operation press the standby toggle 1 Press the standby toggle 2 Press temperature increme...

Страница 18: ...rols see Adjusting panel con trols page 15 2 When device indicators are flashing green set pump function See Setting pump control and speed page 16 The normal mode of pump operation is the cycle mode When setting pump speed for DC motors set the pump speed to the lowest necessary speed This will maintain operating fluid pres sure and reduce the potential for glue degrada tion due to shearing in th...

Страница 19: ... close to or is empty of material See Flush ing page 14 1 Inspect the melt tank for foreign materials and or charring of the adhesive Wipe off all excess adhe sives from all surfaces with purging compound 118090 2 Check the hoses applicator heads and nozzles for wear and ensure integrity of all electrical connec tions 3 Verify the hose is being properly supported so it is not stressed during use T...

Страница 20: ...or hose Check hose and applicator electrical connections Make sure pins are lined up correctly and are secure Check tank thermistor assembly with ohmmeter which should read approximately 100 000 ohms at room temperature Replace if necessary see Replacing thermistor assem bly page 33 Check hose thermistor assembly with ohmmeter Replace hose See Replacing hose page 23 Check applicator thermistor ass...

Страница 21: ...nect hose see Con necting hose page 11 Tank temperature too low Wait for tank to heat up properly Hose will not heat completely until tank reaches 65 of set temperature Improper voltage rating hose A 230 VAC hose will connect to a 115 VAC receptacle Make sure voltage rating on hose matches the voltage rating on the tank Pins not aligned correctly at hose to tank connection Check connection for pro...

Страница 22: ... material manufacturer s instruc tion and follow Adjusting panel controls page 15 Increase orifice size Gun nozzle plugged Clean nozzle or replace See appro priate applicator manual Hose is kinked or bent Check for kinks in hose replace if damaged See Replacing hose page 23 Pump damaged Replace pump see Replacing pump page 28 Material leaks from hose connection Threads at hose connection not seate...

Страница 23: ...hock disconnect power cord and turn the on off switch to OFF See Warnings page 3 WARNING Wait until equipment fluid has cooled completely Read Warnings page 3 WARNING To prevent hose damage do not flex hose when cold When hot the hoses have a minimum bend radius of 16 in 40 64 cm 115 VAC tanks can support up to two 16 ft 4 8 m of total hose 230 VAC tanks can support up to two 24 ft 7 3 m of total ...

Страница 24: ...opriate applicator manual for instructions S R K P J 5 Remove bayonet ring from the electrical connector 6 See FIG 5 Pull electrical connector K from the hose electrical receptacle S 7 See FIG 5 Using an 11 16 in wrench remove hose J from the fluid outlet fitting P 8 Replace hose To reconnect hose see Connecting Hose page 11 ...

Страница 25: ...ected to the auxil iary bypass connector 3 Using 3 32 in hex wrench remove screws 17 from front panel shield 16 4 Using a 5 16 in socket wrench remove screws and washers 12 13 from underneath front panel 15 16 17 12 13 15 5 Pull front panel 15 from tank Disconnect 9 pin X 12 pin Y and ground wire Z connections Y X Z 15 ...

Страница 26: ... ohmmeter shows infinite resistance fuses are bad Use a pliers to remove bad fuses and replace 4 Reconnect fuse board to front panel Line up pins ONNECTOR Hose 1 Hose 2 Head 1 Head 2 1 Using a 3 32 in hex wrench remove screws 17 and remove the front panel shield 16 2 Remove front panel See Replacing front panel page 25 3 Using a phillips screw driver remove four screws 11 from the cover Pull cover...

Страница 27: ...ont panel page 25 2 Remove tank cover see Removing tank cover page 26 3 Remove two wire spade connections and ground wire from tank to motor 4 Turn tank over to access the motor 5 From bottom of tank remove screws and washers 23 24 25 Pull motor 34 from tank 6 Reassemble in reverse order 25 Tank Bottom 24 23 34 ...

Страница 28: ... motor 34 away from bottom of tank 25 Tank Bottom 24 23 34 3 See FIG 6 Using a 1 8 in hex wrench remove motor side set screw 35f Slide motor side coupler 35a from motor shaft FIG 6 Coupling Assembly 118158 4 See FIG 6 Using a 1 8 in hex wrench remove pump side set screw 35f Slide pump side coupler 35e from pump 5 See FIG 6 Disassemble coupler assembly 35a f inspect for damage and replace 6 See FIG...

Страница 29: ...ot loosen if material in pump has cooled Using a heat gun heat the pump assembly before repairing Wear gloves when han dling heated parts When replacing o ring seals lubricate with Krytox lubricant 1 Turn tank over to access the pump 2 Using a 1 4 in hex wrench remove cap screws 31 Pull pump 30 from tank 3 See FIG 7 Remove three cap screws 58 and pull off drive side plate 64 4 See FIG 7 Remove cen...

Страница 30: ...g 56 From housing 56 remove shaft seal 55 and thrust washer 57 Inspect for damage and replace 8 Remove o ring 61 Inspect for damage and replace 9 Remove drive gear 67 10 Remove pump shaft key 66 from shaft 59 11 Remove pin 72 and slave gear 70 12 Push drive shaft 59 through top of 64 13 Reassemble pump in reverse order Make sure to insert pump shaft from the top of drive side plate 64 ...

Страница 31: ...ure adjuster assembly 1 Turn on off switch OFF Unplug tank unit 2 Using a 1 in wrench remove pressure adjuster body 86 79 81 82 85 87 88 86 84 83 80 78 3 Using a 3 32 in hex wrench loosen set screw 87 Loosen and remove knob 88 4 From the body 86 remove shaft 82 u cup 84 and o ring 85 Inspect for damage and replace 5 From shaft 82 remove o ring 83 Inspect for damage and replace 6 From pressure adju...

Страница 32: ...emble u cup 84 onto shaft 82 Make sure lips face towards tank 3 Lubricate and assemble o ring 85 into body 86 Assembly shaft 82 onto body 86 4 Assemble knob 88 onto shaft 82 Tighten screw 87 on knob 88 79 81 82 85 87 88 86 84 83 80 78 5 Lubricate and assemble o ring 78 onto seat 79 Using a 3 16 in hex wrench thread seat 79 into pressure adjuster insert 6 Place spring 81 into poppet 80 Rest poppet ...

Страница 33: ...letely Read Warnings page 3 1 Using an 11 16 in wrench remove fitting 33 and two o rings 32 from pump assembly 30 Inspect for damage and replace Lubricate with Krytox lubri cant 2 From bottom of pump assembly 30 remove and replace remaining o rings 32 Lubricate with Kry tox lubricant 32 32 33 30 1 Turn on off switch to OFF Unplug tank unit 2 Remove tank cover see Removing tank cover page 25 3 From...

Страница 34: ...e to step 4 FIG 10 Power supply 4 See FIG 10 On the back of the tank remove two 8 32 x 1 2 in screws FF on the power supply FF AA BB 5 From top of power supply disconnect motor wire harness Pull power supply away from the tank 6 Cut tape around insulation and remove 7 Remove screws 48 and pull switch assembly 47 from tank Disconnect switch assembly wires from powers supply board Check switch assem...

Страница 35: ...front of insulation 4 Pull back insulation to show heaters 5 Pull out heaters 43 and disconnect wires TANK FRONT 43 6 To replace thermistor assembly disconnect ther mistor wire connection 7 Using a 5 8 box wrench slide thermistor wires through wrench and place wrench around retaining nut 46 Loosen and remove thermistor assembly 44 45 46 inspect for damage and replace 8 Reassemble new thermistor in...

Страница 36: ...Parts 36 309832D Parts Housing assembly 1 2 3 4 5 7 6 8 ti5398a 8 10 9 13 12 11 14 15 16 17 ...

Страница 37: ... Part No Description Qty 1 118195 HOUSING 1 2 COVER 1 3 KNOB 2 4 SCREW 1 4 20 x 3 8 in 8 5 SPRING 4 6 SHIELD cover 1 7 WASHER flat 8 s s 4 8 RIVET s s 43 4 9 GASKET long 2 10 GASKET short 2 11 SCREW ph 10 x 1 2 taping 4 12 SCREW hex 10 32 x 1 2 in 2 13 WASHER lock 10 split 2 14 NUT hex 10 32 1 15 118196 ELEC ASSY digital F and C 115V 1 118197 ELEC ASSY digital F and C 230V 1 16 118201 SHIELD front...

Страница 38: ...Parts 38 309832D Motor pump to frame and tank assembly 7 1 27720 35e 35a 35b 35d 28 27 26 24 25 23 21 18 21 19 ti5197a 35c 29 22 35f 34 23 24 25 31 30 32 33 32 35 21 21 21 ...

Страница 39: ...1 2 in 5 24 WASHER lock 10 split 5 25 WASHER flat 10 5 26 WASHER insulating 1 4 x 3 4 in 4 27 STRAP ground 1 28 WASHER lock 10 internal tooth 1 29 NUT hex 10 32 1 30 118439 PUMP ASSEMBLY see page 42 1 31 SCREW cap 5 16 18 x 3 1 4 in 2 32 O RING 4 33 FITTING JIC conn straight 2 34 118203 MOTOR 90V 115 VAC 1 118204 MOTOR 180V 230 VAC 1 35 118158 HUB ASSEMBLY coupler includes items 35a f 1 35a HUB mo...

Страница 40: ...30V 2 44 118209 THERMISTOR ASSY includes 45 and 46 1 45 SPRING 1 46 NUT retainer 1 47 SWTICH ASSY over temp 1 48 SCREW cap 6 32 x 1 2 in 2 49 FITTING 14 tank insert 1 50 118211 SCREEN tank filter includes items 51 and 52 1 51 PLATE deflector 1 52 RIVET pop 1 8 x 1 8 in 1 7 1 7 1 5217 49 42 43 44 46 45 48 51 52 ti5396a 47 50 ...

Страница 41: ...Parts 309832D 41 ...

Страница 42: ...djuster assembly Pump assembly 118439 includes items 53 79 Pressure adjuster assembly 118180 includes items 80 88 58 65 66 68 69 70 65 79 61 80 62 82 64 84 67 86 71 88 TI5395a 78 77 75 74 73 76 75 74 81 83 85 87 72 63 60 59 57 56 55 54 53 ...

Страница 43: ... 1 56 HOUSING pump seal 1 57 WASHER thrust 1 58 SCREW cap 1 4 20 x 2 3 59 SHAFT pump 1 60 PIN dowel 3 16 diam x 2 in 2 61 O RING 1 62 BUSHING 1 63 PIN spring 2 64 PLATE drive side 1 65 O RING 2 66 KEY shaft 1 67 GEAR drive 1 68 BUSING 1 69 BUSHING 1 70 GEAR slave 1 71 PLATE center section 1 72 PIN dowel 1 2 x 2 diameter 1 73 BUSHING 1 74 PLUG hollow hex 2 75 O RING 2 76 PLATE pump side 1 77 PLUG 1...

Страница 44: ...9 7 4 7 4 7 4 2 7 4 2 2 9 2 7 4 3 4 2 9 7 4 2 7 4 2 7 4 2 3 4 3 4 9 9 2 2 2 2 7 4 9 7 4 5 7 4 7 4 9 6 2 9 5 2 2 7 4 2 7 4 5 6 7 4 3 4 7 4 7 4 2 7 4 2 7 4 2 7 4 2 2 2 2 2 3 4 3 4 9 9 7 4 6 2 9 5 2 2 7 4 6 7 4 3 4 7 4 7 4 5 7 4 7 4 9 7 4 2 7 4 2 7 4 7 4 7 4 9 7 4 2 7 4 5 5 5 5 3 4 3 4 2 2 2 6 2 2 2 5 5 5 3 4 3 4 6 2 0 7 4 315 2 0 8 0 4 490 ...

Страница 45: ...Schematics 309832D 45 Base harness 6 4 0 7 2 350 9 2 9 42 0 2 5 2 7 4 0 0 0 7 2 342 54 7 4 42 0 6 4 2 2 7 5 4 4 5 2 7 0 8 4 2 42 6 4 33 9 2 2 7 ...

Страница 46: ...Schematics 46 309832D Base wiring ...

Страница 47: ...Dimensions 309832D 47 Dimensions MOUNTING HOLES LQ PP LQ PP LQ PP LQ PP LQ PP LQ PP LQ PP LQ PP LQ PP LQ PP LQ PP HOLE 1 2 HOLE 2 MOUNTING HOLES LQ PP LQ PP ...

Страница 48: ...rs Power consumption 115V 2300 watts max Melt unit 900 watts 230V 4600 watts max Melt unit 1700 watts Power requirements single phase 115 VAC 50 60 Hz 230 VAC 50 60 Hz Circuit breaker rating 20 amp Empty weight 51 lb 23 1 kg Pump pressure 300 psi 2 0 MPa 20 6 bar Hoses 115 VAC For 1 hose and 1 applicator up to 30 ft 9 1 m total hose For 2 hoses and 2 applicators up to 24 ft 7 3 m total hose 230 VA...

Страница 49: ...Technical Data 309832D 49 ...

Страница 50: ...manship repairs will be made at a reasonable charge which charges may include the costs of parts labor and transportation THIS WARRANTY IS EXCLUSIVE AND IS IN LIEU OF ANY OTHER WARRANTIES EXPRESS OR IMPLIED INCLUDING BUT NOT LIMITED TO WARRANTY OF MERCHANTABILITY OR WARRANTY OF FITNESS FOR A PARTICULAR PURPOSE Graco s sole obligation and buyer s sole remedy for any breach of warranty shall be as s...

Отзывы: