background image

Troubleshooting

333347F

55

MZLP Troubleshooting 

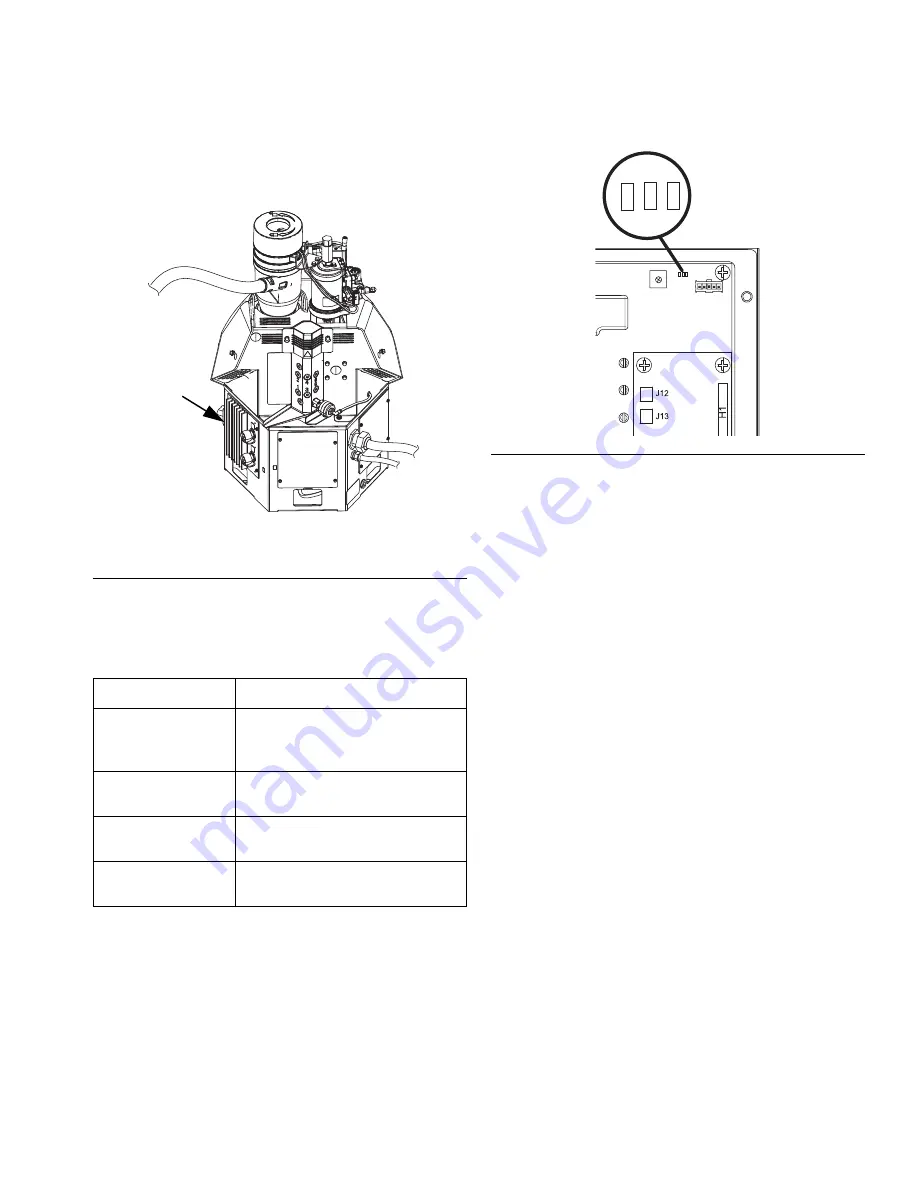
NOTE: 

The MZLP LED is located on the inside of the 

electrical enclosure. To view, remove the electrical 
enclosure front access door. 


F

IG

. 29: MZLP LED Signals

Signal

Description

Green On

MZLP is powered up and input 
voltage is within operating con-
ditions.

Yellow On

Internal communication in pro-
cess

Red Solid

MZLP failure. See troubleshoot-
ing table.

Red Flashing

Software update in process or 
missing software.

WLD

MZLP

F

IG

. 30: MZLP Diagnostic LED Location

J3

1

456

7

89 23

0

Green

Y

ellow

Red

ti20348a

Содержание 24T918

Страница 1: ...losive atmospheres or hazardous locations 1200 psi 8 3 MPa 83 bar Maximum Working Pressure 400 F 204 C Maximum Fluid Operating Temperature 100 psi 0 7 MPa 7 bar Maximum Air Inlet Pressure Important Safety Instructions Read all warnings and instructions in this manual and in the applicator and hose manu als Save all instructions WL D 9902471 Certified to CAN CSA C22 2 No 88 Conforms to ANSI UL 499 ...

Страница 2: ...ical Schematics 78 Incoming Power 78 Cable Identification 78 System 79 480VAC Transformer Option 80 Typical Hose Applicator Wiring 80 2nd and 3rd MZLP Options 81 Air Schematic 82 Parts 83 InvisiPac Systems 83 Electrical Enclosure 89 Transformer Assemblies 92 Melter and Pump Assembly 93 Air Motor 24V558 95 Feed System Shaker and Tube 24V507 96 Air Controls Assembly 97 Pressure Relief Valve 24P856 9...

Страница 3: ...5 16 in driver 7 16 in socket 7 8 in deep well socket 1 in socket 13 mm socket 10 mm socket 1 2 in ratchet Side cutter Phillips head screwdriver Flat head screwdriver Multimeter Tubing cutter Part Description 3A2805 InvisiPac GS35 Hot Melt Applicator Instruc tions Parts 332072 InvisiPac Heated Hose Instructions Parts 333348 HM50 Fuse Kit Instructions Parts 333349 InvisiPac 480V Transformer Upgrade...

Страница 4: ...eutral 3 wire Neutral and PE 50 60 Hz 16A 24T919 4 200 240 VAC 1Φ PE 1 Phase 200 240 VAC 2 wire and PE 50 60 Hz 40A 200 240 VAC Δ 3Φ PE 3 Phase without Neutral 200 240 VAC Line to Line 3 wire and PE 50 60 Hz 27A 350 415 VAC Y 3Φ Neutral PE 3 Phase with Neutral 350 415 VAC Line to Line 200 240 VAC Line to Neutral 3 wire Neutral and PE 50 60 Hz 16A 24T920 6 200 240 VAC 1Φ PE 1 Phase 200 240 VAC 2 wi...

Страница 5: ...C Line to Neutral 3 wire Neutral and PE 50 60 Hz 16A 24V424 4 200 240 VAC 1Φ PE 1 Phase 200 240VAC 2 wire and PE 50 60 Hz 40A 200 240 VAC Δ 3Φ PE 3 Phase without Neutral 200 240VAC 3 wire and PE 50 60 Hz 27A 350 415 VAC Y 3Φ Neutral PE 3 Phase with Neutral 350 415 VAC Line to Line 200 240 VAC Line to Neutral 3 wire Neutral and PE 50 60 Hz 16A 24V425 6 200 240 VAC 1Φ PE 1 Phase 200 240VAC 2 wire an...

Страница 6: ...ine to Line 3 wire and PE 50 60 Hz 17A 24V428 6 335 400 VAC 3Φ PE 3 Phase without Neutral 335 400 VAC Line to Line 3 wire and PE 50 60 Hz 17A Model Channels Voltage Φ Type Description Frequency Max Amps 24V198 2 335 400 VAC 3Φ PE 3 Phase without Neutral 335 400 VAC Line to Line 3 wire and PE 50 60 Hz 17A 24V199 4 335 400 VAC 3Φ PE 3 Phase without Neutral 335 400 VAC Line to Line 3 wire and PE 50 6...

Страница 7: ...ine to Line 3 wire and PE 50 60 Hz 14A 24V431 6 400 480 VAC 3Φ PE 3 Phase without Neutral 400 480 VAC Line to Line 3 wire and PE 50 60 Hz 14A Model Channels Voltage Φ Type Description Frequency Max Amps 24V201 2 400 480 VAC 3Φ PE 3 Phase without Neutral 400 480 VAC Line to Line 3 wire and PE 50 60 Hz 14A 24V202 4 400 480 VAC 3Φ PE 3 Phase without Neutral 400 480 VAC Line to Line 3 wire and PE 50 6...

Страница 8: ...and fluid that s heated can become very hot during operation To avoid severe burns Do not touch hot fluid or equipment SKIN INJECTION HAZARD High pressure fluid from dispensing device hose leaks or ruptured components will pierce skin This may look like just a cut but it is a serious injury that can result in amputation Get immediate surgical treatment Do not point dispensing device at anyone or a...

Страница 9: ...ffic areas sharp edges moving parts and hot surfaces Do not kink or over bend hoses or use hoses to pull equipment Keep children and animals away from work area Comply with all applicable safety regulations FIRE AND EXPLOSION HAZARD Flammable fumes such as solvent and paint fumes in work area can ignite or explode To help prevent fire and explosion Do not use solvent based adhesives that can creat...

Страница 10: ... recommended by the fluid and solvent manufacturer PRESSURIZED ALUMINUM PARTS HAZARD Use of fluids that are incompatible with aluminum in pressurized equipment can cause serious chemical reaction and equipment rupture Failure to follow this warning can result in death serious injury or prop erty damage Do not use 1 1 1 trichloroethane methylene chloride other halogenated hydrocarbon solvents or fl...

Страница 11: ...ker Head G2 Vacuum Transfer Tube G3 Vacuum Transfer Inlet Funnel G4 Vacuum Transfer 3 8 in OD Air Supply H Main Power Switch J System Air Inlet K Vacuum Transfer Shaker Inlet L Air Motor and Pump M Incoming Power Strain Relief N Heated Fluid Manifold Melter P Multi Zone Low Power Temperature Control Module MZLP R Fluid Outlets for connection to Heated Hoses numbered 1 6 S Customer I O Cable option...

Страница 12: ... Before Pump Y Outlet Filter High Pressure After Pump Z Adhesive Pellets Level Sensor not shown inside funnel AA Power and RTD Harness Connection to Heated Hose and Applicator harness connects from system to heated hose then from heated hose to applicator AB Inlet Funnel Screen FIG 2 WL D U R W1 Y X AA AB NOTE System shown with plastic and metal shrouds removed W2 T ...

Страница 13: ...ent Identification 333347F 13 Electrical Enclosure Key P Multi Zone Low Power Temperature Control Module MZLP AC Incoming Power Connection AF Chassis Ground AG Automatic Wiring Board AWB FIG 3 WL D P AC AF AG ...

Страница 14: ...NOTICE To prevent damage to soft key buttons do not press the buttons with sharp objects such as pens plastic cards or fingernails FIG 4 Key Function BA Heating system and pump enable disable BB System status indicator LED BC Stop all system processes BD Defined by icon next to softkey BE Abort current operation BF Accept change acknowledge error select item toggle selected item BG Toggle between ...

Страница 15: ...tem Off The system doesn t have power No System Status Indicator LED on the ADM No heat Pump is off Inactive The heating system and pumps are disabled Yellow system status indicator LED on the ADM No heat Pump is off Warm Up The system is heating the material to the set temperature Flashing green system status indicator LED on the ADM Heat is increasing to setpoint temperature Pump is off Active T...

Страница 16: ...Component Identification 16 333347F ...

Страница 17: ...e 104 To make repairing the system easier locate the system so that all sides are easily accessible and have sufficient lighting Attach Components NOTE Only systems with transformers are supplied with a lifting strap 1 Use supplied lifting strap 127735 to transport sys tems with transformers Wrap strap around all three pump tie rods and loop the strap back through itself in the Choker Configuratio...

Страница 18: ...e must reach from the system to the adhesive pellets container Supplied heated hose must reach from system to applicator s 3 Adjust the funnel inlet a Remove plug 23 and insert the provided 5 16 in nut driver 92 through the access hole in the back of the system Loosen the band clamp 81 two turns b Rotate the funnel inlet G3 and re tighten the band clamp 81 4 Insert 1 3 in 33 mm OD clear vacuum tra...

Страница 19: ...vacuum transfer hose G2 and secure at multiple points with the supplied zip ties G5 See FIG 10 10 If desired secure the 1 3 in 33 mm clear vacuum transfer tube G2 and 3 8 in OD air line G4 with zip ties to a supporting structure at various points in the routing 11 Attach the other end of the long 3 8 in OD air line G4 to the 3 8 in push to connect fitting on the shaker head G1 12 Ensure the adhesi...

Страница 20: ...cal con nectors NOTE Fluid outlet port 1 must be used and electrical connector from that hose must be connected to MZLP connector 1 The system will not operate unless a hose is connected to MZLP connector 1 If a hose is not con nected to connector 1 Invalid Sensor hose gun faults will result If the melter must be run without a hose appli cator electrically attached to MZLP connector use Overtemper...

Страница 21: ...tem See applicator manual for applica tor air pressure requirements and use a regulator before the gun to decrease the air pressure if nec essary 19 Close the ball valve 20 Attach a 3 8 in minimum air supply line to air filter See FIG 13 NOTE Air supply pressure must be between 80 psi 550 kPa 5 5 bar and 100 psi 690 kPa 6 9 bar Rec ommended pressure is 100 psi 690 kPa 6 9 bar If air pressure is ex...

Страница 22: ...scfm capacity Air Filter Ball Valve at System Air Inlet Graco Kit 24R707 included Regulator set to 70 psi 4 8 bar 0 48 MPa Air In 3 8 in 100 psi 6 8 bar 0 68 MPa 30 scfm capacity No dips in vacuum transfer hose Vacuum 40 80 psi 2 8 5 5 bar 0 28 0 55 MPa and at least 65 of hopper shaker air pressure if used Pump 20 100 psi 1 4 6 8 bar 0 14 0 68 MPa Ensure funnel air is connected Vacuum Pump ...

Страница 23: ... electrical cord from access port X through hole Y Conduit is required when routing wires near compressed air components 5 Attach insulated ferrules to the end of each wire 6 Connect ground wire to chassis ground AF See FIG 15 7 Connect L1 L2 L3 and N as shown in FIG 16 Not all models use all 4 wires 8 Use zip ties to secure the electrical cord to the tie downs located on the top of the inside of ...

Страница 24: ...applicator installed b Select the RTD type used on each installed applicator See applicator manual NOTE An incorrect RTD setting will cause the system to be incapable of maintaining the temperature setting NOTE The supported RTD types are Ni 100 ohm Ni 120 ohm NiFe 604 ohm Pt 100 ohm 385 Pt 100 ohm 392 and Pt 1000 ohm An Auto selection is available but should only be used when the specific RTD typ...

Страница 25: ...d set any remaining settings in the Setup screens before going on to the next steps that use the Operation screens These are not required for system operation but include useful functions See Appendix A ADM beginning on page 114 for detailed information about each setup item 9 Press to switch from the Setup screens to the Operation screens Use and to navigate between screens 10 On the Targets scre...

Страница 26: ...numeric keypad to enter the desired temperature c Use and shown next to to adjust heated hose temperature setting to the desired setting for that channel NOTE Alternatively use the physical up and down arrow push buttons on the ADM keypad until is next to the temperature setting to change then use the numeric keypad to enter the desired temperature Applicators Applicator heating is controlled by t...

Страница 27: ...he MZLP board specifies the input range for each signal See the following table for pin assignments Inputs High 10 30 Vdc Low 0 5 Vdc Inputs function without concern for polarity Applying high voltage will turn the heaters on and enable channels Removing voltage will turn the heaters off and disable channels Outputs 0 250 Vac 0 30 Vdc 2A Maximum Option Description Disable Not used Heater On Off Tu...

Страница 28: ... the InvisiPac MZLP For conve nience each InvisiPac ships with connector kit 24P176 If a connector is lost or damaged order kit 24P176 for replacements FIG 18 Customer Input FIG 19 Customer Output Vin no polarity 30 VDC Max Customer Output MZLP Customer In To Customer Input Customer In MZLP Customer Out 250 VAC 0 30 VDC 2A Max ...

Страница 29: ...eing used Initial Startup and Prime NOTE All setup procedures must be completed prior to initial startup See Setup on page 17 NOTE Only 1 4 in 6 mm round hot melt adhesive pel lets can be used in the InvisiPac system PSA type adhesive pellets will not work in the InvisiPac system 1 Direct the applicator into an appropriate waste container 2 Verify the shaker inlet is at the bottom of the empty adh...

Страница 30: ... them open 12 With the applicators open and the system up to tem perature slowly increase pump air pressure until the pump begins to run very slowly Approximately 20 psi 140 kPa 1 4 bar should be sufficient NOTE Operation may be erratic below 20 psi 140 kPa 1 4 bar 13 Continue running the pump until clean air free material is dispensed from each applicator 14 When each applicator is fully primed a...

Страница 31: ...ing for the day dispense into a waste container until the material level is down to the melter core See FIG 23 NOTE This will lower the adhesive level within the fun nel cap to the correct level to prevent any issues upon startup the following production day Automatic Refill The system uses automatic refill by default If the auto matic refill system is malfunctioning and cannot immedi ately be fix...

Страница 32: ...ump air pressures are set as desired See FIG 1 on page 11 c If using Automatic Refill see Automatic Refill on page 31 d If using Manual Refill see Manual Refill on page 30 e Verify applicators are closed 4 Press to enable the heaters and pump NOTE If using the Schedule function the heaters and pump will be enabled automatically at the set time You will not need to press if using the Schedule func ...

Страница 33: ...ues are entered in the Schedule screen To disable a scheduled event navigate to the event and press The event will appear gray on the screen when it is dis abled To re enable an event navigate to the event and press The event will appear red system off or green system on If no events are needed turn the main power switch OFF to prevent system from auto matically enabling and disabling the heaters ...

Страница 34: ... page 12 11 Disconnect hose from melter outlet 12 Wait until system stops draining or at most 10 min utes NOTE There will be some residual adhesive in the sys tem 13 When done performing the procedure that required draining the system set Refill Setting back to Auto on the System 3 screen Flush NOTE This procedure describes how to flush one hose at a time for maximum effectiveness See the hot melt...

Страница 35: ... temperature for the duration specified by the hot melt cleaning fluid manufacturer NOTE Soaking is important to ensure the best possi ble cleaning 15 After the hot melt cleaning fluid has soaked for the specified amount of time open the system air inlet ball valve Slowly increase the pump air pressure until pump begins to cycle to begin pumping the hot melt cleaning fluid and adhesive mixture out...

Страница 36: ...Schedule function see page 33 to automatically enable and disable the heat ing system in accordance with your production sched ule This will ensure adhesive spends as little time at temperature as possible Less time at high temperature ultimately means less adhesive degradation and less char To prevent fire and explosion never exceed the clean ing fluid s rated temperature Residual cleaning fluid ...

Страница 37: ...let filter is designed to prevent large items from entering the system The inlet filter can only be replaced with the system empty 1 Close the system air inlet ball valve NOTE Some adhesives have different melting points The first temperature tried should be approximately half of the dispensing temperature If dispensing at 400 F 204 C first try 200 F 93 C then increase in 20 F 11 C increments If d...

Страница 38: ...3 from system Otherwise a Install inlet filter cap 215 b Install shroud and ADM c Turn main power switch ON d Once ADM software finishes starting up press to enable the heaters e Wait for temperature to rise 20 F 11 C beyond previous temperature f Go to step 4 9 Slide new screen 213 into melter base manifold 201 10 Install filter cap 215 then use a 1 in socket to tighten 11 Feed ADM cable through ...

Страница 39: ...ce To estab lish a preventative maintenance cycle tailored to your environment Graco recommends inspecting filters every 4 weeks after installation and replacing when necessary Document replacement intervals and use this as your preven tative maintenance schedule moving forward Environmental Classification Clean Moderate Dusty Pump inlet filter Replace filter every six months Replace filter every ...

Страница 40: ...system prior to troubleshoot ing Last Digit in Code Code Relates to 0 Melter 1 Applicator Gun 1 2 Hose 1 3 Applicator Gun 2 4 Hose 2 5 Applicator Gun 3 6 Hose 3 7 Applicator Gun 4 8 Hose 4 9 Applicator Gun 5 A Hose 5 B Applicator Gun 6 C Hose 6 Code Description Type Cause Solution A1D0 Low Current Melter Advi sory Melter current is less than 500mA Faulty melter heater s Check heater resistance and...

Страница 41: ...d into MZLP with daughter board and J3 on AWB A8D_ No Current Hose X Alarm Power not getting to hose Check fuses F5 and F6 channels 1 3 5 or F9 and F10 channels 2 4 6 on MZLP that the error hose is connected to Check that electrical connector on the heated hose is plugged into the MZLP Check continuity of pins C and D on electrical connector at MZLP end of heated hose See heated hose manual for im...

Страница 42: ...epair if necessary DDDX Pump Diving Devia tion Pump is trying to feed adhesive no adhesive to feed Storage bin out of adhesive pellets Refill with pellets Level sensor may be over heating Verify air is being delivered from tube 35 Melter at incorrect temperature too low Check melter temperature setting and set to manufac turer s recommendation Plugged vacuum transfer hose or funnel Clear plugged h...

Страница 43: ... melter gets too low and a large amount of cold material enters the melter can cause the temperature to drop significantly With the system on and not dispensing verify that the temperature is properly controlled to the set point If system cannot control temperature ver ify the RTD is seated inside the melter Replace RTD if RTD was seated properly and system cannot control temperature Faulty melter...

Страница 44: ...e applica tor s heater If heater is not shorted to ground replace MZLP T4MX High Tempera ture Trans former Alarm Thermistor reading greater than 212 F 100 C Verify transformer fan is operating correctly and free of obstructions Replace transformer T6D0 Sensor Error Melter Alarm No reading from RTD Verify connector J5 on MZLP board is securely connected Defective RTD Replace melter RTD See Replace ...

Страница 45: ... low replace MZLP If voltage is still low replace power supply V1MW Low Line Volt age Devia tion Incoming line to line voltage has dropped below 175V Verify incoming power is correct gauge for cur rent draw and verify incoming power lines are securely attached to disconnect V4I_ High Can Volt age Alarm Bad or overloaded power supply Verify power supply voltage is 24 VDC If voltage is high replace ...

Страница 46: ... Vacuum trans fer not working Air to vacuum assem bly missing Verify the vacuum transfer system air pressure is 40 80 psi 60 psi rec ommended Air at system air gauge but not to air to shaker Check that air line is connected or not pinched Air is at shaker but there is no feed Plugged shaker unit remove from system and remove plug Adhesive pel lets in storage bin not cover ing shaker head Shaker un...

Страница 47: ...eased significantly to maintain desired system cleanliness The InvisiPac system will not stall pump continues to move even if the applicators are all closed Fluid leak Verify that no external leakage is present Inspect and test the pressure relief valve Perform Flush Pressure Relief Valve page 54 If system is still unable to stall the pump or pressure relief valve may need to be repaired The syste...

Страница 48: ... NOTE If air has become trapped in the pump it can be purged by fol lowing the Pressure Relief Procedure page 33 NOTE Some materials are more difficult to melt than others and it may be impossible to process them at the published melt rate The InvisiPac system was tested to achieve continuous published melt rates when dispensing standard EVA packaging grade adhesives in pellet form with an InvisiP...

Страница 49: ...hed melt rate The InvisiPac system was tested to achieve continuous the published melt rates when dispensing standard EVA packaging grade adhesives in pellet form with an InvisiPac system temperature of 350 F and hose and applicator temperatures of 350 F ADM not dis playing when system turned on Main power circuit breaker off or power cord unplugged Turn main circuit breaker on or plug in power co...

Страница 50: ...ing in system 1 Verify melter hose and applicator temperatures are all with in the same range of the room ambient 2 If the applicator temperature is either much higher or much lower than the melter temperature then the RTD setting is not correct for the RTD being used Select correct RTD setting in the setup screen system 2 before beginning NOTE Failure to have the correct RTD value will cause the ...

Страница 51: ...um pump rate No adhesive or incorrect amount of adhesive out of one some of the dispense modules when triggered Plugged tip on dis pense module Replace tip on dispense module Defective dispense module in closed par tial open position Replace dispense module Plugged applicator manifold filter single dispense module appli cator Replace applicator manifold filter Graco applicator manifold filter in b...

Страница 52: ...nse module Failed dispense module adhesive leaking out middle of dispense mod ule Replace dispense module Hose loose Tighten hose No melter heat Fuse blown in F1 and F2 Check heater rods for a short or a short between the rod wires and ground Cable to over tempera ture switch off or broken Check connection of cable to over temperature switch both to main board and to switch If connection good look...

Страница 53: ...spensing at the correct time Dispense modules opening at the wrong time InvisiPac system does not control the opening and closing of the appli cators The separate controller needs to be adjusted Consult pattern control manufacturer or qualified electrician Pump and vac uum feed sys tem cycle on and off before temperature setpoint is achieved Solenoid connector is installed into the light tower plu...

Страница 54: ...ration Perform this procedure when directed in the Trouble shooting table NOTE System must be up to operating temperature for pump solenoid to trigger on 1 If the heating system and pump is disabled press to enable the heaters and pump 2 Wait for system to reach the temperature setpoints 3 Set pump air pressure to 20 psi 140 kPa 1 4 bar 4 Remove the 3 8 in OD air line from the air motor 5 Verify t...

Страница 55: ...oor FIG 29 MZLP LED Signals Signal Description Green On MZLP is powered up and input voltage is within operating con ditions Yellow On Internal communication in pro cess Red Solid MZLP failure See troubleshoot ing table Red Flashing Software update in process or missing software WL D MZLP FIG 30 MZLP Diagnostic LED Location J3 1 4 5 6 7 8 9 2 3 0 Green Yellow Red ti20348a ...

Страница 56: ...e screws 240 9 Use a flat head screwdriver and a rubber mallet to break loose the retaining nut 235 10 Use channel lock pliers to remove the retaining nut 235 11 Insert an allen wrench through the hole in the top of the piston rod 223 to lift the piston rod 223 up out of the manifold This will also pull out the throat u cup 234 and throat bearing 233 12 Remove piston valve 222 from piston rod 223 ...

Страница 57: ... a rubber mallet to gen tly tap throat u cup 234 into place See FIG 33 6 Slide throat bearing 233 over the piston rod 223 Use socket and tap with a rubber mallet to press throat bearing 233 into place and seat the throat u cup 7 Remove seal installation tool 8 Install retaining nut 235 See FIG 32 9 Install air motor assembly see FIG 31 a Install three screws 240 b With retaining ring around piston...

Страница 58: ...mbly see FIG 35 1 Install new o ring 231 o ring 229 seat 228 and ball 227 then use a 1 2 in drive ratchet without a socket to install and tighten foot valve 230 onto melter 2 Apply anaerobic thread sealant on threads of four bolts 246 and connect pump to melter outlet Torque to 12 18 ft lb 16 24 N m Replace Pump Cylinder Seals and Piston Seals Disassembly see FIG 31 1 Flush the system See page 34 ...

Страница 59: ...manifold 203 See FIG 36 page 58 13 Insert cylinder tool 1301 into bottom of melter out let manifold 203 Use a rubber mallet to gently remove cylinder 216 14 Remove and discard cylinder seals 217 See FIG 37 Reassembly 1 Apply grease to seals 217 then install new cylinder seals 217 onto cylinder 216 See FIG 37 2 Place female cylinder installation tool 1302 into melter outlet manifold 203 to protect ...

Страница 60: ...f valve 245 Pull the air tube from the metal shroud 27 9 Remove nuts 3 on the back metal shroud 27 then remove shroud 10 Remove fabric melter insulator 53 11 Loosen screw AA then remove sensor 125 See FIG 42 page 63 12 Loosen hose clamp 81 then remove funnel FF 13 Remove wire connectors from the over temperature switch 251 14 Remove insulators 53 75 from the melter assembly 5 15 Disconnect the fil...

Страница 61: ...nstall funnel FF then tighten clamp 81 10 Install temperature sensor 125 into melter then tighten screw AA on band heater See FIG 41 on page 62 11 Install insulators 53 75 onto the melter assembly 5 12 Connect ground wire ring terminal 87 and ground screw 88 to melter assembly 5 13 Connect wire connectors to the over temperature switch 251 See FIG 43 on page 64 14 Use nuts 3 to install metal shrou...

Страница 62: ...y see FIG 41 1 Install band heater 208 on the melter with the opening and screw facing the front of the system in alignment with the sensor port 2 Install sensor 125 3 Slide band heater up then tighten screw AA NOTE Band heater should be oriented to hold sensor in place when tightened It should not bend the sensor 4 Route band heater wires through grommet 63 in the top of the electrical enclosure ...

Страница 63: ...h 251 See FIG 43 on page 64 11 Pull cable out of the electrical enclosure then dis card sensor 125 and wires Reassembly see FIG 42 1 Route new harness wires through grommet 63 in the top of the electrical enclosure 2 Connect wire connectors to over temperature switch 251 See FIG 43 on page 64 3 Place band heater temperature sensor 125 in melter 4 Tighten screw AA NOTE Screw should lightly squeeze ...

Страница 64: ...remove the switch Re assembly see FIG 43 1 Use the two screws 255 to secure the new over temperature switch 251 to the melter 2 Connect wire connectors to new over temperature switch 3 Use 7 16 in socket to install nuts 3 to secure metal shroud 27 4 Route relief valve air tube 36 through the metal shroud then attach to the relief valve 5 Feed ADM cable through shroud then install shroud and connec...

Страница 65: ...cing the melter heater rod 209 Install Melter Assembly See page 60 5 If replacing pump heater rod 210 feed ADM cable through shroud then install shroud and connect cable to ADM 6 If installing the pump heater rod 250 install the metal shroud 27 a Place metal shroud on system b Install and tighten nuts 3 c Pull the air tube through the metal shroud 27 then connect the air tube 36 to the relief valv...

Страница 66: ...Thread new fluid pressure relief valve 245 into manifold See FIG 45 Once hand tight use cres cent wrench to tighten 10 Use nuts 3 to install metal shroud 11 Connect air tube to pressure relief valve 12 Feed ADM cable through plastic shroud then install shroud and connect cable to ADM NOTICE To prevent damage to o ring ensure o ring is seated properly prior to moving to next step ...

Страница 67: ...Key 24V510 A F1 and F2 fuses are physically larger than F3 F10 B Blue sticker on relay C Marked 24V133 FIG 46 MZLP ID and Fuse Locations NOTICE To prevent system damage always use fast acting fuses Fast acting fuses are required for short circuit protection J1 J2 J3 J6 J5 J7 F10 F9 F8 F7 F6 F5 F4 F3 F2 F1 WL D A B C Fuse Part 24V510 MZLP Fuses F1 F2 250VAC 25A fast acting white 0 25 in x 1 2 in F3...

Страница 68: ...ard based on location See FIG 48 for rotary switch location 2 Apply channel label stickers to new MZLP See FIG 47 3 Use four screws 114 to install MZLP 112 to elec trical enclosure 1 4 Reconnect cables to MZLP 112 NOTE Do not force the electrical connection Minimal force is required to seat the connector If resistance is felt stop and verify the connector orientation NOTE If unable to determine co...

Страница 69: ... element 3 Gently pull up on cable while unscrewing fill sensor connector then remove fill sensor cable from fill sensor 20 4 Loosen fill sensor jam nut then remove fill sensor 20 from sensor housing 73 Reassembly see FIG 49 1 Thread new fill sensor 20 into sensor housing 73 Bottom out the sensor in the sensor housing then back out 1 2 turn 2 Tighten jam nut on fill sensor 20 3 Connect fill sensor...

Страница 70: ... Use two screws 144 to secure power supply bracket 145 to new AWB 143 See FIG 51 2 Mount power supply 146 to power supply bracket 145 See FIG 51 3 Connect connector labeled AWB J1 on power sup ply harness 147 to J1 on AWB 143 See Electri cal Schematics page 78 4 Use two screws 131 to install AWB 143 to electri cal enclosure 1 See FIG 51 5 Reconnect cables to AWB 143 NOTE Do not force the electrica...

Страница 71: ...e FIG 51 3 Install electrical enclosure front access door 10 Replace Power Supply Harness Disassembly 1 Turn main power switch OFF 2 Remove electrical enclosure front access door 10 3 Disconnect screw terminal connections between power supply 146 and power supply harness 147 according to the following table 4 Unplug power supply harness 147 from J1 on AWB 143 See Electrical Schematics page 78 Reas...

Страница 72: ...Insert hands through access holes FF see FIG 52 in bottom of electrical enclosure then disconnect air lines from air control solenoids 402 9 Disconnect air control solenoids cable from MZLP daughter board connector J13 Pull wire out of the electrical enclosure 10 Remove two screws 405 securing solenoids 402 to air control assembly 9 then remove air control solenoids Reassembly see FIG 52 1 Use two...

Страница 73: ...and do not tighten yet 2 Install bracket 403c then install two nuts 403a finger tight 3 Place one small crescent wrench on the brass part of the gauge then use a second small crescent wrench to tighten the air fitting 403b 4 Orient gauge as desired then tighten two nuts 403a to secure gauge 403 in place 5 Slide air control assembly 9 into place then use two screws 8 secure to electrical enclosure ...

Страница 74: ...pense until the fluid level in the melter is at or below the honeycomb grid NOTE If a screw or air valve seal is dropped during this procedure it could fall into the melter Melter fluid level must be below honeycomb grid before moving to next step 6 Once the fluid level is low enough close the bleed type ball valve installed at the system air inlet 7 Disconnect air hose and cable from the air moto...

Страница 75: ...ee screws 240 d Remove screws 8 screws 74 and bracket 82 7 If replacing a damaged air motor with a new fully assembled air motor a Remove three screws 211 securing air motor tie rods 220 to base plate 219 b Remove tie rods 220 from air motor 218 Install Air Motor See FIG 58 1 If replacing a damaged air motor with a new fully assembled air motor a Install tie rods 220 onto air motor 218 b Install t...

Страница 76: ...155 Install Fan 1 Mount new fan 155 rear fan grill 170 and nuts 158 on grill 154 with the arrow pointing toward the grill 154 2 Tie down fan wires onto tie down locations on grill 154 using cable ties 161 3 Route fan wires with transformer wires into the elec trical enclosure 1 Connect red and black fan wires to J7 connector Reconnect J7 connector to AWB board See FIG 60 4 Reinstall corrugated tub...

Страница 77: ... Replace token access panel 9 Press to continue to the InvisiPac operation screens FIG 62 Remove Access Panel FIG 63 Insert Token NOTICE A status is shown while software is updating to indicate progress To prevent corrupting the software load do not remove token until the status screen disappears r_24P860_3B9900_3a T r_24P860_3B9900_4a Icon Description Update successful Update unsuccessful Update ...

Страница 78: ...30 24P860 ADM 86 127666 Cable Extension 87 WIRE ground 90 Plug Phoenix 8pin 103 Harness MZLP 1 AWB 112 24V288 Module MZLP with daughter board 118 24V510 Module MZLP 121 16T087 Cable Board 123 127768 Cable CAN 124 16T103 Cable Pump 125 Sensor RTD 1M 126 16T108 Cable Ultrasonic 129 Harness MZLP 2 AWB Harness MZLP 2 3 AWB 135 16W035 Connector Jumper 136 Harness MZLP 1 AWB 138 Harness Disc AWB 140 Tra...

Страница 79: ...2T1 5L3 3L2 1L1 N N L3 DC OK DC OK V V V V GND N L TEMP TEMP FAN FAN TEMP TEMP FAN FAN 1 2 3 4 1 2 3 4 1 2 3 4 1 2 3 4 1 2 4 3 5 1 2 4 3 5 1 2 4 3 5 6 1 2 4 3 5 6 1 2 4 3 5 1 2 4 3 5 J5 L1 L2 L3 GND L1 L2 L3 GND 1 2 3 4 140 138 143 123 30 129 90 148 136 103 112 1201 9 20 86 126 124 25 125 251 121 Melter OT Switch and Melter RTD Motor Cycle Switch Fill Sensor Air Solenoid Optional Light Tower Hose ...

Страница 80: ...l Hose Applicator Wiring GB1 J7 6T3 4T2 2T1 N TEMP TEMP FAN FAN TEMP TEMP FAN FAN GB GND J2 W1 W2 W4 GND W3 PTC L1 L2 5L3 3L2 1L1 N L3 AWB P2 P1 P3 143 OVER TEMP GUN HEATER T GUN RTD GND J8 A B C D E F G H J K L A B C D E F G H J K L MZLP1 HOSE HEATER T HOSE RTD 112 ...

Страница 81: ...l Schematics 333347F 81 2nd and 3rd MZLP Options J3 1 2 4 3 5 1 2 4 3 5 J3 1 2 4 3 5 J6 1 2 4 3 5 1 2 4 3 5 1 2 4 3 5 1 2 4 3 5 J3 1 2 4 3 5 MZLP3 MZLP 2 MZLP 1 1 2 4 3 5 6 J5 1 2 4 3 5 6 121 121 135 118 118 112 ...

Страница 82: ...otor and slow down the system dis pense rate Level Sensor Restrictor Level Air Sensor Refill Gauge Air Control Manifold Refill Control Solenoid Air Motor Control Solenoid Air Motor Gauge Pressure Relief Valve Air Motor Feed Wand Line Air Inlet Under Control Box Optional Ramp Up Down Controller Safety Pop Off Valve ...

Страница 83: ...pipe sealant to all non swiveling pipe threads Bottom sensor 20 out then back off 1 2 turn Lubricate all seals and o rings with water resistant grease Torque to 5 11 ft lb 7 15 N m Torque to 8 10 in lb 0 9 1 1 N m 1 2 3 4 5 6 44 19 28 30 53 13 8 14 3 8 83 27 25 1 26 24 18 75 6 38 58 22 10 11 8 29 8 23 23 38 31 39 64 43 43 43 6 64 ...

Страница 84: ...Parts 84 333347F System Parts Page 2 of 3 WL D 54 7 5 8 8 9 1 63 20 68 67 69 66 72 74 73 69 69 62 61 81 80 79 74 82 8 8 41 49 40 4 85 63 87 89 88 3 42 3 86 43 5 ...

Страница 85: ...333347F 85 System Parts Page 3 of 3 WL D 76 78 32 34 16 in 406 4 mm 34 8 in 203 mm 34 2 in 50 8 mm 36 13 in 330 2 mm 35 48 in 1219 mm 34 48 in 1219 mm 34 48 in 1219 mm 49 35 48 in 1219 mm 55 24 77 57 91 86 39 ...

Страница 86: ... 24 24 18 126961 FITTING 45 elbow hydraulic 2 2 2 4 4 4 6 6 6 2 2 2 4 4 4 6 6 6 19 116793 FITTING 2 2 2 4 4 4 6 6 6 2 2 2 4 4 4 6 6 6 20 24R041 SENSOR ultrasonic 1 1 1 1 1 1 1 1 1 1 1 1 1 1 1 1 1 1 21 101976 TOOL allen wrench 1 1 1 1 1 1 1 1 1 1 1 1 1 1 1 1 1 1 22 24N957 SHAKER feed system 1 1 1 1 1 1 1 1 1 1 1 1 1 1 1 1 1 1 23 114606 PLUG hole 2 2 2 2 2 2 2 2 2 2 2 2 2 2 2 2 2 2 24 120753 FITTING...

Страница 87: ... 1 62 BAFFLE pellet 1 1 1 1 1 1 1 1 1 1 1 1 1 1 1 1 1 1 63 121487 GROMMET sheet metal 3 4 in 2 2 2 2 2 2 2 2 2 2 2 2 2 2 2 2 2 2 64 24R707 KIT inlet air 1 1 1 1 1 1 1 1 1 1 1 1 1 1 1 1 1 1 66 FUNNEL insert 1 1 1 1 1 1 1 1 1 1 1 1 1 1 1 1 1 1 67 24V506 FILTER HM50 feed 1 1 1 1 1 1 1 1 1 1 1 1 1 1 1 1 1 1 68 FUNNEL filter cover 1 1 1 1 1 1 1 1 1 1 1 1 1 1 1 1 1 1 69 O RING fluoroelastomer 160 3 3 3 ...

Страница 88: ...1 1 90 PLUG phoenix 8 pos 1 1 1 1 1 1 1 1 1 1 1 1 1 1 1 1 1 1 91 FITTING 5 32 in OD tube push to con 1 1 1 1 1 1 92 17A345 TOOL 5 16 nut driver 1 1 1 1 1 1 1 1 1 1 1 1 1 1 1 1 1 1 93 127735 STRAP lifting 3 ft 1 1 1 1 1 1 1 1 1 1 1 1 Ref Part Description Quantities HM50 HM25 2 Channel 4 Channel 6 Channel 2 Channel 4 Channel 6 Channel 24T918 24V201 24V198 24T919 24V202 24V199 24T920 24V203 24V200 24...

Страница 89: ...ling pipe threads Set rotary switch to 1 on MZLP with daughter card Set rotary switch to 2 on MZLP 2 Set rotary switch to 3 on MZLP 3 1 2 3 4 114 112 113 118 113 114 113 118 114 106 107 120 110 108 109 101 132 105 104 2 3 117 111 143 112a MZLP 2 MZLP MZLP 3 4 131 146 131 145 144 ...

Страница 90: ...1 1 1 1 1 1 108 104641 FITTING bulkhead 1 1 1 1 1 1 109 121141 FITTING elbow swivel 3 8t 1 4mnpt 1 1 1 1 1 1 110 114421 BUSHING strain relief 1 1 1 1 1 1 111 117666 TERMINAL ground 1 1 1 1 1 1 112 MODULE MZLP with daughter board 1 1 1 1 1 1 112a 24R042 KIT board daughter 1 1 1 1 1 1 113 16T440 CAP souriau uts14 2 4 6 2 4 6 114 125856 SCREW 8 32 serrated flange 12 12 12 12 12 12 116 24P175 PLATE bl...

Страница 91: ...nh sems 6 32 x 3 8 2 2 2 2 2 2 145 BRACKET power supply 1 1 1 146 126453 POWER SUPPLY 24v 1 1 1 1 1 1 147 HARNESS power supply awb 1 1 1 1 1 1 148 CABLE board samtec 1 1 1 1 1 1 Ref Part Description Quantity 1 MZLP 2 MZLP 3 MZLP 1 MZLP 2 MZLP 3 MZLP No Transformer 400 480 V Transformer Kit Description Includes 24V528 Upgrade from 2 channel system to 4 channel sys tem 113 118 121 129 a ground ing w...

Страница 92: ...onnect red fan wire labeled to the connector coming from transformer 153 1 2 3 4 152 160 156 157 156 161 167 154 155 1 2 151 158 157 166 166 166 161 2 2 4 153 4 170 168 168 3 Ref Part Description Qty 151 ENCLOSURE base 480v 1 152 ENCLOSURE top 480v 1 153 TRANSFORMER 480v 240v 6kva 480V systems only 1 TRANSFORMER 400v 240v 6kva 400V systems only 1 154 GRILL fan 1 155 FAN 24 vdc 120m x 120m 1 156 11...

Страница 93: ...mm below surface Assemble inserts 252 0 01 0 05 in 0 3 1 3 mm below surface Torque to 27 33 in lb 3 3 8 N m Apply anaerobic thread sealant on threads Torque to 12 18 ft lb 16 24 N m 1 2 3 4 5 6 7 8 9 10 217 216 217 223 224 225 226 222 221 227 228 229 231 232 230 5 4 218 239 235 233 234 220 240 219 206 211 7 246 245 244 243 242 247 255 236 208 211 204 202 207 253 213 215 206 210 201 249 257 258 209...

Страница 94: ...t 1 235 193046 NUT packing 1 236 24P855 FILTER assy 100 mesh welded 1 238 196762 PIN straight 1 239 196750 SPRING retaining 1 240 101864 SCREW cap sch 5 16 x 1 in 3 242 117059 O RING fluoroelastomer 1 243 RETAINER seat dump valve 1 244 15Y627 PACKING o ring 2 116 ptfe 1 245 VALVE relief 1 246 121295 SCREW cap socket head 5 16 x 2 5 in 4 247 15H304 FITTING plug 9 16 sae 9 249 167002 INSULATOR heat ...

Страница 95: ...ant grease Torque to 95 105 in lb 10 7 11 9 N m 1 2 505 522 507 511 511 2 513 506 512 509 4 1 2 1 2 Ref Part Description Qty 505 24A579 MANIFOLD medium short 1 506 GASKET cover small 2 507 SEAL air valve manifold 1 509 SCREW m6 x 25 thread forming 8 511 VALVE pilot 2 512 VALVE air small 1 513 15M213 MUFFLER 3 8 1 ...

Страница 96: ... Shaker Grounding Kit 24R708 purchase sepa rately also available Kit includes a grounding wire assembly and a screw and washer for installing on the shaker tube 301 Apply pipe sealant to threads 1 301 302 306 304 ti20738a 1 Ref Part Description Qty 301 24P861 SHAKER 1 302 24N954 TUBE steel 1 303 TUBE clear PVC 1 3 in 33 mm OD 10 304 HOSE nylon 3 8 in OD 250 psi 1 7 MPa 17 bar 15 5 305 125370 CLAMP...

Страница 97: ...1 402 406 404 404 1 1 Ref Part Description Qty 401 PANEL air controls 1 402 24V520 CONTROL air vacuum trans fer and pump 1 403 15T500 GAUGE pressure air panel mount 1 8 in npt 2 404 15T498 FITTING 90 degree swivel 5 32 in tube x 1 8 in female npt 2 405 100058 SCREW cap hex head 2 406 054753 TUBE nylon round black 2 407 C38321 TIE cable 3 62 in 1 ...

Страница 98: ... grease Torque to 4 6 in lb 0 5 0 7 N m 1 2 3 604 3 2 2 2 1 3 603 1 1 Ref Part Description Qty 601 BODY fluid 1 602 BODY air 1 603 15T413 PISTON air 1 604 AIR CAP valve 1 605 BEARING shaft needle 1 606 SHAFT needle valve 1 607 SOCKET ball assembly 1 608 108771 PACKING o ring 1 609 110073 PACKING o ring 1 610 111841 WASHER plain 5 8 in 2 611 BEARING valve 1 612 O RING FKM 1 613 FITTING push to conn...

Страница 99: ...th 1 702 BAFFLE pellet 1 703 O RING fluoroelastomer 160 3 704 FUNNEL insert 1 705 24V506 FILTER feed 1 706 FUNNEL filter cover 1 707 113161 SCREW flange hex hd 2 708 SCREW 10 16 thread forming 5 709 BRACKET funnel mounting 1 710 HOUSING sensor 1 WL D 706 704 705 703 708 707 708 709 710 703 702 703 701 ...

Страница 100: ...ing that parts do not get damaged Parts included in Cylinder Tools Kit 24R227 pur chase separately Parts included in Rod Tools Kit 24R228 purchase separately Part Purpose 1301 Remove Cylinder 1302 Install Cylinder Female 1303 Install Cylinder Male Part Purpose 1304 Install Rod Female 1305 Install Rod Male 1306 Install Rod Bullet ti20983a ...

Страница 101: ...llation See Attach Components on page 17 Air Adjustment Lock 24R084 Panel enables locking access to the air adjustment screws Air Adjustment Lock Installation 1 Remove screws from system air panel 2 Use screws to install panel 801 3 Snap bracket 802 into panel 801 4 Insert lock through hole in panel and bracket to lock access to the air controls Lock not included in kit ti21128a ti21129a WL D Ref ...

Страница 102: ...ation 1 Remove existing hot melt applicator system 2 Use six screws 1102 and six nuts 1103 to secure adapter plate 1101 through the existing holes from the previous system 3 Align the InvisiPac system with the bolts on the adapter plate 1101 then place onto the adapter plate 1101 4 Use the remaining three nuts 1103 to secure the InvisiPac system to the adapter plate 1101 5 Use elbow fitting 1104 t...

Страница 103: ...Accessories 333347F 103 ...

Страница 104: ...Metric fitting included in Air Metric Fitting Kit 24W637 page 113 905 910 903 902 901 907 915 903 915 904 909 914 916 912 ti20928a Ref Part Description Qty 901 HOPPER 30 gallon 1 902 LID hopper 30 gallon 1 903 126930 SHAKER ball vibrator 1 904 126929 VALVE air pilot 3 way closed 1 905 BRACKET shaker container 1 907 HOSE nylon 3 8 in OD 250 psi 1 7 MPa 17 bar 1 908 119798 CONNECTOR tee push tube 1 ...

Страница 105: ...shop air to elbow fitting 914 on the piloted air valve Shop air must be capable of 100 psi 0 7 MPa 7 bar NOTE The piloted air valve must use shop air Adding a tee at the system inlet to run the hopper shaker may impact pump and vacuum transfer performance 7 Place steel shaker rod assembly into hopper 901 with steel rod resting in the hopper groove in the rim of the hopper 8 Place lid 902 on hopper...

Страница 106: ... green at temperature solid green or has an active error red 24R226 Parts Not for sale J1 J2 J3 J6 J5 J7 F10 F9 F8 F7 F6 F5 F4 F3 F2 F1 WL D 1201 1203 1202 1204 1205 J12 AA BB 1201a Ref Part Description Qty 1201 16T102 LIGHT tower red and green 1 1201a SCREW 3 1202 GROMMET single cable 1 1203 16K322 BRACKET light tower 1 1204 GROMMET multiple wires 1 1205 125835 CLIP ferrite bead 1 ...

Страница 107: ...supplied light tower screws 1201a to install light tower 1201 7 Remove electrical enclosure front access door 8 Route light tower cable through the other hole in the bracket 1203 then through the grommet 1204 into the electrical enclosure 9 Connect light tower cable to MZLP connector labeled J12 Air Reservoir Kit 16W366 This kit allows the system to operate as low as 60 psi 0 4 MPa 4 bar 16W366 Pa...

Страница 108: ...01 1302 1306 1304 1305 AA BB CC 1307 1308 1308 Ref Part Description Qty 1301 MODULE GCA MZLP 1 1302 16T087 CABLE jumper male male 21 in 1 1303 HARNESS 2nd MZLP power 1 1304 112190 STRAP wrist grounding 1 1305 16T440 CAP jam nut sealing 2 1306 24R324 SOFTWARE UPGRADE TOKEN InvisiPac System 1 1307 FITTING straight 2 1308 LABEL InvisiPac Channel Num bers 1 ...

Страница 109: ...n See FIG 65 6 Remove electrical enclosure front access door NOTE Do not force the electrical connection Minimal force is required to seat the connector If resistance is felt stop and verify the connector orientation 7 Connect CAN jumper cable 1302 to MZLP 1 con nector J3 and connect other end of jumper cable 1302 to MZLP 2 connector J3 See FIG 65 8 Connect power harness 1303 to MZLP 2 connec tor ...

Страница 110: ...1301 1302 1304 1305 BB BB AA 1303 1306 1308 CC 1307 Ref Part Description Qty 1301 MODULE GCA MZLP 1 1302 16T087 CABLE jumper male male 4 in 1 1303 112190 STRAP wrist grounding 1 1304 24R324 TOKEN software upgrade 1 1305 16T440 CAP jam nut sealing 2 1306 HARNESS MZLP 3 1 1307 16W035 CONNECTOR jumper 1 1308 FITTING tee 2 1309 ...

Страница 111: ... not force the electrical connection Minimal force is required to seat the connector If resistance is felt stop and verify the connector orientation 7 Connect CAN jumper cable 1302 to MZLP 2 con nector J3 and connect other end of jumper cable 1302 to MZLP 3 connector J3 See FIG 66 8 Install jumper connector 1307 in J5 on MZLP 3 9 Connect wires from power harness 1306 between AWB connector J5 and M...

Страница 112: ... Use the extension cables to remote mount the ADM dis play off of the InvisiPac system Kits available sepa rately ADM Remote Mount Bracket 24A326 This bracket is used to remote mount the ADM display along with an ADM extension cable Ref Part Description Qty 1401 24P860 MODULE Advanced Display ADM 1 1402 124149 POWER SUPPLY GCA 1 1403 CORD SET US MX PR CA TW 115V 10A 1 1404 24R322 TOKEN InvisiPac S...

Страница 113: ...anual 334358 for installation instructions Strain Relief Bushing Kit 24X190 The strain relief bushing kit allows the use of a smaller outside diatmer OD power cord This strain relief bush ing is intended for power cords with an OD of 0 512 1 024 in 13 26 mm Installation 1 Remove standard strain relief bushing 106 Retain and reuse nut 2 Install strain relief bushing from kit and secure with retaine...

Страница 114: ...ng Temperature setting achieved Actual temperature of hose left and applicator right Actual temperature of system shown warming up System temperature setting Use and to adjust set ting Use the physical numeric key pad on ADM to enter tempera ture setting Select channel to view and or edit the applicator or hose temperature setting Applicator temperature setting Use and to adjust set ting Hose temp...

Страница 115: ...n be downloaded in the USB logs See Appendix B USB Downloading Uploading on page 120 Zone Tracked Events Code Custom Language Downloaded EQU3 Custom Language Uploaded EQU4 Fill Valve Closed EBFX Fill Valve Open EAFX Heat Off EBDX Heat On EADX Logs Downloaded EQU5 Pump Cycles Total Reset ERD1 Pump Off EBPX Pump On EAPX Red Stop Button Pressed EB0X Setup Value Changed EC0X System Power Off EM0X Syst...

Страница 116: ...m Digital Outputs 0 Pump Solenoid 1 Fill Solenoid 2 Light Tower Green Light 3 Light Tower Red Light ISO DI Customer Digital Inputs 0 Customer Input 1 1 Customer Input 2 2 Customer Input 3 3 Customer Input 4 ISO DO Customer Digital Outputs 0 Customer Input 1 1 Customer Input 2 2 Customer Input 3 3 Customer Input 4 Fill Reading of Ultrasonic Fill Sensor Old Fill Sensor 2400 2700 mV New Fill Sensor 4...

Страница 117: ...isable setpoint changes on the run operation screens If the setup screens are pass word protected the setpoints cannot be changed with out first entering the password Pump Idle Time to System Inactive The heating sys tem will be disabled after the pump has been idle for the set amount of time Power Type Select the system power type Circuit Breaker Size Select the circuit breaker size Refill Settin...

Страница 118: ...ting See Select ADM Settings on page 24 Advanced 1 Language Language displayed on the screen Date Format Choose format of the date Date Set the date Time Set the time Enter Password If not 0000 the Setup screens will be password protected Screen Saver The screen will go black after the set amount of time Silent Mode Disable ADM sounds Advanced 2 Temperature Units Units of measure for displayed tem...

Страница 119: ...ill not warn the user when logs are full If the logs are full data will be overwritten Download Depth Last ___ Days The USB download will provide data as old as the number of days entered Old data may be in memory but will not be downloaded if older than the number of days entered Advanced 4 This screen shows the part number and version of each installed software module ...

Страница 120: ... DOWNLOAD The 8 digit numeric folder name matches the 8 digit ADM serial number which is located on the back of the ADM When downloading from multiple ADMs there will be one sub folder in the GRACO folder for each ADM The log files should be opened in a spreadsheet pro gram NOTE If emailing the files zip compress them to mini mize file size Upload Procedure Use this procedure to install a system c...

Страница 121: ...SV tracks the setpoint and actual temperatures every 15 seconds This log can store up to 250 000 lines of data The system stores 1041 hours of system operation data or 43 days of around the clock operation Once full the system will overwrite the oldest data NOTE To prevent losing any data never go more than 43 days without downloading the logs GCA Log This log 3 GCA CSV lists the installed GCA mod...

Страница 122: ...e is a tab delimited text file that contains two columns The first column consists of a list of strings in the language selected at the time of down load The second column can be used to enter the cus tom language strings If a custom language was previously installed this column contains the custom strings Otherwise the second column is blank Modify the second column of the custom language file as...

Страница 123: ...C 3 ph Y 50 60 Hz 17A HM25 24V427 HM50 24V199 335 400 VAC 3 ph Y 50 60 Hz 17A HM25 24V428 HM50 24V200 335 400 VAC 3 ph Y 50 60 Hz 17A Electrical Minimum Applicator Wattage Per Channel at 240 VAC 90 W Maximum Applicator Wattage Per Channel 400 W Input Output Capability 4 inputs 0 30V 4 outputs 240VAC 24VDC 2A Pump Flow Rate HM25 96 lb hr 43 5 kg hr HM50 130 lb hr 59 kg hr Melt Rate Constant Through...

Страница 124: ...er Air Consumption at 80 psi 550 kPa 5 5 bar 17 2 scfm intermittent duty 4 at 25 lb hr 29 2 scmh intermittent duty 4 at 11 3 kg hr Required Air Tubing Size Minimum Air Tubing Inner Diameter less than 50 ft 15 2 m of tubing 3 8 in 9 5 mm Minimum Air Tubing Inner Diameter 50 ft 15 2 m or longer of tubing 1 2 in 12 7 mm Sound Sound Pressure Level 77 dB A IP Code InvisiPac Base System IP54 Wetted Part...

Страница 125: ... 4 1 2 16 9 9 9 9 9 9 18 13 13 13 4 12 3 6 22 14 9 9 9 9 25 16 13 13 4 25 7 6 31 20 14 12 35 23 16 13 5 4 1 2 18 11 9 9 9 9 20 13 13 13 5 12 3 6 25 16 11 9 9 28 18 13 13 5 25 7 6 36 23 17 14 41 27 19 15 6 4 1 2 20 12 9 9 9 9 22 13 13 13 6 12 3 6 28 18 13 10 32 20 13 13 6 25 7 6 41 27 20 16 47 31 22 18 1 4 1 2 17 15 15 15 20 20 20 20 1 12 3 6 19 15 15 15 21 20 20 20 1 25 7 6 21 15 15 15 24 20 20 20...

Страница 126: ...15 10 9 9 9 9 17 13 13 13 4 12 3 6 21 14 11 9 9 23 15 13 13 4 25 7 6 30 20 15 12 34 22 17 13 5 4 1 2 17 11 9 9 9 9 19 13 13 13 5 12 3 6 23 16 12 9 9 27 18 14 13 5 25 7 6 34 23 17 14 40 27 20 16 6 4 1 2 18 12 9 9 9 9 21 14 13 13 6 12 3 6 26 17 13 11 30 20 15 13 6 25 7 6 39 26 19 16 46 31 23 19 1 4 1 2 17 15 15 15 20 20 20 20 1 12 3 6 19 15 15 15 20 20 20 20 1 25 7 6 21 15 15 15 22 20 20 20 2 4 1 2 ...

Страница 127: ...nting Hole Dimensions WL D 35 8in 909 mm 22 3 in 566 mm 18 3 in 465 mm WL D 41 9 in 1064 mm 18 3 in 465 mm 22 3 in 566 mm WL D WALL Minimum distance from rear mounting hole to wall 7 0 in 178 mm 3 3 in 84 mm 3 3 in 84 mm 2 0 in 51 mm 14 2 in 361 mm 7 1 in 180 mm 101 in 257 mm 5 3 in 133 mm ...

Страница 128: ... Stand and Vacuum Feed Dimensions ti22866b A ti22865a Tube Bend Radius 8 0 in 203 mm 12 0 in 305 mm 30 0 762 mm Radius 9 1 in 232 mm 31 3 795 mm 17 4 442 mm 27 2 in 692 mm A in mm System 60 7 in 1542 mm System With Transformer 66 5 1689 mm ...

Страница 129: ...Technical Data 333347F 129 ...

Страница 130: ...purchaser transportation prepaid If inspection of the equipment does not disclose any defect in material or workmanship repairs will be made at a reasonable charge which charges may include the costs of parts labor and transportation THIS WARRANTY IS EXCLUSIVE AND IS IN LIEU OF ANY OTHER WARRANTIES EXPRESS OR IMPLIED INCLUDING BUT NOT LIMITED TO WARRANTY OF MERCHANTABILITY OR WARRANTY OF FITNESS F...

Отзывы: